
That sharp, metallic aftertaste in your morning brew? Or maybe your Keurig’s been making odd gurgling sounds lately. These red flags often point to one overlooked culprit: a spent charcoal filter silently failing in your water reservoir. Most coffee drinkers don’t realize this tiny component works 24/7 to purify water, trapping chlorine, sediment, and impurities that ruin flavor and accelerate internal scaling. When it’s exhausted, your coffee quality plummets immediately—and mineral buildup starts threatening your machine’s lifespan.
Replacing your Keurig charcoal filter isn’t just about better-tasting coffee; it’s preventative maintenance that extends your brewer’s life. Keurig’s own engineers confirm spent filters allow contaminants to circulate through internal tubing, causing clogs and pump strain. The good news? This critical fix takes less time than your morning brew cycle. In this guide, you’ll discover exactly when to replace your filter, how to match it to your model, and a foolproof 10-minute installation process that prevents costly repairs down the line.
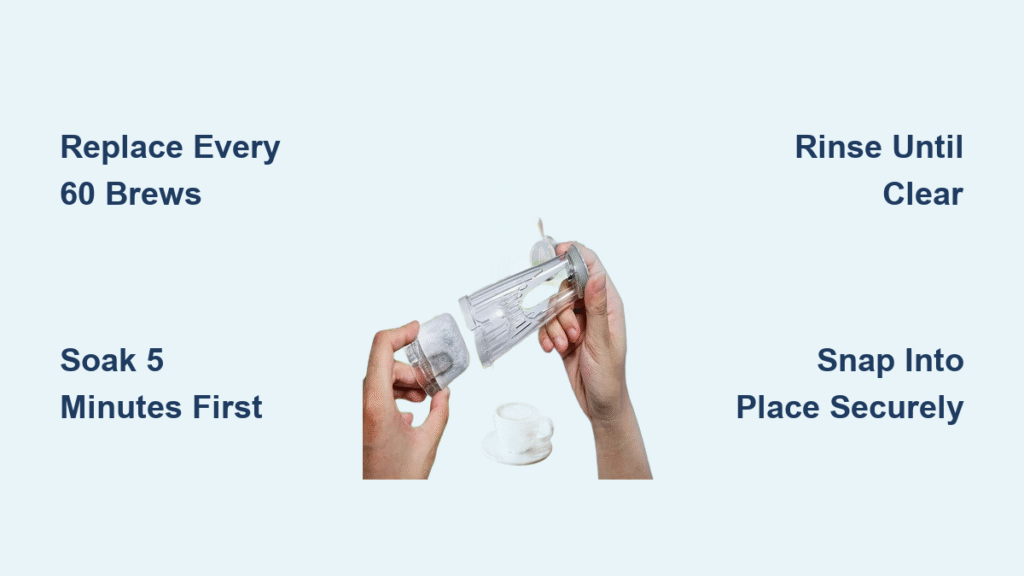
Spotting Filter Failure: When to Replace Your Keurig Charcoal Filter
Your Coffee’s Off-Flavor Is the First Warning Sign
If your brew suddenly tastes bitter, metallic, or “flat,” check your filter before blaming the beans. Charcoal filters lose effectiveness after 60 brew cycles—not calendar months—because they physically saturate with impurities. Once saturated, they stop trapping chlorine and minerals, allowing contaminants to flow directly into your cup. Heavy users might need replacement monthly, while occasional drinkers could stretch to three months. Ignoring this leads to permanent scaling inside heating elements, which no descaling can fully reverse.
Built-In Reminders Beat Calendar Guesswork
Newer Keurig models like the K-Elite and K-Supreme feature automatic filter alerts on their displays. Activate this in your settings menu to get flashing notifications when it’s time. For older units without this tech, track reservoir refills religiously: after your 60th fill, replace the filter immediately. Skipping replacements creates a domino effect—unfiltered water deposits limescale faster, forcing you to descale twice as often and shortening your machine’s lifespan by up to 40%.
Keurig Filter Compatibility: Avoid Costly Mistakes

Universal Fit for Most Household Models
The cylindrical charcoal filters sold at Target, Walmart, or Amazon work flawlessly in 90% of home Keurigs, including K-Classic, K-Select, K-Mini Plus, and K-Express series. These all share the same reservoir design with a snap-in filter holder. Confirm compatibility by checking for a removable plastic cartridge cage at the tank’s base—if it’s there, standard filters ($0.65 each in bulk) will fit. International buyers note: UK filters cost £0.90 and Australian versions run AU$4, but dimensions remain identical.
Office Models and Compact Units Need Special Parts
Commercial Keurig Pro units, Rivo espresso systems, and older K200 models reject standard filters. These use proprietary internal filtration or require no filter at all (like some K200s). Inserting a universal filter here causes leaks or reservoir misalignment. Check your manual’s “Water Filtration” section—if it mentions “non-replaceable” or “integrated” filters, skip replacements entirely. Forcing incompatible parts risks water damage to your counter or machine base.
Tools & Supplies: What You Actually Need
Budget-Friendly Filter Sourcing Hacks
Skip single-pack markups: 12-packs online ($7.80) slash costs to $0.65 per filter—lasting a year for daily brewers. Avoid “premium” branded filters; third-party charcoal cartridges meet Keurig’s specs at half the price. Pro tip: Order filters when your current one hits 45 refills. Shipping delays won’t leave you scrambling with a spent filter.
Zero-Tool Installation Essentials
You’ll need only three items:
– New charcoal filter cartridge (soaked per instructions)
– Clean bowl of water for activation
– 60 seconds under running tap for rinsing
No screwdrivers, towels, or special tools required—this is purely a hands-on process. Keep a timer handy; over-soaking weakens the charcoal structure.
Pre-Installation: Critical Activation Steps
The 5-Minute Soak That Makes or Breaks Performance
Dump your new filter into room-temperature water for exactly five minutes. This hydrates the charcoal granules, expanding them to maximum absorption capacity. Skip this step, and dry charcoal will shed carbon dust into your first 2-3 brews, creating a gritty texture. Never use hot water—it cracks the filter casing. Set a phone timer; exceeding five minutes causes premature saturation, reducing lifespan by weeks.
Rinse Until Crystal Clear
After soaking, hold the filter under cool running water for 60 seconds while gently rotating it. Stop only when water runs completely clear—any cloudiness means loose carbon particles remain. These would otherwise clog your machine’s micro-channels. Place a white paper towel beneath the stream; gray residue confirms you need more rinsing. This step is non-negotiable for clean-tasting coffee.
Removing the Old Filter Assembly Safely

Reservoir Extraction Without Spills
Tilt the water tank slightly backward as you lift it straight up from the Keurig base. This angles the fill spout away from the machine, preventing drips. Place it on a towel-lined counter—never directly on wood surfaces. If water sloshes during removal, your reservoir was overfilled; future fills should stop ½ inch below the MAX line.
Filter Holder Removal: The Hidden Snap Mechanism
Locate the plastic cylinder protruding from the tank bottom (it’s labeled “FILTER” on most models). Grip it firmly at the base—not the top—and pull upward with steady pressure. It releases with a soft click. If it sticks, rotate it 15 degrees left/right; mineral deposits sometimes cause minor adhesion. Never yank violently, as this cracks the reservoir.
Opening the Holder Without Fingernail Damage
Pinch the holder’s base tabs inward while lifting the top half. If it resists, tap the edges lightly on your counter to loosen stuck carbon residue. The spent filter inside will look grayish and feel gritty—discard it immediately in regular trash (charcoal filters aren’t recyclable). Wipe the empty holder with a dry cloth before proceeding; moisture causes new filters to shift during installation.
Installing Your New Filter Like a Pro
Precise Cartridge Placement Matters
Drop the fresh filter into the upper holder half, ensuring it sits flush against the bottom. If it tilts, coffee flow becomes uneven, leaving half the charcoal unused. Test by shaking the holder—no rattling should occur. This alignment guarantees water passes through the entire filter surface, not just one side.
The Audible Click Confirmation
Align the bottom holder’s tabs with the top’s slots, then press down firmly until you hear a distinct snap. If it feels loose, reopen and reseat the filter. A poorly snapped holder will pop out during reservoir reinstallation, dumping charcoal into your tank. Run your finger around the seam—it should feel completely smooth with no gaps.
Final Reassembly for Flawless Operation
Reservoir Reinstallation: Avoiding the Leak Trap
Slide the tank straight down onto the Keurig base until it clicks into place. If you hear a thud instead of a click, lift and reposition—it’s misaligned over the pump inlet. Fill only to the MAX line with filtered water, then run one empty brew cycle (no K-cup) to flush residual carbon dust. This prevents your first post-replacement cup from tasting like dirt.
First Brew Verification Checklist
After the cleansing cycle, brew a plain hot water cup. It should run clear and fast—no sputtering. If flow seems slow, remove the reservoir and reseat the filter holder; minor misalignment restricts water pressure. Your coffee’s flavor should noticeably improve within 24 hours as fresh-filtered water cycles through all internal components.
Maintenance Coordination for Long-Term Savings
Sync Descaling with Filter Changes
Schedule descaling every other filter replacement (roughly every 4 months). This one-two punch removes mineral deposits while ensuring clean water flows through descaling solution. Skipping this pairing leaves scale hidden behind the filter, forcing you to descale more frequently later.
Stockpile Filters Without Clutter
Store extras in their original packaging inside a sealed container with silica gel packets. Humidity degrades unused filters within months, reducing effectiveness. Keep a 3-filter stash in your coffee cupboard—enough for 6 months of brewing without emergency store runs.
Emergency Bypass Tactics When Filters Run Out
Safe Short-Term Workarounds
If your filter expires mid-week, fill the reservoir with pitcher-filtered or bottled water immediately. This maintains taste quality without damaging your machine. Never use distilled water—it lacks minerals needed for proper electrical conductivity in Keurig heating systems. Set a phone alert for 7 days; exceeding two weeks risks rapid scale accumulation.
Time Investment vs. Machine Longevity
The 10-Minute Payoff
Total hands-on time: 8 minutes for soaking/rinsing, 2 minutes for installation. Contrast this with descaling (20+ minutes) or professional repairs ($150+ for pump replacements caused by unfiltered water). Fresh filters deliver 60+ flawless brews per replacement—making this the highest-ROI maintenance task for any Keurig owner.
Future-Proofing Your Brew Quality
A spent filter won’t break your Keurig overnight, but it silently erodes performance. Within 90 days, mineral deposits can narrow internal tubing by 30%, slowing brew times and increasing energy use. Consistent filter changes ensure your machine operates at factory specs for 5+ years—a small habit with massive cumulative benefits.
Key Takeaway: Replacing your Keurig charcoal filter every 60 brews is the single easiest upgrade for superior coffee and machine longevity. Fresh filters eliminate metallic aftertastes, prevent costly internal scaling, and keep your brewer running like new. Set a recurring phone reminder for filter changes—your taste buds and wallet will thank you for years. Grab a 12-pack today and reclaim the clean, vibrant coffee experience you deserve.


