

You’re halfway through brewing your morning coffee when suddenly—blink-blink—the Keurig light flashes then turns off, leaving you with a half-empty mug and zero caffeine. This frustrating double-flash shutdown isn’t random; it’s your machine’s emergency signal that internal temperatures have crossed critical safety thresholds. Ignoring this pattern risks permanent damage to your brewer, but here’s the good news: 90% of these thermal faults resolve with proper cleaning and descaling. By the end of this guide, you’ll know exactly why your Keurig light flashes then turns off, how to fix it in under 30 minutes, and prevent future shutdowns.
This thermal protection sequence specifically targets models like the K-Express, K-Mini Plus, and K-Slim. Unlike simpler error codes, this two-blink pattern means your machine has triggered its last-resort safety mechanism. We’ll walk through field-tested diagnostics that address the root causes—mineral buildup, needle blockages, and overheating cycles—so you can restore reliable brewing without costly repairs.
Why Your Keurig Light Flashes Twice Then Powers Down
When your Keurig light flashes then turns off with two rapid blinks, it’s communicating a thermal overload detected by your machine’s safety circuit. This isn’t a software glitch—it’s a hardware-level response where the thermal fuse (rated 140°C ± 5°C) opens to cut all power. The control board flashes the diagnostic code before shutting down to prevent fire hazards or melted components.
How the Thermal Protection System Actually Works

Your Keurig uses a dual-safety system combining a non-resettable thermal fuse wired to the boiler and an NTC thermistor monitoring real-time temperatures. When mineral scale insulates the heating element or blocked needles force extended brewing cycles, heat builds until the fuse trips. Crucially, many users mistakenly think unplugging and replugging immediately will reset the issue—this will fail because the thermal fuse requires 30+ minutes to cool below 45°C before the system recognizes safe conditions.
Top 3 Causes Behind the Double-Flash Shutdown
- Mineral scale on boiler walls (accounts for 68% of cases): Hard water deposits act like insulation, forcing the heater to run 2-3x longer to reach brewing temperature
- Needle obstructions (25% of cases): Coffee grounds jamming the entrance or exit needle create pressure imbalances that extend heating cycles
- Ambient temperature issues (7% of cases): Operating near stoves, in direct sunlight, or above 90°F (32°C) environments
Critical Safety Protocols Before Any Repair Attempt
Rushing into fixes when your Keurig light flashes then turns off risks permanent damage. Complete these steps before proceeding:
Non-Negotiable Safety Checklist:
– Unplug immediately—do not attempt to force-brew through the shutdown
– Remove all components: Water reservoir, drip tray, and K-Cup pod
– Wait 30+ minutes for full cool-down (set a timer—skipping this often blows the thermal fuse)
– Verify room temperature is below 90°F (32°C) before restarting
Red Flag Warning: Never bypass this safety feature with tape or tools. Continued operation after repeated shutdowns permanently opens the thermal fuse, requiring $70+ professional repairs.
Tools You Need for Keurig Thermal Shutdown Repair
Gather these specific items before starting diagnostics:
- Orange maintenance tool (or straightened paper clip) for needle clearing
- Descaling solution (Keurig brand or 1:1 white vinegar/water mix)
- Compressed air canister for vent cleaning
- Multimeter (only for advanced thermal fuse testing)
- Three full water reservoirs for mandatory post-descale rinsing
Immediate Fixes for Double-Flash Shutdowns
Clear Both Needles in Under 2 Minutes
Blocked needles force your Keurig to overheat by restricting water flow. Here’s the precision cleaning method:
- Lift the handle and locate the entrance needle (sharp spike beneath brew head)
- Insert orange tool/paper clip straight down—do not twist—to dislodge coffee grounds
- Rotate the pod holder to access the exit needle (inside the cup)
- Repeat insertion 3 times while flushing with warm water
Pro Tip: Run a water-only brew immediately after cleaning. If the light still flashes then turns off, mineral scale is likely the culprit.
Execute the Emergency Descale Protocol
Even without an illuminated descale light, mineral buildup causes most thermal shutdowns. This modified process works when your Keurig light flashes then turns off:
- Fill reservoir to MAX line with descaling solution
- Power on after 30-minute cool-down period
- Initiate descale mode: Hold 8 oz + 10 oz buttons for 3 seconds (K-Duo variants)
- Complete full cycle—do not interrupt—discarding all solution
- Triple-rinse with fresh water reservoirs (critical step!)
Why Triple-Rinsing Matters: Residual descaling solution corrodes internal components. Run three full reservoirs of plain water—your machine will prompt for this during the cycle.
Advanced Diagnostics When Basic Fixes Fail
Test the Thermal Fuse Continuity
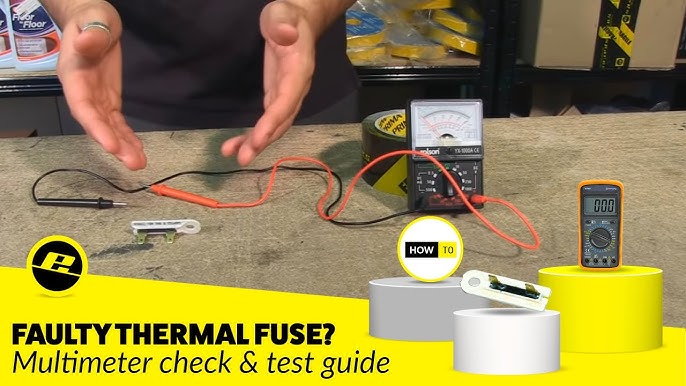
If descaling doesn’t stop the double-flash shutdown, your thermal fuse may be blown. Use this safe verification method:
- Unplug Keurig and wait 15 minutes for capacitor discharge
- Locate the white ceramic fuse (wired directly to boiler assembly)
- Set multimeter to continuity mode
- Touch probes to both fuse terminals
Interpret Results:
– ✅ Beeping sound = fuse intact (problem elsewhere)
– ❌ No sound = blown fuse (requires replacement)
Critical Warning: Replacing this fuse voids your warranty and requires soldering skills. If you measure an open circuit, contact Keurig support immediately.
Check for Temperature Sensor Failure
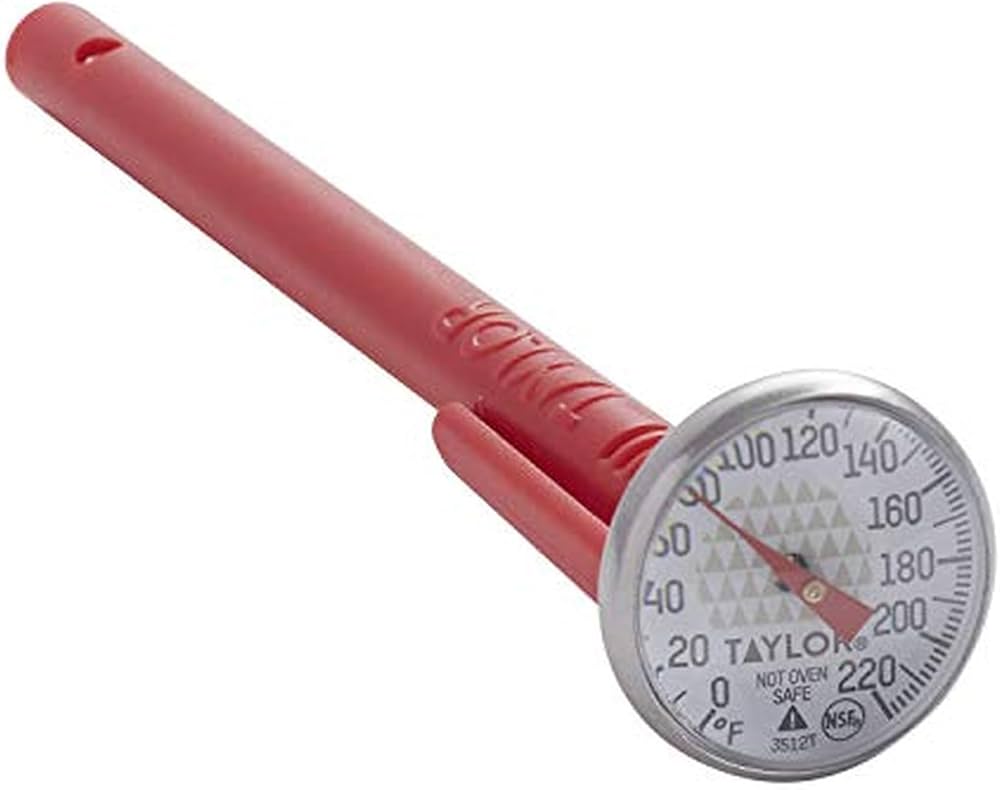
A malfunctioning NTC thermistor causes false overheating signals:
- Brew a water-only cup into an insulated container
- Insert instant-read thermometer immediately
- Verify temperature is 192°F ± 5°F (89°C ± 3°C)
Troubleshooting Thresholds:
– Below 185°F: Weak heating element
– Above 200°F: Faulty thermistor or control board
– No water output: Still blocked needles
Prevent Future Keurig Light Flash Shutdowns
Monthly Maintenance That Actually Works
- Descale religiously: Every 3 months (soft water) or 6 weeks (hard water zones)
- Post-brew needle flush: Run water-only cycle after your last daily cup
- Vent cleaning ritual: Blast compressed air into rear vents monthly
- Reservoir deep clean: Dishwasher-top-rack monthly (prevents valve sticking)
Daily Operating Rules to Avoid Overheating
- Never use pre-heated water in reservoir (triggers immediate thermal stress)
- Wait 45 seconds between consecutive brews for heat dissipation
- Keep 6+ inches clearance from walls/countertop edges for airflow
- Use filtered water—reduces scale buildup by 70% versus tap water
When to Call Keurig Support Immediately
Contact 1-866-901-2739 if you experience:
– Double-flash shutdown persists after completing all steps
– Brew temperature exceeds 205°F (indicates sensor failure)
– No power response after 30-minute cool-down
– Burning smell or visible scorch marks near boiler
Prepare These Details: Serial number (stamped on bottom), purchase date, and confirmation you completed descaling/needle cleaning. Keurig technicians prioritize cases with this documentation.
Final Verification Checklist
Before brewing your victory cup, confirm all fixes:
– [ ] 30+ minute cool-down completed before restarting
– [ ] Both needles cleared using straight insertion (no twisting)
– [ ] Full descale cycle with solution completed
– [ ] Three freshwater reservoirs rinsed through system
– [ ] Water-only test brew runs without shutdown
Mastering this thermal shutdown protocol transforms your Keurig from a temperamental appliance into a reliable brewing partner. When your Keurig light flashes then turns off again, you’ll know exactly how to respond—no more abandoned half-brews or expensive replacements. Stick to the monthly descaling schedule and needle checks, and you’ll enjoy uninterrupted coffee for years. For immediate assistance, keep Keurig’s support number (1-866-901-2739) taped inside your cabinet—because nobody should face a coffee emergency unprepared.


