
Your morning coffee ritual comes to an abrupt halt when you discover your Keurig handle won’t budge from the up position. This frustrating issue affects countless Keurig owners who suddenly find themselves unable to brew their essential cup of coffee. Whether you’re facing a handle that’s completely frozen or just resisting downward pressure, this common problem typically has straightforward solutions that don’t require professional help or expensive repairs.
Most Keurig handle sticking issues stem from simple mechanical problems that you can resolve in under 30 minutes with basic household items. The good news is that 9 out of 10 stuck handle situations can be fixed without replacing any parts. In this comprehensive guide, you’ll discover proven techniques to free your stuck Keurig handle, understand why it happens, and learn maintenance habits to prevent future occurrences—saving you both time and money.
Immediate Checks for Keurig Handle Stuck in Up Position
Before attempting more complex solutions, perform these quick visual inspections that solve most handle problems in under two minutes.
Identify Visible Obstructions Blocking Handle Movement
Examine the pod chamber and surrounding mechanism for coffee grounds, K-cup foil fragments, or misaligned components. Remove the water reservoir and drip tray to get better visibility. Use a flashlight to spot debris lodged where the handle connects to the brewer’s top housing—this narrow gap collects stubborn coffee residue that prevents smooth operation. Gently remove any blockages with a soft-bristled toothbrush or damp microfiber cloth, being careful not to push debris deeper into the mechanism.
Confirm Proper K-Cup Placement and Condition
An improperly seated or damaged K-cup causes more stuck handle issues than any mechanical failure. Remove the pod and inspect both the pod holder and puncture needles. Look for coffee grounds clogging the needle tips or foil remnants stuck in the chamber. Straighten a paperclip and carefully clear any blockages from the upper and lower needles. When replacing the K-cup, ensure it sits completely flat in the holder with no tilting—this proper alignment prevents unnecessary resistance when closing the handle.
Why Your Keurig Handle Gets Stuck: Three Primary Causes

Understanding the root cause helps you apply the right solution without wasting time on ineffective methods.
Coffee Grounds Accumulation in Critical Areas
Dark roast coffees produce finer grounds that easily migrate into the handle mechanism’s pivot points. This gritty buildup creates friction that gradually worsens until the handle won’t move. The problem accelerates if you frequently brew strong concentrations or use non-Keurig pods with different dimensions. You’ll notice increasing resistance when closing the handle before it eventually seizes completely—this warning sign means immediate cleaning is required.
Internal Component Misalignment from Improper Handling
Forcing the handle down when it meets resistance often misaligns the internal levers and springs. This common mistake happens when users try to close the handle with a poorly seated K-cup. The misaligned components bind against each other, creating a mechanical lock that prevents normal operation. Unlike broken parts, misaligned mechanisms usually respond well to gentle realignment techniques without requiring part replacement.
Worn or Broken Internal Components
After several years of use, plastic components like the return spring or lever arms develop cracks from repeated stress. Older Keurig models (over 3 years) commonly experience handle mechanism failures as plastic parts become brittle. Visible signs include a handle that feels loose before sticking, unusual clicking sounds during operation, or complete inability to maintain downward position. While concerning, most broken parts can be replaced individually for under $30 rather than purchasing a new brewer.
Safe Techniques to Free Your Stuck Keurig Handle
Apply these controlled methods to resolve your Keurig handle stuck in up position without causing further damage.
Controlled Pressure Application Method
Wrap a rubber glove or silicone oven mitt around the handle for better grip and protection. Apply steady, downward pressure while simultaneously rocking the handle gently side-to-side—this motion helps dislodge stuck particles without stressing plastic components. Never use pliers or metal tools that could crack the handle housing. If you encounter solid resistance that doesn’t yield after 10-15 seconds of gentle pressure, stop immediately and proceed to deeper cleaning methods.
Targeted Heat Application for Stubborn Cases
Fill a bowl with hot tap water (140-160°F, not boiling). Hold just the top portion of your Keurig (keep electrical components dry) over the steam for 30-60 seconds. The heat causes plastic components to expand slightly, often freeing seized mechanisms. Alternatively, use a hairdryer on medium heat, focusing on the handle pivot points for 30 seconds. Allow the brewer to cool completely before attempting to move the handle—sudden temperature changes could damage components.
Comprehensive Handle Mechanism Cleaning Procedure
When basic fixes fail, perform this thorough cleaning to address hidden buildup causing your Keurig handle stuck in up position.
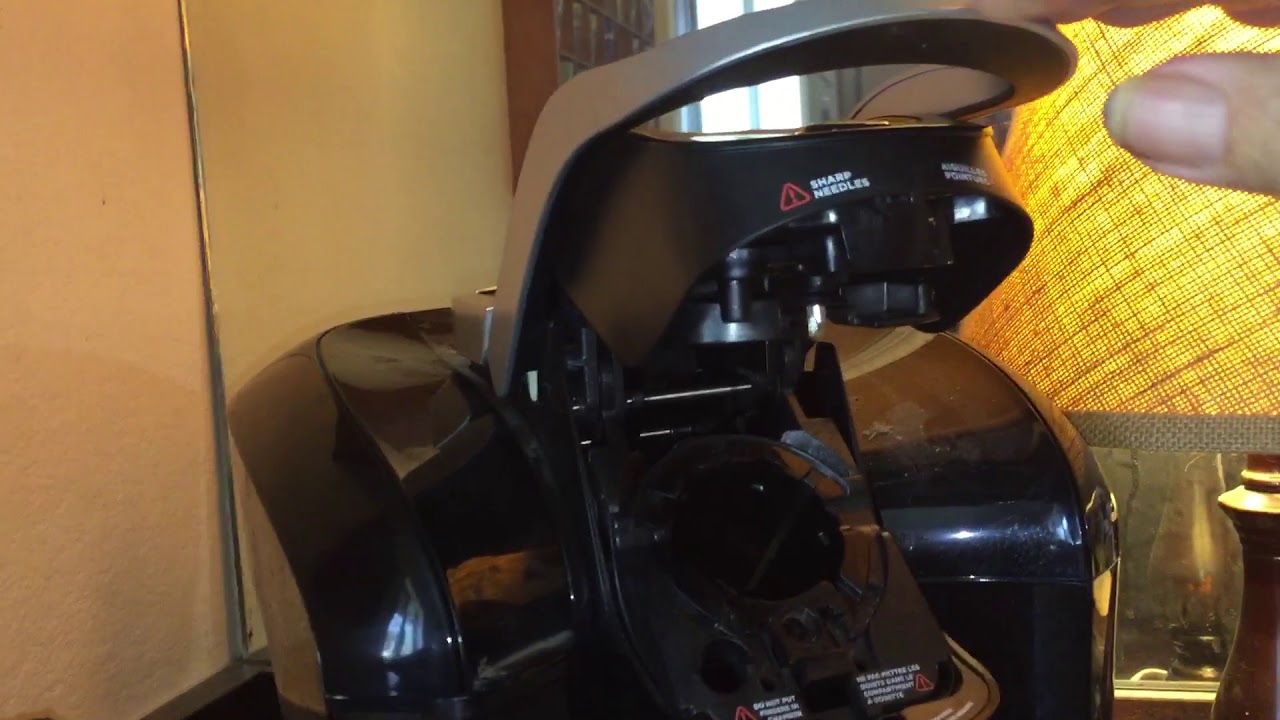
Accessing the Internal Mechanism Safely
Unplug your Keurig and allow it to cool for at least one hour. Remove all detachable components including water reservoir, drip tray, and K-cup holder. Most models have 2-4 screws hidden under the top lip near the handle—use a Phillips screwdriver to remove these while keeping track of different screw lengths. Gently lift the top housing, being mindful of any attached wiring (don’t disconnect unless necessary). Take photos during disassembly to ensure proper reassembly.
Deep Cleaning Critical Components
Create a cleaning solution of warm water and mild dish soap. Use a soft-bristled brush (an old toothbrush works perfectly) to scrub:
– The handle pivot points where metal rods connect
– Spring mechanisms that return the handle to up position
– Lever arms that connect handle movement to brewing functions
– The entire K-cup holder assembly
Pay special attention to crevices where coffee grounds accumulate. Rinse thoroughly with clean water and dry completely with a lint-free cloth before reassembly. Apply one drop of food-grade lubricant (like silicone grease) to pivot points for smoother operation—never use petroleum-based oils that can damage plastic components.
Preventing Future Keurig Handle Sticking Problems
Implement these simple maintenance habits to avoid recurring handle issues.
Daily and Weekly Maintenance Routine
Wipe the handle mechanism with a damp cloth after each use to prevent coffee buildup. Every Sunday, perform a 2-minute deep clean: remove the K-cup holder, use a soft brush to dislodge grounds from crevices, and run a vinegar solution through the brewer to dissolve mineral deposits. Monthly, check the handle’s movement—smooth operation indicates proper maintenance, while slight resistance signals it’s time for more thorough cleaning.
Proper Brewing Technique to Reduce Wear
Always center K-cups in the holder before closing the handle. Apply gentle, consistent pressure downward—never force the handle shut. If you encounter resistance, reopen immediately and check for proper pod alignment rather than pushing harder. Consider using Keurig’s official pods as third-party alternatives sometimes have dimensional variations that cause unnecessary stress on the handle mechanism.
Optimal Storage and Usage Conditions
Keep your Keurig away from steam sources like stovetops that can cause internal condensation. Never store items on top of the brewer where they might fall into the handle mechanism. When traveling or moving your Keurig, secure the handle in the down position with a rubber band to prevent internal components from shifting during transport. In humid environments, occasionally run an empty brew cycle to evaporate any moisture that might cause corrosion.
When to Consider Replacement Parts or New Brewer

Some situations require more than basic maintenance to resolve your Keurig handle stuck in up position.
Identifying Replaceable Components
With the top housing removed, manually cycle the handle mechanism while watching for:
– Cracks in the plastic lever arms
– A stretched or broken return spring
– Worn pivot bushings showing visible play
– Damaged mounting points where the handle attaches
Most replacement parts cost $15-30 and install with basic hand tools. The handle assembly itself is the most commonly replaced component and typically solves the problem when cleaning fails.
Cost-Benefit Analysis for Repair vs. Replacement
Professional repair costs often exceed $80—more than many newer Keurig models. If your brewer is over 4 years old with multiple issues (slow brewing, leaking, inconsistent temperatures), replacement may be more economical. However, for newer models with only handle problems, a $25 handle assembly replacement extends your brewer’s life significantly. Consider upgrading to models with redesigned handle mechanisms that address common sticking issues in older versions.
A Keurig handle stuck in up position doesn’t have to ruin your morning coffee routine. By following these targeted solutions, you’ll resolve most sticking issues within 30 minutes using basic household items. Remember that regular maintenance prevents 80% of handle problems before they start—just two minutes of cleaning after each use saves you from lengthy repairs later. When mechanical failure does occur, replacement parts remain affordable and installation straightforward for most users. The key is addressing the issue promptly; what starts as minor resistance becomes a complete blockage if ignored. Implement these techniques today and enjoy smooth, reliable coffee brewing every morning without handle frustrations.


