
Your Keurig used to deliver perfect coffee in 27 seconds flat. Now you’re staring at a machine that sputters for over a minute, delivering half-filled cups while you’re already late for work. If you’re battling these Keurig cleaning issues, you’re not alone—most owners face this exact frustration. The good news? 90% of performance problems stem from preventable maintenance oversights. This guide delivers precise solutions for every Keurig cleaning issue, from stubborn scale buildup to needle obstructions. You’ll learn exactly what to clean, when to clean it, and how to restore that factory-fresh brew speed—no guesswork required.
Diagnose Keurig Cleaning Issues Before They Worsen
Spot Flow Rate Warning Signs
Don’t wait for complete failure—catch Keurig cleaning issues early by monitoring these critical indicators:
– Brew time doubling from 27 to 60+ seconds for medium cups
– Inconsistent volumes where some cups fill completely while others stop halfway
– Dribbling instead of streaming from the spout during brewing
– “Brewing” status lingering for minutes before switching to “ready”
Run These 2-Minute Diagnostic Tests
Verify your specific problem with these quick checks:
Water-Only Brew Test
– Remove all K-Cups and run a medium cup cycle
– Normal flow: Steady stream finishing in 25-30 seconds
– Problem confirmed: Slow flow indicates internal scale or needle blockage
Brand Comparison Test
– Brew identical cup sizes with Green Mountain versus your usual brand
– If Green Mountain flows normally: Your pods may be over-packed
– If both brew slowly: Scale or needle obstruction is the culprit
Eliminate Scale Buildup in 7 Steps
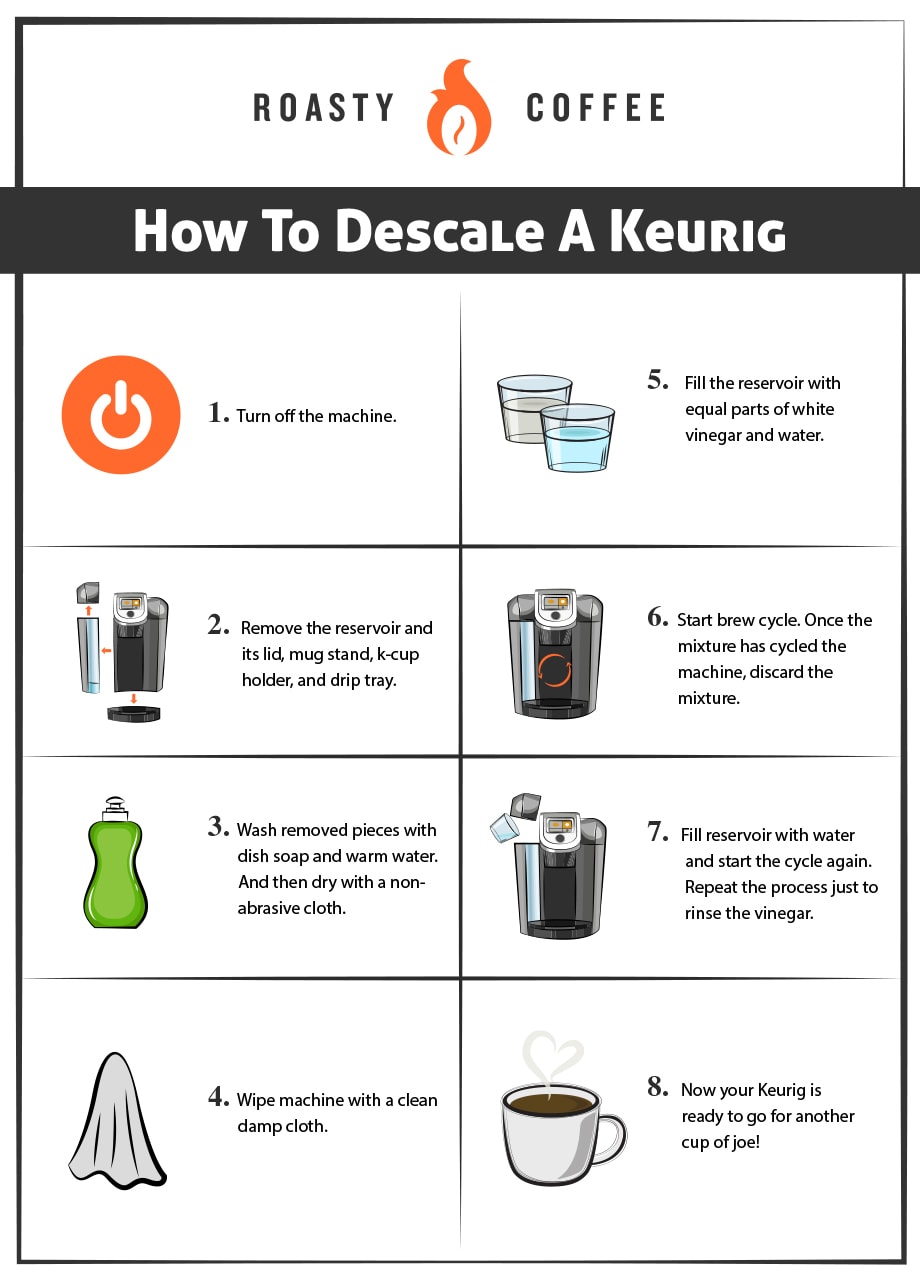
Complete Descaling Protocol
Scale chokes water pathways on heating elements—follow this exact process:
Solution Selection Guide
– Commercial descaler: Keurig solution + full reservoir (most convenient)
– Vinegar method: Equal parts white vinegar and water (let sit overnight)
– Citric acid: 5g powder per 100g water (no lingering taste, most effective)
Critical Descaling Steps
1. Empty reservoir completely—never mix old water with solution
2. Fill to MAX line with chosen descaling liquid
3. Run 2 large cups into measuring cup (discard immediately)
4. Let sit 30 minutes (extend to overnight for vinegar)
5. Empty remaining solution before rinsing
6. Flush with 3 full reservoirs of fresh water
7. Test with plain water until no chemical taste remains
Adjust for Your Usage
– Heavy users (8+ pods/day): Descale every 6-8 weeks
– Standard users: Every 3 months
– After storage (>1 month): Always descale before first use
Clear Needle Obstructions Without Damage
Upper Needle Unclogging Method
Coffee grounds in the puncture needle cause most flow failures:
Manual Cleaning Process
– Unplug and cool completely before starting
– Remove pod holder by gripping the rim firmly
– Locate upper needle (metal tube inside chamber)
– Insert straightened paperclip gently through shaft
– Flush debris with water-only brew cycle
Commercial Tool Shortcut
– Use Keurig’s pod-shaped cleaner tool
– Insert like regular K-Cup and close lid 5 times
– Always follow with plain water rinse cycle
Lower Needle Safety Protocol
Plastic debris from K-Cups blocks the exit needle:
– Separate funnel from holder by pulling pieces apart
– Identify exit needle (sharp metal tube in funnel base)
– Clear debris using paperclip under running water
– Rinse thoroughly until water flows freely through screen
– ⚠️ Critical warning: Needles are razor-sharp—handle pod holder by edges only
Restore Filter System Performance

Reservoir Filter Deep Clean
A clogged filter starves your pump of water:
Weekly Maintenance Routine
– Remove filter holder by lifting straight from reservoir
– Rinse under warm water to remove visible debris
– Gently scrub with soft brush for stubborn buildup
– Replace securely to prevent water bypass
Replacement Schedule
– Standard use: Every 2-3 months
– Hard water areas: Every 6-8 weeks
– Installation tip: Soak new filter 5 minutes, rinse 1 minute before use
Internal Screen Unclogging
The reservoir’s outflow screen traps debris:
– Remove reservoir and flip upside down
– Locate mesh screen at bottom of unit
– Rinse vigorously under warm tap water
– Verify flow—water should stream freely through screen
Solve K-Cup Flow Problems Immediately

Problem Pod Identification
Some brands consistently cause Keurig cleaning issues:
– Donut House: Changed filter specifications create restrictions
– New England: Over-packed grounds block water flow
– Store brands: Inconsistent quality control causes erratic performance
Reliable Testing Method
– Brew 3 consecutive cups of the same brand
– Document flow rate and liquid retention in pods
– Switch to Green Mountain as your performance baseline
Reusable Pod Optimization
Eliminate paper filter clogs with these best practices:
– Use medium-coarse grind to prevent over-packing
– Fill only 2/3 full for proper water channeling
– Rinse after every use and deep clean weekly
Prevent Keurig Cleaning Issues with 5-Minute Daily Routine
Essential Daily Actions
– Remove used pods immediately after cooling
– Wipe exterior with damp cloth to prevent sticky buildup
– Empty drip tray daily to stop mold growth
– Refill reservoir with fresh cold water (never reuse old water)
Weekly Deep Clean Checklist
– Disassemble pod holder, drip tray, and reservoir
– Handwash all components with warm soapy water
– Clean both needles using paperclip method
– Air-dry completely before reassembly
Emergency Fixes for Critical Failures
No Flow Troubleshooting
When coffee won’t come out:
1. Confirm machine is powered on and heated
2. Run water-only test cycle without K-Cup
3. Clean both needles immediately
4. Perform emergency descaling if water test fails
Partial Cup Solutions
For cups that stop filling halfway:
– Descale if last cleaning was >3 months ago
– Clear both needles using paperclip method
– Check used pods for excessive retained liquid
– Test with bottled water to rule out source issues
Maintain Warranty Protection While Cleaning
Chemical Safety Rules
- Ventilate kitchen during descaling (open windows)
- Wear gloves with commercial descalers to protect skin
- Rinse thoroughly with 3+ full water reservoirs
- Lemon juice alternative is safest for chemical sensitivity
Warranty Preservation Tips
- Never disassemble internal components (voids 1-year warranty)
- Use only approved cleaners: Keurig solution, vinegar, or citric acid
- Document all maintenance with dates for support calls
- Contact support first: 866-901-BREW before attempting repairs
Secure Long-Term Keurig Performance
Water Quality Strategy
- Install filter to reduce scale by 85%
- Keep bottled water for emergency testing
- Avoid softened water (salt creates gummy residue)
Preventive Replacement Schedule
- Water filters: Every 2-3 months
- Needle cleaning: Weekly without exception
- Descaling: Every 3 months (or 6-8 weeks for heavy use)
- Annual pump check: Compare sound to new machine
Your Keurig should now deliver coffee at factory speed. Remember: weekly needle cleaning prevents 90% of flow problems, while consistent descaling eliminates scale damage. Set phone reminders for maintenance tasks, and your morning coffee will always be ready when you are. Start today with the water-only brew test—it takes 2 minutes and identifies your exact issue. Most Keurig cleaning issues resolve within 30 minutes of proper maintenance, getting you back to perfect coffee in record time.


