

There’s nothing quite like the aroma of freshly brewed coffee filling your campsite as the sun rises over the trees. For outdoor enthusiasts, a reliable camping coffee maker is as essential as a good tent or sleeping bag. The Coleman camping coffee maker has been a staple in outdoor kitchens for decades, helping adventurers start their days right with hot, flavorful coffee no matter how remote their location. If you’ve ever wondered how to properly use your Coleman percolator to avoid bitter brews or disappointing results, you’re in the right place.
Many campers make the mistake of treating their camping coffee maker just like their home drip machine, only to end up with over-extracted, burnt-tasting coffee that ruins the morning mood. The truth is, percolator-style coffee makers like Coleman’s models operate on a completely different principle than automatic drip machines. Understanding these differences is crucial for brewing camp coffee that rivals your favorite café. In this guide, you’ll learn the exact steps to operate your Coleman camping coffee maker properly, avoid common pitfalls, and enjoy consistently great coffee in the great outdoors.
Coleman Coffee Maker Setup: Essential Equipment Checklist

Before you even think about brewing, gather all necessary components to ensure a smooth coffee-making experience. Your Coleman camping coffee maker won’t function properly if you’re missing critical pieces or using incompatible equipment. Most Coleman percolators require specific heat sources that match their design—using the wrong burner can lead to uneven heating or damage.
Required Components for Proper Operation
- Coleman percolator unit (typically 8-12 cup capacity with glass knob)
- Fresh, cold water (filtered is best for flavor)
- Coarse-ground coffee (medium grind will clog the system)
- Compatible heat source (camp stove, fire grate, or designated burner)
- Heat-resistant gloves (for safe handling)
- Measuring cup and spoon (for precise ratios)
Heat Source Compatibility Guidelines
Coleman percolators work with various heat sources but require careful temperature management. On a propane camp stove, use medium-low heat—never high. Over a campfire, position the percolator at the edge of the flames where you have steady, moderate heat. Electric Coleman models require a 12V power source or standard outlet if available at your campsite. Using excessive heat causes coffee to boil violently, extracting bitter compounds and potentially damaging your percolator’s glass knob.
Step-by-Step Coleman Percolator Brewing Process
Preparing the Water Chamber Correctly
Fill the bottom chamber with cold water up to the indicated line inside (never above the tube opening). Most campers don’t realize that overfilling prevents proper percolation—the water needs space to boil and create the necessary pressure to rise through the central tube. For best results, use water that’s been filtered or purified, as minerals in untreated water affect both taste and coffee maker longevity.
Measuring Coffee Grounds for Optimal Flavor
Use 1 tablespoon of coarse-ground coffee per cup of water—adjust to taste preferences. Fine grounds will seep through the filter basket, creating sludge at the bottom of your cup. Place grounds directly into the filter basket, then position it securely over the central tube. Avoid tamping or pressing the coffee down; it should sit loosely to allow proper water circulation. Many campers ruin their brew by using pre-ground grocery store coffee designed for drip machines—this is too fine for percolators.
Assembling and Positioning Your Percolator
Secure the top chamber with the glass knob onto the base, ensuring a tight seal. Place the assembled percolator on your heat source, positioning it dead center for even heating. If using a camp stove, adjust the flame so it only touches the bottom of the percolator without lapping up the sides. Uneven heating causes inconsistent brewing and potential damage to the unit. The glass knob should face away from wind direction if outdoors.
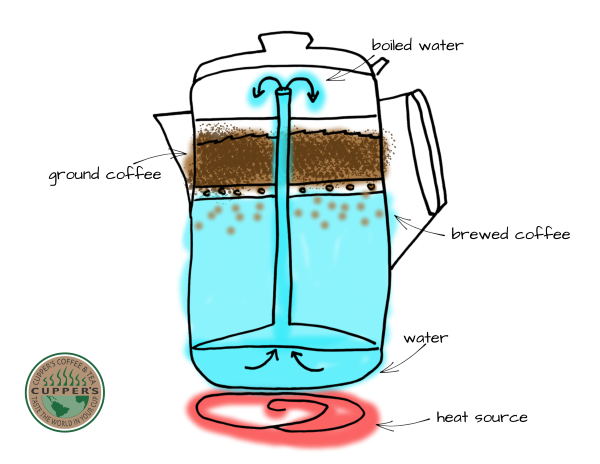
Monitoring the Brewing Cycle for Perfect Results
Turn the heat to medium and watch for steam emerging from the glass knob—this indicates the brewing cycle has begun. After 1-2 minutes, you’ll see coffee rising through the central tube and showering over the grounds. This cycling process should continue for 7-10 minutes total (less for milder coffee, more for stronger). The moment coffee stops cycling upward, remove from heat immediately—over-percolating creates bitterness. Most campers leave it on too long, thinking more cycling equals stronger coffee, when it actually degrades flavor.
Common Coleman Coffee Maker Mistakes That Ruin Your Brew

Using Incorrect Coffee Grind Size
The #1 mistake campers make is using medium or fine grind coffee in their percolator. Percolators require coarse grounds similar to French press coffee—anything finer will pass through the filter basket. Look for “percolator grind” or “camp grind” at specialty coffee shops. If you’re grinding your own beans, use a burr grinder set to the coarsest setting. Fine grounds not only create sludge but can clog the central tube, preventing proper percolation.
Ignoring Elevation Adjustments
At higher elevations, water boils at lower temperatures, requiring longer brewing times. For every 2,000 feet above sea level, add 1-2 minutes to your standard brewing time. Many mountain campers end up with weak coffee because they follow sea-level instructions. Conversely, in deep valleys or canyons, you might need to reduce brewing time slightly. Pay attention to visual cues—when the coffee stops cycling upward, it’s done regardless of elevation.
Cleaning and Maintaining Your Coleman Camping Coffee Maker
Post-Brew Cleaning Procedure
Disassemble all components while still warm (not hot) for easiest cleaning. Rinse the filter basket immediately to prevent coffee oils from hardening. Use a soft brush and mild soap to clean all parts—never abrasive scrubbers that can damage the enamel coating. Pay special attention to the central tube, which often accumulates coffee residue affecting future brews. Dry all components thoroughly before storage to prevent rust and odors.
Long-Term Storage Best Practices
Before storing your Coleman coffee maker for extended periods, ensure it’s completely dry inside and out. Place a desiccant packet inside the bottom chamber to absorb moisture. Store with the lid slightly ajar rather than tightly sealed to prevent musty odors. If you notice any pitting or rust spots, address them immediately with a specialized enamel cleaner—don’t let corrosion spread. Properly maintained, a Coleman percolator can last decades of camping trips.
Troubleshooting Poor Coffee Quality Issues
Weak or Watery Coffee Solutions
If your coffee lacks strength, don’t simply add more grounds next time—that can clog the system. Instead, extend the brewing cycle by 1-2 minutes while monitoring the percolation action. Check that your heat source provides consistent temperature—not fluctuating on and off. Old or stale coffee beans also cause weak flavor, so store your camping coffee in an airtight container away from temperature extremes. The water-to-coffee ratio might need adjustment based on your specific taste preferences.
Bitter Coffee Fixes That Work
Bitter coffee almost always means over-extraction from too-long brewing or excessive heat. Next time, reduce brewing time by 2-3 minutes and use lower heat. Ensure you’re not using dark roast beans, which become especially bitter when percolated. Try slightly coarser grounds to slow extraction. If the problem persists, check for mineral buildup inside the percolator—run a vinegar-water solution through an empty cycle to clean internal components.
Pro Tips for Campsite Coffee Excellence
Seasoned campers know that great coffee starts before you even reach your campsite. Pre-measure your coffee into labeled bags at home to avoid fumbling with supplies in the dark morning chill. Keep a small container of cinnamon sticks to add subtle flavor without needing creamer. For cold mornings, pre-heat your mug with hot water while the coffee brews to maintain optimal drinking temperature. And always bring a backup instant coffee packet—sometimes the fire just won’t cooperate!
Mastering your Coleman camping coffee maker transforms morning camp routines from a chore into a cherished ritual. With these precise steps and insider tips, you’ll consistently brew rich, flavorful coffee that makes waking up in the wilderness something to look forward to. Remember that perfect camp coffee requires attention to detail—proper grind size, accurate measurements, and careful heat management make all the difference. Once you’ve dialed in your technique, you’ll never settle for mediocre camp coffee again. Store your percolator properly after each trip, and this trusty companion will deliver excellent coffee for many adventures to come.


