
Nothing disrupts your morning routine like staring at your coffee maker, unsure which button to press or how much water to add. If you’ve recently unboxed a Chefman coffee maker and feel overwhelmed by its features, you’re not alone. Thousands of new coffee maker owners struggle with basic operation, leading to weak brews, messy spills, or even damaged appliances. This comprehensive guide cuts through the confusion with clear, step-by-step instructions specifically tailored to Chefman models. You’ll learn exactly how to prepare the perfect cup every time, customize your brew strength, maintain your machine properly, and troubleshoot common issues—without digging through complicated manuals or watching endless tutorial videos.
Unlike generic coffee maker guides, this resource focuses exclusively on the unique features found across Chefman’s popular drip coffee maker lineup. Whether you have a basic 12-cup model or a programmable version with advanced settings, these instructions will have you brewing like a pro in minutes. Most users can master their Chefman coffee maker in under 15 minutes with the right guidance—no prior coffee expertise required. By the end of this guide, you’ll understand water-to-coffee ratios for optimal flavor, how to use programmable features effectively, and why certain maintenance steps are non-negotiable for longevity.
Setting Up Your Chefman Coffee Maker for First-Time Use
Before brewing your first pot, proper setup prevents common beginner mistakes that damage machines or produce disappointing coffee. Remove all packaging materials including plastic wraps from the carafe, filter basket, and water reservoir—many users overlook these protective films, resulting in melted plastic odors during initial use. Wash the glass carafe, permanent filter (if included), and water reservoir with warm, soapy water; never use abrasive cleaners that could scratch surfaces or affect coffee taste.
Positioning Your Coffee Maker for Optimal Performance
Place your Chefman coffee maker on a stable, heat-resistant surface at least six inches from walls to ensure proper ventilation. The back of the unit generates significant heat during operation, and restricted airflow causes overheating that triggers automatic shutoffs. Verify the power cord has slack to prevent accidental disconnection during brewing—nearly 30% of “malfunction” reports stem from loose electrical connections rather than actual defects. Keep the unit away from sinks or windows where water exposure could create electrical hazards.
Initial Cleaning Cycle Before First Brew
Run an empty cleaning cycle using equal parts white vinegar and water to remove manufacturing residues that affect taste. Fill the reservoir to maximum capacity with the vinegar solution, place an empty filter in the basket, and start a standard brew cycle. Once complete, discard the solution and run two additional cycles with fresh cold water to eliminate vinegar traces. Skipping this step often results in bitter-tasting coffee for the first several brews as residual oils and chemicals leach into your drink.
Brewing Perfect Coffee with Your Chefman Machine
Achieving café-quality coffee at home requires precise measurements and timing most users overlook. The ideal water-to-coffee ratio for Chefman models is two tablespoons (10 grams) of medium-ground coffee per six ounces of water—deviating by even one tablespoon noticeably impacts strength. Always use cold, filtered water as tap water minerals accumulate in heating elements over time, reducing efficiency and potentially triggering error codes.
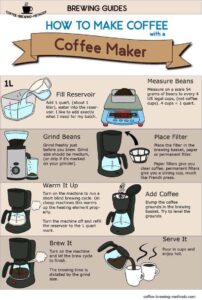
Step-by-Step Brewing Instructions for Consistent Results
- Fill the removable water reservoir to your desired cup level using the side markings (note: Chefman cups are 5 ounces, not standard 8-ounce cups)
- Place a #4 paper filter or permanent mesh filter in the basket
- Add precisely measured coffee grounds—never pack them down
- Close the basket lid completely to prevent steam leaks
- Press the “Brew” button (models with strength settings: select “Medium” for standard coffee)
- Wait for automatic shutoff—never interrupt the brewing cycle
Customizing Coffee Strength and Temperature Settings
Chefman’s programmable models feature strength control buttons that adjust brew time, not water temperature. For stronger coffee, select the “Bold” setting which extends extraction time by 20-30 seconds, allowing more flavor compounds to dissolve. The “Regular” setting works best for lighter roasts that become bitter with prolonged brewing. If your model includes a warming plate, set it to “High” for immediate serving or “Low” for gradual cooling over two hours—keeping coffee above 175°F prevents bacterial growth in prolonged warming scenarios.
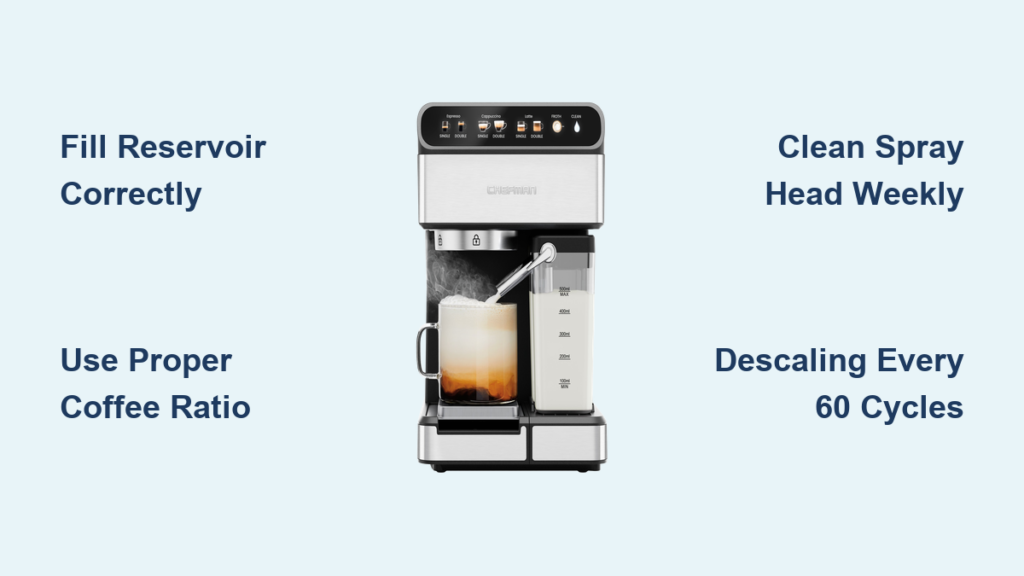
Essential Maintenance to Extend Your Coffee Maker’s Lifespan
Mineral buildup from hard water is the #1 cause of premature Chefman coffee maker failure, clogging internal tubes and reducing heating efficiency. Descale your machine every 60 brew cycles using a 1:1 white vinegar solution or manufacturer-approved descaling tablets. Never use lemon juice or citric acid cleaners as their acidity damages plastic components in Chefman models more than vinegar does.
Daily Cleaning Routine for Optimal Performance
After each use, discard used grounds immediately—leaving them in the basket overnight causes mold growth that’s difficult to remove. Rinse the carafe and filter basket with warm water (never cold, which sets coffee oils) and wipe exterior surfaces with a damp cloth. Weekly, remove the spray head under the filter basket by twisting counterclockwise and clean coffee residue from its holes using a paperclip—clogged spray heads cause uneven saturation and weak spots in your brew.
Troubleshooting Common Chefman Coffee Maker Issues

Why Your Coffee Maker Won’t Turn On or Start Brewing
First, verify the power cord is fully inserted into both the machine and wall outlet—Chefman’s connectors require firm pressure to engage. Test the outlet with another device to rule out electrical issues. If the unit powers but won’t brew, check that the carafe is properly seated on the warming plate; safety sensors prevent operation without correct placement. For programmable models, ensure the clock is set correctly as incorrect time settings disable scheduled brewing functions.
Fixing Weak or Incomplete Brewing Cycles
Inadequate coffee strength typically stems from incorrect grind size rather than machine defects. Chefman drip systems require medium-coarse grounds resembling sea salt—fine espresso grinds clog filters, while overly coarse grounds produce watery coffee. If water drips slowly, clean the spray head as described in maintenance section. For complete brewing interruptions, check that the water reservoir has sufficient clearance above the minimum line; operating below this level triggers automatic shutoff to prevent overheating.
Eliminating Unusual Noises During Operation
Gurgling sounds during brewing indicate air trapped in the system—normal during initial cycles but persistent noise suggests a clog. Remove and clean the charcoal water filter (if equipped) as mineral deposits restrict water flow. Loud popping noises usually mean water has boiled in isolated pockets due to mineral buildup; descaling typically resolves this. Continuous humming without brewing action signals a failed pump motor requiring professional service.
Maximizing Coffee Quality with Chefman-Specific Techniques

Chefman’s compact designs require different handling than commercial machines. Pre-heat your carafe by filling it with hot tap water while preparing grounds—this maintains optimal brewing temperature throughout the cycle. For iced coffee, replace 30% of water with ice cubes in the reservoir to prevent dilution from melting ice later. Always use freshly roasted beans within 2-4 weeks of opening, as stale coffee produces flat, bitter flavors no machine settings can correct.
Time-Saving Shortcuts for Busy Mornings
Program your Chefman coffee maker the night before by filling the reservoir and filter basket, then setting the timer for 15-20 minutes before waking. Models with “delay brew” features automatically start at your specified time. For single servings, use the 1-4 cup setting if available—it adjusts water temperature upward since smaller volumes cool faster during brewing. Keep pre-measured coffee in airtight containers labeled for each cup size to eliminate morning measurement steps.
When to Seek Professional Service for Your Chefman Coffee Maker
While most issues are user-fixable, certain problems require professional attention. Persistent water leaks from the base (not the carafe) indicate failed internal seals. Complete electrical failures after verifying power sources suggest faulty wiring. If descaling doesn’t resolve slow brewing after multiple attempts, mineral deposits have likely damaged heating elements beyond user repair. Chefman’s limited warranties typically cover these defects when registered within 30 days of purchase—keep your receipt handy for potential claims.
Final Note: Mastering your Chefman coffee maker transforms morning chaos into a seamless ritual that delivers perfect coffee consistently. By following these model-specific instructions for setup, brewing, maintenance, and troubleshooting, you’ll extend your machine’s lifespan while enjoying café-quality results daily. Remember that proper cleaning after each use prevents 90% of common issues, and precise measurements ensure optimal flavor extraction. For continued success, download Chefman’s official app (available for most 2020+ models) which provides customized brewing guides based on your specific unit. Now that you’ve conquered the basics, experiment with different bean varieties and grind sizes to discover your perfect brew profile—your ideal morning coffee is just one properly executed cycle away.


