
You’ve just unboxed your new Black and Decker coffee maker, but the power button seems elusive. That moment of confusion when you’re standing in your kitchen, coffee craving in full force, yet unable to get your machine running is incredibly frustrating. Many coffee lovers face this exact problem—staring at what appears to be a completely unresponsive appliance despite following what they believe are the correct steps. The good news is that Black and Decker coffee makers have straightforward power procedures that, once understood, make operation simple. This guide will walk you through exactly how to power up your Black and Decker coffee maker model, troubleshoot common power issues, and ensure you’re enjoying your morning brew in minutes.
Unlike some premium coffee makers with complex interfaces, Black and Decker models prioritize simplicity. However, this simplicity can sometimes lead to confusion when you can’t immediately locate the power function. Most coffee drinkers expect a prominent power button, but Black and Decker often integrates power activation into the brewing process itself. By the end of this guide, you’ll know precisely how to activate your specific model, recognize proper power indicators, and solve any power-related issues that might prevent you from getting your caffeine fix.
Locate Your Coffee Maker’s Control Panel Layout
Identify Standard Black and Decker Control Configurations
Black and Decker coffee makers typically feature one of three control panel layouts that determine how you activate power:
- Basic models: Single “Brew” button that serves as both power and start function
- Programmable models: Dedicated “Power” button alongside “Brew” and programming controls
- Single-serve models: Power switch located on the side or back rather than the front panel
The most common mistake users make is searching for a separate power button on basic models when the “Brew” button doubles as the power activator. Your machine likely powers up automatically when you add water and press “Brew” for the first time after plugging in.
Recognize Power Indicator Lights on Your Model
Different Black and Decker models use various visual indicators to show power status:
- Red light: Standard power indicator (illuminates when machine is receiving electricity)
- Amber light: Heating cycle in progress (appears after power-up)
- Green light: Ready to brew (appears once water has heated)
If you plug in your coffee maker and see no lights whatsoever, this indicates a fundamental power issue rather than an operational misunderstanding. Check that you’ve inserted the plug fully into a working outlet and that your circuit breaker hasn’t tripped.
Power Activation Procedures by Model Type
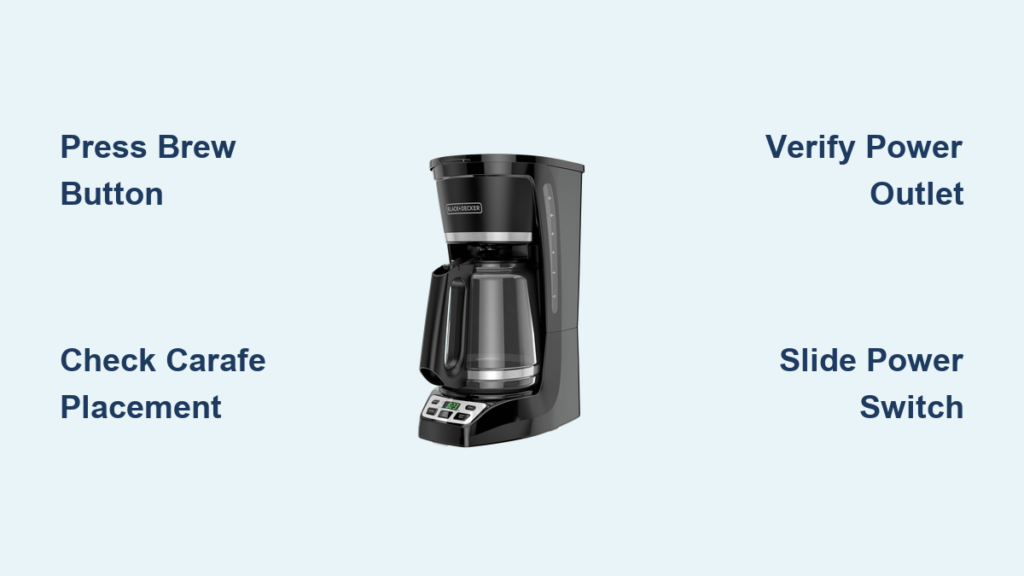
Basic Drip Coffee Makers (Single-Touch Operation)
For most entry-level Black and Decker coffee makers like the 2-12 cup models:
- Ensure the carafe is properly seated on the warming plate
- Fill the water reservoir to your desired level
- Add coffee grounds to the filter basket
- Press the single “Brew” button firmly once
The machine will power up automatically and begin brewing within 10 seconds. There is no separate “on” step—the brewing command activates the power. If your model has a “Pause & Serve” feature, pressing this button first will also power up the machine.
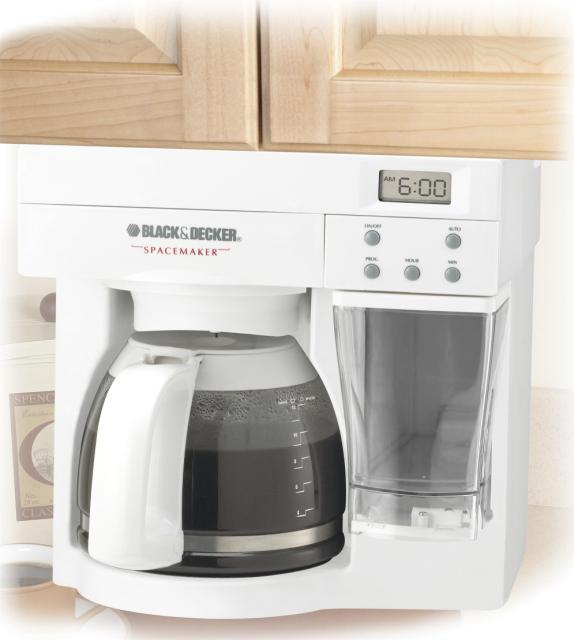
Programmable Coffee Makers (Scheduled Brewing)
For models with programmable features like the Black and Decker CM series:
- Plug in the coffee maker (power light should illuminate immediately)
- Press the dedicated “Power” button (usually top-left corner)
- Set current time using “Hour” and “Minute” buttons
- Program brew time by pressing “Program,” then setting time
- Press “Brew” to start immediate brewing or “Auto” to activate scheduled brewing
The dedicated power button must be pressed before programming or brewing. If you skip this step, pressing other buttons will have no effect. The power button typically has a universal power symbol (⭘|) rather than text.
Single-Serve Pod Machines (FlexBrew Models)
For Black and Decker FlexBrew and similar single-serve models:
- Locate the power switch on the side or back of the machine
- Slide the switch to the “I” (on) position
- Wait for the power light to illuminate (usually 5-10 seconds)
- Insert your preferred pod or coffee grounds
- Close the pod holder and press “Brew”
Unlike drip models, single-serve machines require this explicit power switch activation before any brewing functions work. The switch is often small and easily overlooked during initial setup.
Troubleshooting Power Activation Failures
When Pressing Brew Doesn’t Start the Machine
If your basic model doesn’t power up when pressing “Brew”:
- Check carafe placement: The machine won’t activate if the carafe isn’t properly seated
- Verify water level: Some models require minimum water level before powering brewing cycle
- Reset the machine: Unplug for 30 seconds, then try again
- Inspect filter basket: Must be properly inserted in most models
Many users unknowingly leave the carafe slightly askew, triggering the safety mechanism that prevents operation. Lift and firmly reseat the carafe, ensuring it clicks into position on the warming plate.
No Lights When Plugged In (Complete Power Failure)
When your coffee maker shows absolutely no signs of power:
- Test the electrical outlet with another device
- Check if the circuit breaker has tripped
- Inspect the power cord for damage or fraying
- Try a different power outlet in another room
- Reset the machine by unplugging for 2 full minutes
If multiple outlets fail to power the machine, the issue likely involves either a tripped internal thermal fuse (from overheating) or a manufacturing defect. Contact Black and Decker customer support with your model number before attempting internal repairs.
Proper Power Cycling Techniques

Correct Shutdown and Restart Procedures
Never unplug your coffee maker mid-brew cycle. Instead:
- Press “Off” or “Cancel” if your model has these buttons
- Wait for the machine to complete its cooling cycle (1-2 minutes)
- The power light will turn off automatically when safe to unplug
Forcing a shutdown by yanking the plug can damage internal components and create electrical hazards. If your machine seems stuck in operation, unplug it but wait 5 minutes before attempting to restart.
Energy-Saving Power Management Tips
To extend your coffee maker’s lifespan while saving energy:
- Unplug when not in use for extended periods (prevents “vampire” energy drain)
- Use the auto-shutoff feature if your model has one (typically 2-hour default)
- Never leave the machine plugged in during vacations or extended absences
- Consider a smart plug to control power remotely
Most Black and Decker coffee makers consume minimal standby power, but unplugging completely eliminates this small drain and protects against power surges.
Maintenance Practices That Prevent Power Issues
Monthly Electrical System Checks
Prevent unexpected power failures with these simple maintenance steps:
- Wipe the power cord connections with a dry cloth monthly
- Inspect the plug for bent prongs or discoloration
- Check that the outlet isn’t loose when the plug is inserted
- Clean around control buttons to prevent coffee grounds from interfering with electrical contacts
Coffee grounds and liquid spills around the control panel are common causes of electrical malfunctions. Always clean up spills immediately with a slightly damp cloth (never spray cleaner directly on the machine).
When to Contact Black and Decker Support
Contact customer service if:
- Your machine shows no signs of power after trying all troubleshooting steps
- You smell burning when attempting to power up
- The power cord feels unusually warm during operation
- Your model is under warranty (typically 1-2 years)
Have your model number ready (usually found on the bottom plate) and be prepared to describe the exact symptoms. Black and Decker offers live chat support on their website for faster assistance with power-related issues.
Final Note: Mastering your Black and Decker coffee maker’s power system ensures you’ll never miss your morning brew again. Remember that most basic models activate power through the “Brew” button rather than a separate power switch, while programmable models require explicit power activation. Keep your machine properly maintained with regular electrical checks, and always follow correct shutdown procedures to maximize its lifespan. If persistent power issues arise, consult Black and Decker’s official support resources with your specific model information for targeted solutions. Now that you know exactly how to power up your machine, you can enjoy reliable coffee brewing every time.


