

Your Keurig Slim should deliver that perfect morning cup without hesitation, but when it starts brewing weak coffee or takes forever to heat up, mineral buildup is likely clogging the system. The frustrating truth? Daily cleaning of just the water reservoir and drip tray isn’t enough to maintain optimal performance. Taking apart your Keurig Slim for a thorough cleaning eliminates hidden coffee residue and limescale that accumulate in hard-to-reach areas, restoring both speed and flavor to your brew.
Many coffee lovers avoid deep cleaning because they fear breaking their machine or can’t find clear instructions. This comprehensive guide solves that problem with precise, step-by-step directions specifically for the Keurig Slim model. You’ll discover exactly which components disassemble safely, how to access the problematic areas most users miss, and the cleaning techniques that actually remove stubborn buildup without damaging your appliance. Within 30 minutes, you’ll transform your sluggish coffee maker back to like-new condition.
Disconnect Power and Prepare Your Workspace
Before attempting any disassembly, unplug your Keurig Slim from the electrical outlet—this critical safety step prevents electrical hazards during cleaning. Remove all K-cups from the holder and empty the water reservoir completely. Allow the machine to cool for at least 30 minutes if you’ve recently used it, as internal components retain significant heat even after brewing stops.
Cover your work surface with an absorbent towel to catch water drips and organize small parts. Place a small container nearby for screws to prevent them from rolling away. Position good lighting to see small components clearly, and keep all your cleaning tools within easy reach before starting the disassembly process.
Why Cooling Time Matters for Keurig Slim Maintenance
The heating element in your Keurig Slim maintains temperatures above 190°F even after brewing completes. Attempting disassembly while hot risks burns and can warp plastic components when exposed to cleaning solutions. The 30-minute cooling period allows internal pressure to normalize, preventing accidental steam release when opening components. This waiting period also gives you time to gather all necessary tools and mentally prepare for the disassembly sequence.
Gather Proper Cleaning Supplies for Keurig Slim
Assemble these specific tools before starting: a small Phillips head screwdriver for accessing internal components, a soft-bristled brush for delicate parts, white vinegar or Keurig-approved descaling solution for mineral deposits, warm soapy water for exterior components, several microfiber cloths to prevent lint residue, and a straightened paperclip for clearing needle blockages.
Avoid using metal scrubbers, abrasive cleaners, or harsh chemicals that can damage plastic seals and internal coatings. Never submerge the entire machine in water—only remove and clean specific components as outlined in this guide. Using improper tools often causes more damage than the buildup you’re trying to remove, turning a simple maintenance task into an expensive repair.
Essential Tool Alternatives When Supplies Run Low
Don’t have a paperclip? A safety pin works perfectly for clearing the exit needle. No white vinegar? Mix citric acid with water at a ratio of 1 tablespoon per cup as an effective descaling alternative. Forgot your soft brush? Wrap a microfiber cloth around a toothpick for precision cleaning in tight spaces. The key is using non-abrasive materials that won’t scratch plastic surfaces or damage rubber seals during the cleaning process.
Remove and Clean External Components First
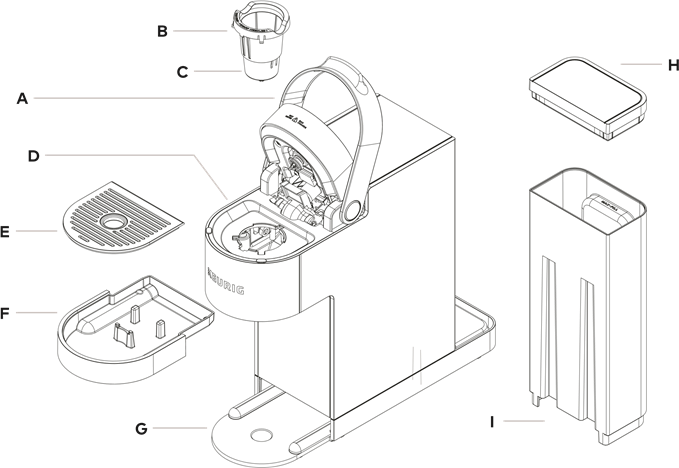
Begin disassembly by lifting the water reservoir straight upward—no twisting required—and set it aside for cleaning. Pull out the drip tray assembly by grasping both sides and lifting upward to release the retention clips. Remove the K-cup holder by pressing the release button and lifting straight up, then separate the funnel component from the needle assembly underneath.
Soak these removable parts in warm, soapy water for 10-15 minutes to loosen coffee oils before gently scrubbing with your soft brush. Pay special attention to the drip tray grate where coffee grounds accumulate and the K-cup funnel where oils build up over time. Rinse thoroughly with clean water and inspect for any remaining residue before setting aside to dry completely.
Identifying Hidden Buildup in Common Components
The water reservoir often develops cloudy film along the interior walls that impacts taste—this requires vinegar soaking for complete removal. The drip tray grate collects fine coffee particles that block proper drainage, causing overflow issues. The K-cup funnel develops a dark ring of coffee oil near the rim that affects flavor transfer. These problem areas won’t disappear with surface cleaning alone, which is why deep disassembly and soaking are essential for complete maintenance.
Access and Clean the Internal Brewing Chamber

Open the top handle fully until it locks in the upward position. Locate the two small screws on the underside of the top lid near the hinge mechanism and carefully remove them with your Phillips screwdriver. Gently lift the top cover straight up to expose the brewing chamber components, taking note of the rubber gasket’s position for proper reassembly.
Remove the upper needle assembly by gently pulling upward—this component contains tiny holes that frequently clog with coffee grounds. Use your paperclip to carefully clear each hole while holding the needle over a container to catch debris. Soak both the needle assembly and rubber gasket in vinegar solution for 15 minutes to dissolve mineral deposits before rinsing thoroughly.
Recognizing Critical Alignment Markers During Disassembly
Notice the small alignment tabs on the K-cup holder that must match corresponding slots during reassembly—forcing components without proper alignment causes leaks. The rubber gasket has a specific orientation with a thicker edge that must face downward toward the brewing chamber. The upper needle assembly has a keyed connector that only fits one way into the housing. These subtle markers ensure proper sealing and function when you reassemble your Keurig Slim.
Complete the Descaling Process for Internal Components
Prepare a 1:1 mixture of white vinegar and water (or follow package instructions for descaling solution) and fill the empty water reservoir. Place a large mug on the drip tray and run a brew cycle without inserting a K-cup. Continue running cycles until the reservoir empties completely, then let the machine sit with the descaling solution inside for 30 minutes to dissolve stubborn mineral deposits.
After the soaking period, run three consecutive brew cycles with fresh water only to flush all vinegar residue from the system. Continue running water cycles until the output smells neutral and runs completely clear—this ensures no acidic aftertaste affects your next cup of coffee.
Troubleshooting Incomplete Descaling Results
If coffee still tastes slightly acidic after cleaning, run additional water-only cycles until the flavor normalizes. Weak brewing performance after descaling often indicates residual buildup—repeat the vinegar cycle and extend the soaking time to 45 minutes. For persistent issues, check that you’ve properly reassembled all components, as misaligned parts can restrict water flow even after cleaning.
Reassemble Your Keurig Slim Correctly
Begin reassembly by positioning the rubber gasket exactly as it was before removal, ensuring the thicker edge faces downward. Insert the upper needle assembly into its housing, verifying it clicks into place. Place the top cover over the brewing chamber and secure it with the two screws you removed earlier—don’t overtighten, as this can strip the plastic threads.
Snap the K-cup holder into position by aligning the tabs with the slots until you hear a definite click. Replace the water reservoir and drip tray assembly, then plug in your machine. Run one test brew cycle with just water to verify proper operation before making your first cup of coffee.
Critical Checks Before First Post-Cleaning Brew
Listen for unusual noises during the test cycle that might indicate misaligned components. Check for leaks around the K-cup holder and water reservoir connections. Verify the machine heats water to proper temperature by feeling the mug after brewing—it should be hot but not scalding. Confirm water flows at normal speed through the system, indicating successful removal of blockages. These quick checks prevent frustration and potential damage from improper reassembly.
Establish a Maintenance Schedule to Prevent Future Issues
Clean your Keurig Slim’s removable components weekly with warm soapy water to prevent coffee oil accumulation. Perform full descaling every three months using vinegar solution, increasing frequency if you have hard water in your area. Empty the water reservoir daily instead of leaving water sitting overnight to prevent bacterial growth and mineral buildup.
Store your machine in a dry location away from steam sources like stovetops, as humidity accelerates mineral deposits. Consider using filtered water for daily operation—it reduces mineral content by up to 90% compared to tap water, dramatically extending time between deep cleanings and improving coffee flavor.
Your Keurig Slim now delivers the fast, flavorful coffee it was designed to make. By following this disassembly and cleaning process every three months, you’ll avoid the weak, bitter coffee that signals internal buildup. Remember that consistent maintenance takes less time than troubleshooting performance issues caused by neglect—just 30 minutes of your time preserves years of reliable coffee service. Keep this guide handy for your next cleaning session, and enjoy consistently perfect cups from your Keurig Slim.


