
When your new commercial Bunn coffee maker arrives at your café, restaurant, or office kitchen, proper setup is critical for optimal performance and longevity. Many business owners rush through installation only to face inconsistent brews, leaks, or premature equipment failure within weeks. The right setup process for your commercial Bunn coffee maker ensures you get the rich, flavorful coffee your customers expect while maximizing your investment. In this guide, you’ll learn the precise steps to properly install your commercial Bunn unit, avoid common setup mistakes that damage equipment, and get brewing professional-quality coffee from day one.
Commercial coffee makers operate under different requirements than residential models, with higher water pressure needs, specific electrical requirements, and more rigorous maintenance protocols. Understanding how to set up a commercial Bunn coffee maker correctly prevents costly service calls and keeps your operation running smoothly during peak hours. Whether you’ve purchased a Bunn NHB, VPR, or another commercial series, this guide covers the universal setup principles that apply to most Bunn commercial units.
Pre-Installation Requirements for Commercial Bunn Units
Before you even unbox your commercial Bunn coffee maker, verify your location meets all necessary requirements. Commercial Bunn models typically need dedicated 120V electrical circuits with proper grounding—never plug these units into standard multi-outlet strips used for office equipment. Water supply is equally critical: commercial Bunn coffee makers require consistent water pressure between 20-80 PSI and temperature below 100°F (38°C) to prevent internal damage.
Checking Your Water Quality and Pressure
Commercial environments often have water conditions that differ significantly from residential settings. Hard water with high mineral content will rapidly damage heating elements and internal components. Use a water pressure gauge to confirm your supply falls within Bunn’s specifications, and consider installing an inline water filter system if your water hardness exceeds 3 grains per gallon. For locations with water pressure outside the acceptable range, install a pressure regulator to protect your investment.
Space and Ventilation Requirements
Commercial Bunn units generate significant heat during operation and require proper clearance: 4 inches on all sides and 6 inches above the unit. Never install your coffee maker inside a closed cabinet or against walls without adequate airflow. The heat buildup can trigger automatic safety shutoffs during busy periods or cause premature component failure. Ensure your designated location has easy access to both power and water connections without requiring excessive hose extensions that could kink or leak.
Unpacking and Initial Setup Procedures
Carefully remove all packaging materials, paying special attention to protective foam around the water tank and internal components. Commercial Bunn coffee makers ship with transit locks engaged on certain models—consult your specific manual to verify whether these need removal before first use. Most commercial units include a water reservoir, brew group, and drain hose that require proper positioning before initial operation.
First-Time Water System Priming
Never power on your commercial Bunn coffee maker without first properly priming the water system. Begin by connecting the water supply line to your filtered water source using the appropriate fittings (typically 3/8″ compression fittings for commercial models). Open the water supply valve slowly while monitoring for leaks at all connection points. Then, run at least three full brewing cycles with just water—no coffee grounds—to flush manufacturing residues from internal components and ensure proper water flow through the entire system.
Electrical Connection Safety Protocol
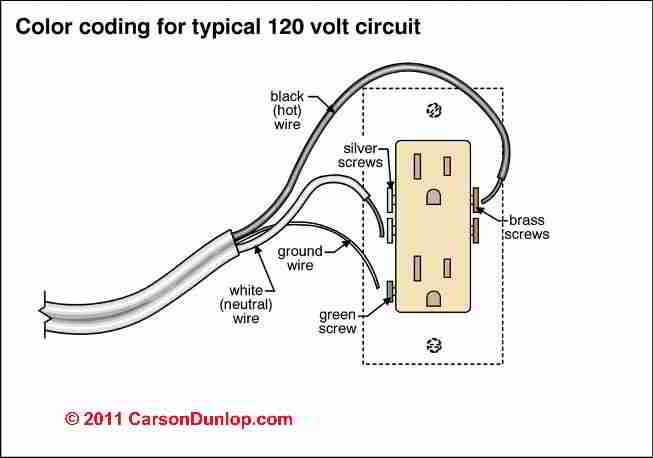
Commercial Bunn coffee makers draw significant power during heating cycles and require direct connection to properly grounded outlets. Always verify outlet voltage matches your unit’s requirements (typically 120V for most commercial Bunn models in North America). The ground fault circuit interrupter (GFCI) protection required in commercial kitchens must be tested before connecting your coffee maker. Never use extension cords or power adapters, as voltage drops can damage heating elements and void warranties.
Power-Up Sequence and Initial Diagnostics
After verifying proper electrical connection, power on your commercial Bunn unit and observe the initial startup sequence. Most models will run a self-diagnostic check, with indicator lights cycling through specific patterns. Consult your model’s manual for normal startup behavior—any irregular light patterns or error codes at this stage indicate installation issues that must be addressed before proceeding. Allow the unit to reach full operating temperature (typically 15-20 minutes) before attempting your first brew cycle.
Configuring Brew Settings for Commercial Performance

Commercial Bunn coffee makers offer adjustable parameters that significantly impact output quality. The water temperature setting—typically factory preset between 195-205°F—should be verified with a separate thermometer during your first few brew cycles. Adjust the water volume per brew cycle to match your specific coffee baskets and desired strength. For consistent results in high-volume environments, program automatic pre-infusion times if your model supports this feature, allowing grounds to properly saturate before full brewing pressure engages.
Customizing Dispensing Parameters
Commercial settings require precise control over dispensing duration and volume. Most Bunn commercial units allow adjustment of the brew switch activation time, which determines how long water flows during each cycle. Calibrate this setting based on your coffee blend’s extraction requirements—lighter roasts typically need longer contact time than dark roasts. For multi-basket models, verify equal water distribution across all brew heads by running test cycles with empty baskets and measuring output from each spout.
Troubleshooting Common Setup Issues
Even with careful installation, commercial coffee makers may exhibit initial performance issues. If your Bunn unit shows low water pressure during brewing, check for kinked supply lines, clogged water filters, or insufficient water pressure at the source. For units that won’t maintain proper temperature, verify electrical supply stability and ensure the heating element isn’t coated with mineral deposits from hard water.
Addressing Error Codes Immediately
Commercial Bunn models display specific error codes for installation-related issues. Code E1 typically indicates water temperature problems, while E2 points to heating element issues often caused by inadequate water flow during initial setup. Never ignore these warnings—address the underlying cause before continuing operation, as doing so can cause permanent damage to expensive components.
Essential Post-Setup Verification Steps
Before serving coffee to customers, conduct thorough performance validation. Measure actual brew temperature at the discharge point with a calibrated thermometer—commercial standards require 195-205°F for proper extraction. Time the complete brew cycle to ensure it matches your programmed settings. Check for leaks at all connection points with a paper towel, as even minor drips can indicate improperly seated fittings that will worsen with use.
Quality Control Testing Protocol
Run three consecutive brew cycles with your standard coffee blend and evaluate consistency. Commercial operations require minimal variation between batches—more than a 10% difference in extraction time or volume indicates setup issues needing adjustment. Document your baseline performance metrics to quickly identify future problems.
Preventive Maintenance Schedule for Longevity
Your commercial Bunn coffee maker requires specific maintenance routines to maintain performance after proper setup. Implement daily backflushing with clean water to remove coffee oils from internal components. Schedule weekly deep cleaning with Bunn-approved descaling solution to prevent mineral buildup—never use vinegar in commercial units as it damages seals and sensors. Replace water filters according to manufacturer specifications, typically every 2-3 months in high-volume settings.
Creating a Setup Documentation File
Document your exact setup configuration including water pressure readings, electrical specifications, and custom brew settings. Include photos of properly connected components for future reference. This documentation proves invaluable during service calls and when training new staff on equipment operation.
Final Calibration Before Customer Service
Before serving your first customer cup, perform a final calibration using your standard coffee recipe. Adjust grind size, water volume, and brew time to achieve your target extraction within the commercial Bunn unit’s capabilities. Record these optimal settings and post them near the machine for consistent operation across all shifts. Verify that the first 10 brew cycles maintain consistent temperature and volume—commercial units should stabilize within this range when properly installed.
With your commercial Bunn coffee maker now correctly set up, you’ve laid the foundation for reliable, high-quality coffee service that will satisfy customers and minimize downtime. Remember that proper setup is just the beginning—consistent maintenance and monitoring of performance metrics ensure your investment delivers exceptional coffee for years to come. When in doubt about any aspect of your Bunn unit’s operation, always consult the specific model manual rather than applying generic coffee maker advice to commercial equipment.


