
Your Ninja Dual Brew coffee maker sits on the counter, ready to brew your morning coffee, but the blinking clock reminds you it’s not quite operational yet. Without the correct time set, you can’t program automatic brews or use timer functions – crucial features that make your coffee maker truly “smart.” Setting the clock properly is the essential first step to unlocking your Ninja Dual Brew’s full potential, yet many users struggle with this basic setup. In this guide, you’ll learn the exact steps to set the clock on your Ninja Dual Brew coffee maker correctly the first time, avoiding common mistakes that leave your display flashing frustratingly.
Why Proper Clock Setup Matters for Your Ninja Dual Brew
Setting the clock on your Ninja Dual Brew isn’t just about telling time – it’s the foundation for all automated functions. When the clock displays incorrectly, your scheduled brews won’t start at the right time, defeating the purpose of having a programmable coffee maker. The Ninja Dual Brew’s clock system integrates with multiple brewing modes, including thermal carafe, classic carafe, and single-serve options, making accurate timekeeping essential for optimal performance. Many users mistakenly think their coffee maker is defective when scheduled brews don’t activate, not realizing the simple fix is correcting the clock setting. This guide will walk you through the precise process so you can enjoy perfectly timed coffee every morning.
Required Tools for Ninja Dual Brew Clock Setup
What You’ll Need Before Starting
Setting the clock on your Ninja Dual Brew requires nothing more than the coffee maker itself and about two minutes of your time. Unlike complex appliances, no special tools or additional components are necessary. The control panel contains all the buttons you need to navigate the clock settings. Before beginning, ensure your coffee maker is plugged in and powered on – the display should be illuminated. Have the current time handy from a reliable source like your smartphone or computer, as accuracy matters when setting the clock. The entire process can be completed while the machine is cold, so no waiting for heating elements is required.
Step-by-Step Process to Set the Clock on Your Ninja Dual Brew
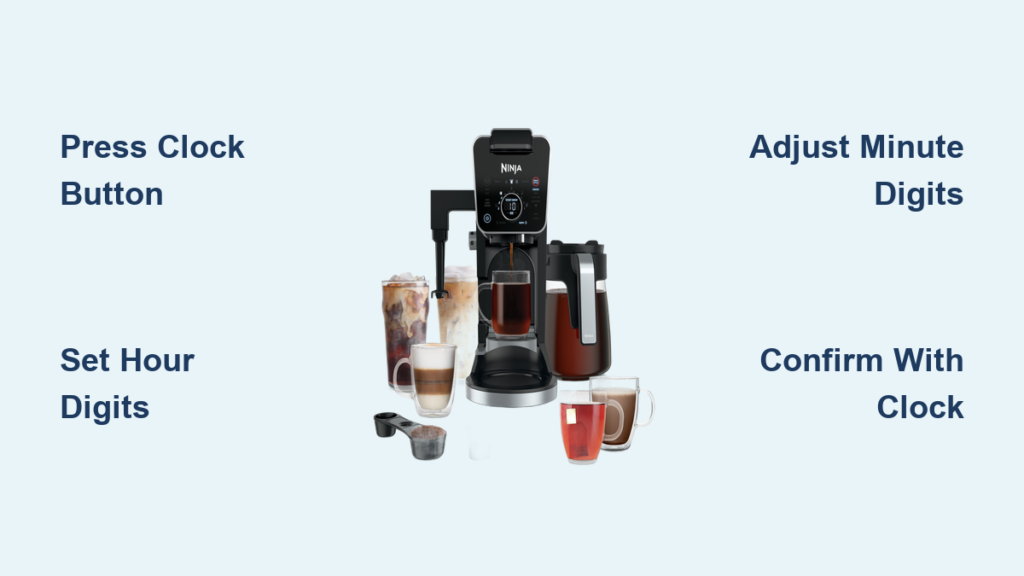
Entering Clock Setup Mode
To begin setting the clock, locate the “Clock” button on your Ninja Dual Brew’s control panel. This button typically appears as a small clock icon near the display screen. Press and hold this “Clock” button for approximately 3 seconds until the hour digits on the display begin to flash. This indicates you’ve successfully entered clock setup mode. If the digits don’t flash after holding for 3 seconds, release and try again – sometimes a firmer press is needed. The flashing hour display is your signal that the coffee maker is ready to accept time input.
Adjusting the Hour Setting
With the hour digits flashing, use the “Hour” button (usually marked with “+” and “-” symbols or separate up/down arrows) to set the correct hour. Press the button repeatedly to scroll through the hours until you reach the current time. Pay attention to whether your display shows AM or PM – some models automatically switch between 12-hour formats while others require you to set this separately. If you accidentally overshoot the correct hour, simply continue pressing the button to cycle through to the right time. Most Ninja Dual Brew models allow you to set time in 12-hour format only, so be mindful of AM versus PM designation.
Setting the Minutes Correctly
Once the hour is set correctly, press the “Clock” button again. This action will make the minute digits begin flashing, indicating it’s time to set the minutes. Use the “Minute” button to scroll through and select the current minute. Press the button repeatedly until you reach the precise minute. If your coffee maker has separate hour and minute adjustment buttons, continue using the appropriate button for minutes. Take care to set the minutes accurately, as even a five-minute discrepancy can mean missing your scheduled brew time. Some users find it helpful to wait until the minute changes on their reference clock before finalizing this setting.
Confirming and Saving Your Time Setting
After setting both the hour and minutes, press the “Clock” button one final time to save your settings and exit clock setup mode. The flashing should stop, and the display should show the steady, correct time. To verify your settings were saved properly, unplug the coffee maker for 30 seconds and plug it back in – the correct time should reappear without needing reprogramming. If the display returns to flashing or shows the wrong time, repeat the process, ensuring you press the “Clock” button to confirm each setting before moving to the next step. Properly saved time settings will remain accurate even during brief power outages, though extended outages may require resetting.
Troubleshooting Common Ninja Dual Brew Clock Issues

When the Clock Won’t Stop Flashing
If your Ninja Dual Brew’s clock remains in flashing mode after attempting to set it, you likely didn’t properly confirm the settings. Return to clock setup mode by pressing and holding the “Clock” button, then carefully follow the sequence: set hour → press “Clock” → set minutes → press “Clock” to save. Many users skip the final confirmation step, leaving the clock in setup mode. If the display continues flashing after multiple attempts, try resetting the entire unit by unplugging it for two full minutes before retrying the clock setup process from the beginning.
Fixing Time That Resets After Power Outage
While brief power interruptions shouldn’t affect your Ninja Dual Brew’s clock settings, extended outages may cause the time to reset. To minimize this issue, consider plugging your coffee maker into a surge protector with battery backup. If you frequently experience time resets, check that your coffee maker’s internal battery (if equipped) is functioning properly – though most Ninja models rely solely on main power for timekeeping. After any power restoration, immediately check and reset the clock if necessary to ensure scheduled brews function correctly the following morning.
Maximizing Your Ninja Dual Brew’s Timer Features After Clock Setup

Programming Your First Automatic Brew
With the clock correctly set, you’re now ready to use your Ninja Dual Brew’s scheduling features. Press the “Brew Time” or “Program” button, then use the hour and minute buttons to select when you want coffee to be ready. For example, if you want fresh coffee at 7:00 AM and brewing takes 15 minutes, set the timer for 6:45 AM. Confirm your selection, and the display should show the scheduled time with a clock icon. Add water and coffee before going to bed, and wake up to freshly brewed coffee exactly when you want it.
Creating Custom Brewing Schedules for Different Days
Advanced Ninja Dual Brew models allow different schedules for weekdays versus weekends. After setting the main clock, access the programming menu to create separate schedules – perhaps a 6:30 AM brew time for workdays and 8:00 AM for weekends. Navigate through the programming menu using the same hour/minute buttons, selecting the day(s) you want each schedule to apply. This feature is particularly useful for maintaining consistent routines while accommodating different weekend wake-up times without manual adjustments.
Maintenance Tips to Keep Your Ninja Dual Brew Clock Running Accurately
When to Reset the Clock for Daylight Saving Time
When daylight saving time begins or ends, remember to adjust your Ninja Dual Brew’s clock just as you would other household devices. The process is identical to the initial setup: enter clock mode, adjust hours forward or backward, and save the new time. Set a reminder on your phone to handle this twice yearly, or better yet, program your coffee maker to automatically adjust if your specific model supports this feature (check your manual for details). Failing to update for daylight saving time means your scheduled brews will be an hour off for several months.
Preventing Common Clock-Related Brewing Issues
Many Ninja Dual Brew owners report “malfunctioning” scheduled brews when the actual issue is an incorrect clock setting. Make it a habit to verify your clock display matches the actual time whenever you add water to the reservoir. If you notice the clock running fast or slow consistently, it may indicate an internal timing issue requiring service. For most users, however, simply following the proper clock-setting procedure outlined in this guide will ensure reliable automatic brewing for years to come.
Final Note: Taking just two minutes to properly set your Ninja Dual Brew’s clock unlocks the full convenience of automatic brewing. By following these specific steps for your model, you’ll enjoy perfectly timed coffee every morning without the frustration of flashing displays or missed schedules. Remember to verify your clock settings monthly and after any power interruptions to maintain consistent performance. With your clock correctly set, you’re now ready to explore all the programmable features that make your Ninja Dual Brew a morning essential.


