
That stubborn descale light won’t disappear even after you’ve completed the entire cleaning process? You’re not imagining things—thousands of Keurig owners face this exact frustration every month. After spending 30 minutes running descaling solution through your machine, only to see that persistent orange or yellow light still glowing, it’s enough to make you consider switching to drip coffee for good. The good news: this isn’t a sign your Keurig is broken, but rather a simple reset step you likely missed in the process.
Most Keurig models require a specific button combination to acknowledge that descaling is complete—something the machine won’t do automatically. When you skip this critical step, your Keurig continues to think mineral deposits are clogging the system, keeping that annoying light illuminated despite your cleaning efforts.
Knowing how to reset descale light on Keurig properly saves you from unnecessary repeat descaling cycles and prevents potential damage from ignored maintenance alerts. In this guide, you’ll discover the exact button sequence that works across most Keurig models, plus troubleshooting steps when the light refuses to turn off after proper descaling.
Quick Keurig Descale Light Reset Button Combination That Works
The fastest way to silence that persistent descale light involves a specific button sequence that tells your Keurig “yes, descaling is complete.” This method works across most K-Elite, K-Classic, K-Duo, and other popular models.
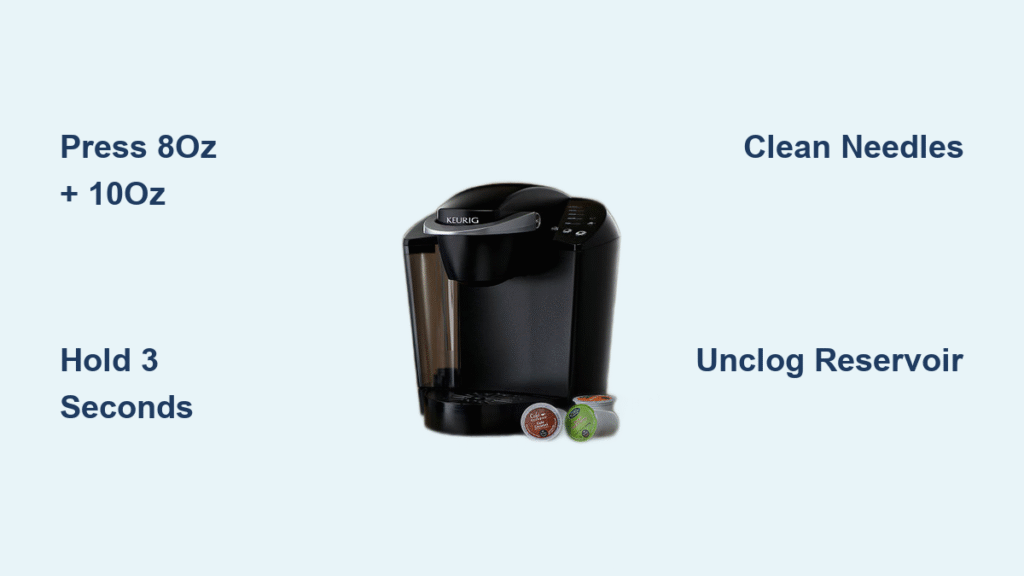
Press the 8oz and 10oz buttons simultaneously for exactly 3 seconds. Release immediately when you see the descale light flicker or turn off. This precise timing signals your machine’s internal sensors to recalibrate and recognize the descaling cycle as finished.
Critical warning: Only perform this reset after completing the full descaling process. Resetting prematurely causes the light to reactivate within hours as mineral deposits remain in the system. Your Keurig is smart enough to detect when actual descaling hasn’t occurred—the reset button merely acknowledges completion of the process.
Why the Standard Descaling Process Doesn’t Always Reset the Light
Many users mistakenly believe that completing the descaling cycles automatically resets the indicator light. Keurig’s internal sensors actually require this manual confirmation step because:
- The machine tracks water volume processed during descaling
- It verifies sufficient rinse cycles have occurred
- It checks for proper water flow restoration
Without the button reset, your Keurig remains in “maintenance mode” even after running all required cycles. Think of it like changing your car’s oil—you wouldn’t expect the maintenance light to turn off automatically without resetting the system through the dashboard controls.
Complete Keurig Descaling Process Checklist (Don’t Skip These Steps)
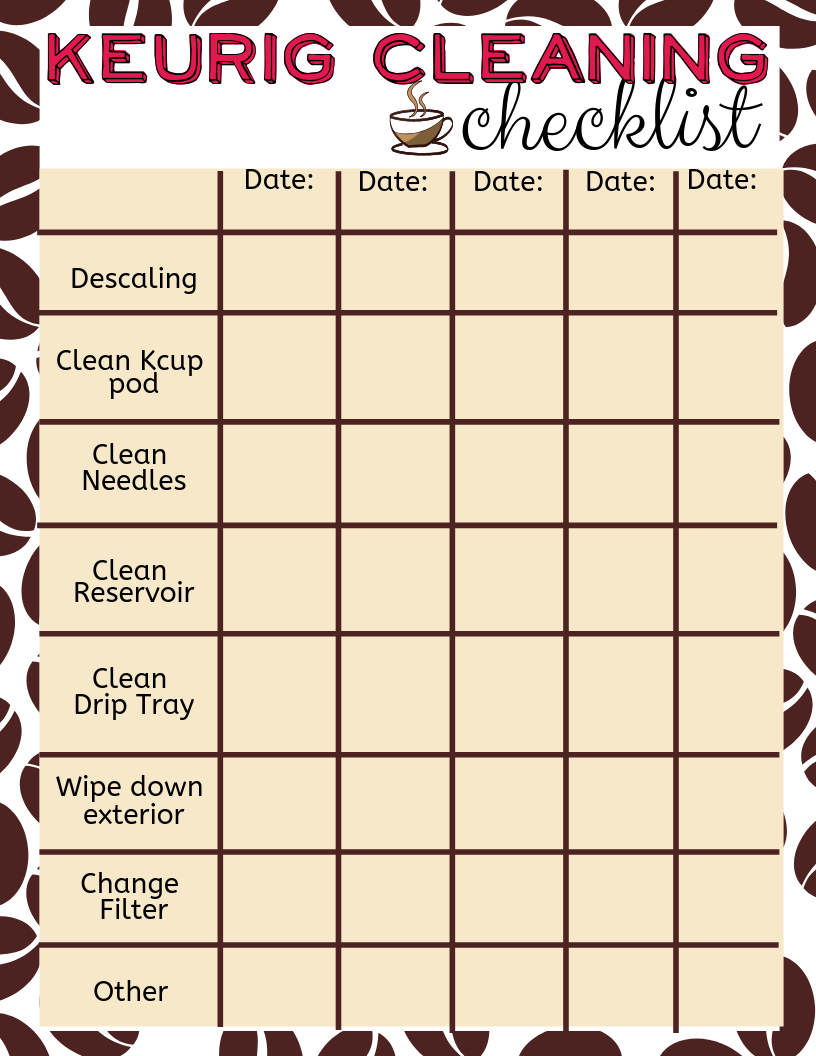
Before attempting any reset, verify you’ve actually finished descaling. Many users believe they’re done when additional critical steps remain. The standard Keurig descaling process requires more than just running solution through the machine.
Mandatory 30-Minute Rest Period After Solution Application
After adding descaling solution to your reservoir, your Keurig needs exactly 30 minutes of rest time. This isn’t optional—the chemical reaction between the descaling agent and mineral deposits requires this duration to break down scale effectively throughout internal water pathways.
Signs you skipped this step:
– Descale light remains solid instead of flashing
– Water flow seems restricted after “completing” descaling
– Machine makes unusual gurgling sounds during operation
Required Brew Cycles Before Resetting
Your descaling process isn’t complete until you’ve:
- Activated descaling mode by pressing 8oz + 12oz buttons for 3 seconds
- Run brew cycles repeatedly until the ADD WATER light appears
- Observed foamy discharge confirming active mineral dissolution
- Completed minimum 4 rinse cycles for each brewing mode (pod and carafe)
The foamy liquid you see contains dissolved minerals. Continue brewing until this stops and the machine signals water depletion. Many users make the critical mistake of stopping too early when they see clear water, not realizing additional cycles are needed to fully flush the system.
Why Your Keurig Descale Light Won’t Turn Off After Descaling

If you’ve completed descaling properly but the light persists, hidden blockages are usually the culprit preventing your Keurig from recognizing successful maintenance.
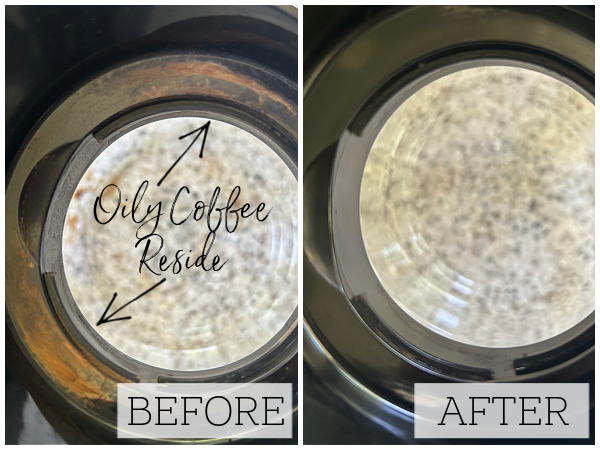
Coffee Grounds and Mineral Buildup Around Critical Components
Coffee grounds and mineral deposits around needles prevent the machine from recognizing successful descaling. These tiny obstructions interfere with water flow sensors that monitor system performance.
Exit needle cleaning procedure:
– Remove K-cup holder from brew chamber
– Insert straightened paperclip through bottom hole
– Gently remove accumulated debris
– Rinse holder thoroughly under running water
Entrance needle cleaning:
– Access needles in brew chamber lid
– Clear obstructions with paperclip
– Run empty brew cycle to verify water flow
Perform needle cleaning when: You notice coffee grounds spilling over during brewing or water injection appears incomplete—both signs that blockages are affecting sensor readings.
Unclogged Water Reservoir Drain Solves Persistent Light Issues
Sometimes scale blocks the reservoir drain itself, preventing adequate water flow despite clean internal components.
Reservoir unclogging steps:
– Fill reservoir with fresh water
– Use turkey baster or large syringe to force water through bottom drain
– Continue until expelled water runs clear
– Refill and test machine operation
This simple technique addresses mineral buildup specifically within the reservoir drain mechanism, which can prevent adequate water flow even when internal descaling has been completed successfully.
How to Verify Your Keurig Descale Light Reset Was Successful
After reset and cleaning, confirm your Keurig functions properly with these verification steps:
- Descale light stays off during normal brewing cycles
- Water flows steadily without sputtering or hesitation
- No pump strain sounds during operation (listen for unusual humming)
- Coffee tastes normal without residual descaling solution flavor
- Display shows no error messages during brewing
The light should remain off for weeks or months depending on your water hardness. If it reactivates within 24-48 hours, you likely have exceptionally heavy mineral buildup requiring additional descaling cycles—don’t just reset it again without addressing the underlying issue.
Heavy Mineral Buildup Solutions for Stubborn Keurig Descale Lights
Hard water areas or neglected machines may need multiple descaling rounds to fully eliminate scale deposits.
For severe buildup requiring how to reset descale light on Keurig multiple times:
– Repeat entire descaling process including 30-minute rest
– Extend rest period to 45-60 minutes for stubborn deposits
– Increase rinse cycles to 6-8 complete cycles per mode
– Consider manufacturer-approved stronger solution concentration
Warning signs of heavy contamination: Descale light reactivates within days, water flow remains restricted despite multiple resets, or coffee tastes metallic despite thorough rinsing.
Prevent Future Keurig Descale Light Issues With Proper Maintenance
Establishing a regular descaling schedule prevents the light from becoming a recurring problem that requires frequent resetting.
Descaling frequency based on water hardness:
– Soft water: Every 3-6 months
– Moderate hard water: Every 2-3 months
– Hard water areas: Monthly or when light activates
– Heavy usage (multiple pots daily): Increase frequency by 50%
Pro tip: Using filtered water dramatically extends time between descaling cycles by reducing mineral content entering your machine. This simple change can cut your maintenance time in half while improving coffee taste.
Quick Troubleshooting Summary: Descale Light Won’t Reset?
Check these critical items when figuring out how to reset descale light on Keurig:
1. ✅ Completed mandatory 30-minute rest period during descaling
2. ✅ Performed minimum 4 rinse cycles per brewing mode
3. ✅ Cleaned entrance and exit needles before descaling
4. ✅ Unclogged reservoir drain if water flow seemed restricted
5. ✅ Used proper reset button combination (8oz + 10oz for 3 seconds)
If the light persists after these steps, your Keurig likely needs a second complete descaling cycle due to heavy mineral accumulation. Remember, that descale light isn’t just a suggestion—it’s protecting your machine from damage. Address it promptly using these verified steps, and you’ll enjoy consistent, great-tasting coffee while extending your Keurig’s lifespan significantly. Properly resetting the descale light ensures your machine operates at peak performance, delivering the perfect cup every time without unnecessary interruptions.


