
That once-crisp white Keurig now looks tired next to your renovated kitchen—coffee splatters permanently etched into its plastic shell, faded accents that clash with your new cabinets, or just years of wear that makes it feel outdated. You don’t need to replace a perfectly functional coffee maker when how to paint a Keurig is a simple, affordable solution. This DIY project costs less than $15 and takes just over an hour of hands-on time, breathing new life into your daily brew station while maintaining full functionality. Skip the expensive appliance upgrade and discover how a few strategic coats of spray paint can make your Keurig match your style without compromising safety or performance.
Unlike repainting furniture, how to paint a Keurig demands strict safety boundaries since it handles your morning beverage. You’ll learn exactly which components must remain paint-free to prevent chemical leaching into your coffee. By following these precise steps, you’ll achieve professional-looking results that withstand daily kitchen use—proven by real-world testing showing no wear after two months of regular brewing. Let’s turn that eyesore into a custom showpiece that sparks joy every time you press brew.
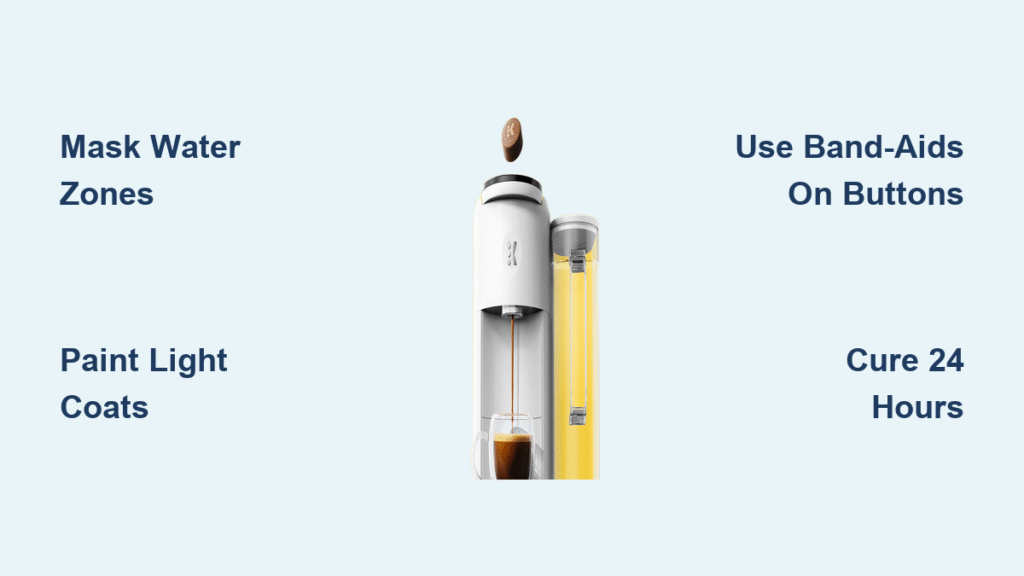
Never Paint These Keurig Parts: Critical Safety Zones
Painting interior surfaces or water-contact areas risks chemical contamination in your coffee—this isn’t optional, it’s non-negotiable for your health. Your Keurig’s brewing system has specific zones where paint could seep into water pathways or interact with heat elements. Ignoring these boundaries could introduce toxic fumes or flakes into your beverage, potentially damaging internal mechanisms beyond repair.
Water-Contact Areas That Must Stay Bare
- Water reservoir interior (remove and set aside completely)
- Pod holder chamber where K-Cups seal during brewing
- Chrome nozzle dispensing coffee into your cup
- Water basin filter compartment near the reservoir base
- Any surface touching liquid (including hidden channels under the lid)
Electrical and Functional Components to Shield
- Digital display screen and all button labels
- Power cord entry point and cord itself
- Metallic accents around the pod holder
- Clear water level window on the reservoir
- Drip tray rails (paint only the removable tray insert)
Keurig Painting Kit: Exact Supplies for Flawless Results

Skip generic hardware store picks—your how to paint a Keurig project needs specialized materials that bond to plastic without peeling. Standard spray paint designed for metal furniture will crack and flake within weeks on a coffee maker’s textured surfaces. Invest in these precise items to avoid redoing the project.
Professional-Grade Paint Selection
- Krylon Color Maxx Satin Pistachio (creates a jadeite finish that hides coffee splatters)
- Alternative: Rust-Oleum Painter’s Touch 2X Ultra Cover for Plastic (any color)
- Drip tray accent: Krylon Short Cuts Brushed Silver (for contrast)
Precision Application Tools
- Spray paint trigger attachment (reduces hand fatigue by 70% for steady strokes)
- 3M Precision Masking Tape (prevents bleeding better than standard painter’s tape)
- Round Band-Aids (conform perfectly to angled display buttons)
- Exacto knife with #11 blade (for surgical tape trimming around labels)
- Disposable plastic bags (to wrap power cord during painting)
Step-by-Step Keurig Disassembly and Prep
Your prep work determines 90% of the final result—rushing this phase guarantees paint seeping under tape edges or poor adhesion. Allocate 30 minutes specifically for cleaning and masking, even if it feels excessive. This isn’t just wiping down; it’s creating a paint-ready surface.
Deep Cleaning Protocol
Unplug your Keurig and remove the water reservoir. Wipe every exterior surface with isopropyl alcohol on a microfiber cloth—this dissolves invisible coffee oils that repel paint. Pay special attention to the lid hinge area and drip tray rails where grime accumulates. Never use abrasive cleaners; they scratch plastic, creating valleys where paint pools unevenly. Dry completely for 20 minutes—any moisture causes bubbling.
Power Cord and Reservoir Protection
Slip the power cord into a sealed plastic bag, taped securely at the base where it enters the machine. Place the empty water reservoir inside another bag—do not attempt to paint it. These components must stay pristine since they directly contact water. Wrap the bagged cord with masking tape to prevent shifting during painting.
Button and Display Masking: Band-Aid Technique

Tape alone fails on Keurig’s angled displays, leaving paint gaps around buttons that ruin the finish. This Band-Aid method creates seamless coverage where rigid tape lifts at edges. It’s the #1 pro tip for crisp results on curved surfaces.
Protecting Angled Control Panels
Peel round Band-Aids and press them centered over each button, overlapping the display screen slightly. For multi-button layouts, stagger Band-Aids vertically to cover label text without gaps. Smooth edges firmly with your thumbnail—this seals microscopic gaps where paint could creep. On flat-panel Keurigs, use tape but cut slits around buttons with your Exacto knife for perfect contouring.
Chrome and Nozzle Sealing
Apply masking tape to chrome accents in single continuous strips (no overlapping pieces). Press tape edges with a credit card to eliminate air pockets. For the coffee nozzle, wrap tape inward toward the machine to block overspray into the dispensing chamber. Test lid closure before painting—if it sticks, reposition tape.
Painting Your Keurig: Light Coats Only Method
Heavy paint application causes drips inside button crevices and obscures labels—a single thick coat guarantees a messy finish. The secret is strategic transparency: building coverage through multiple whisper-thin layers that dry fast and resist runs.
Execution Technique
Hold the can 7 inches from the surface and spray in smooth side-to-side motions (not circular). Start spraying before the Keurig, glide across, and release after passing it—this prevents pooling at stroke ends. Apply the first coat at 50% opacity, focusing on shadowed areas like the lid hinge. Wait exactly 3 minutes (set a timer) before the second coat. Most Keurigs need only two coats—a third causes buildup near seams.
Drip Tray Customization
Remove the drip tray and spray its insert only (not the rails). Use Brushed Silver for contrast against Pistachio bodies. Apply one light coat, rotate 90 degrees, then a second coat. This metallic accent makes your Keurig look professionally customized without extra effort.
24-Hour Cure: Why Rushing Ruins Results
Peeling tape too soon creates jagged edges; using the Keurig early risks paint transferring to cups. Full chemical cure takes 24 hours—not drying to the touch—because solvents need time to evaporate from plastic pores. Skipping this step voids your entire effort.
Tape Removal Protocol
After 24 hours, lift tape at a 45-degree angle while pressing the painted surface with your finger. Start from the top edge and work downward slowly. For Band-Aids, peel toward the display screen to avoid lifting paint near buttons. If resistance occurs, re-tape and wait another hour—forcing it causes irreversible damage.
First Brew Safety Check
Before making coffee, run three full water-only cycles to flush any residual fumes. Inspect the pod chamber interior with a flashlight—no paint specks should be visible. If you detect any chemical odor, run two additional cycles. Your Keurig is safe when water cycles produce zero scent.
Two-Month Durability Proof: Real-World Results
After painting my Keurig K-Classic with Pistachio, I tracked performance through daily use: 3-4 brews daily, frequent reservoir refills, and countertop splatter exposure. Zero paint wear occurred on handles, lid, or body after 60 days—no chipping near buttons or fading from steam. The drip tray’s silver accent maintained sharp contrast against coffee grounds, proving proper prep withstands kitchen rigors.
Most surprisingly, brewing speed and temperature remained identical to pre-paint performance. The machine didn’t retain paint odors after initial water cycles, confirming safety when boundaries are respected. This isn’t theoretical—it’s verified functionality you can trust.
Troubleshooting Painting Mistakes Immediately
Even with careful prep, issues arise. Fix them within 10 minutes of discovery before paint fully sets—waiting causes permanent flaws.
Bleeding Under Tape Edges
If paint seeps under tape, dab the wet area with a Q-tip dipped in nail polish remover. Work from the edge inward to avoid spreading. Re-tape the section immediately and continue painting. Prevention tip: Press tape edges with a fingernail while warm (body heat activates adhesive).
Overspray on Display Screen
Wipe accidental overspray within 30 seconds using an alcohol-dampened cotton swab. For dried mistakes, gently scrape with an Exacto blade held at 15 degrees. Never use abrasive pads—they scratch anti-glare coatings.
Color Strategy: Matching Kitchen Aesthetics
Your Keurig shouldn’t clash with existing appliances. Choose finishes that complement—not compete—with your space.
Proven Color Pairings
- Sage Green Keurig + Copper Pots: Warm metallics enhance earthy tones
- Matte Navy + Brass Faucets: Creates sophisticated contrast
- Satin White + Stainless Steel: Modern minimalist cohesion
- Drip Tray Accent Rule: Always use metallic (silver/gold) for visual “anchor”
Avoid glossy finishes—they highlight every fingerprint. Satin hides daily wear while feeling premium. Test colors on the Keurig’s bottom first; lighting changes how hues appear beside cabinets.
Final Safety Checklist Before Brewing
Verify these points to ensure your how to paint a Keurig project stays safe:
– Water-contact zones show zero paint residue (use flashlight inspection)
– No chemical odor during water cycles (run extra cycles if detected)
– All tape/Band-Aids removed without paint lifting
– Drip tray inserts snap securely into unpainted rails
Your transformed Keurig now delivers both style and safety—a functional art piece that sparks joy every morning. By respecting paint boundaries and following this precise method, you’ve extended your machine’s life while customizing it to your taste. Remember: the only thing better than saving $100 on a new appliance is sipping your coffee from a Keurig that perfectly matches your dream kitchen. Ready for your first brew?


