
Your Fellow coffee grinder sits at the heart of your morning ritual, transforming whole beans into the perfect foundation for exceptional coffee. But when coffee oils and fine particles accumulate inside your Opus, Bambu+, or other Fellow model, even the freshest beans can’t save your brew from tasting stale or bitter. This frustrating reality hits most coffee lovers by mid-morning when that second cup lacks the vibrancy of the first—a direct result of residue buildup in neglected grinders. A thorough cleaning takes less time than your daily pour-over ritual yet delivers dramatic improvements in flavor consistency and machine longevity.
Most Fellow grinder owners don’t realize how quickly performance degrades between cleanings. Coffee oils penetrate burr surfaces within weeks, creating microscopic residue layers that disrupt precise particle sizing. This guide gives you the exact procedures Fellow enthusiasts use to maintain peak performance, whether you’re a casual home barista or a daily espresso enthusiast. You’ll learn time-tested techniques for both quick maintenance between deep cleanings and the complete disassembly process that restores factory-fresh grinding performance—all achievable in under 30 minutes with common household tools.
Remove Coffee Grounds and Residue Before Cleaning
Begin your Fellow grinder cleaning process by eliminating loose debris that could interfere with disassembly. Unplug your grinder and run a final pulse with no beans to clear the grinding chamber of residual grounds. Tap the hopper gently to dislodge any beans clinging to the walls, then empty remaining beans into an airtight container for later use—never leave beans inside during cleaning as moisture exposure could compromise freshness.
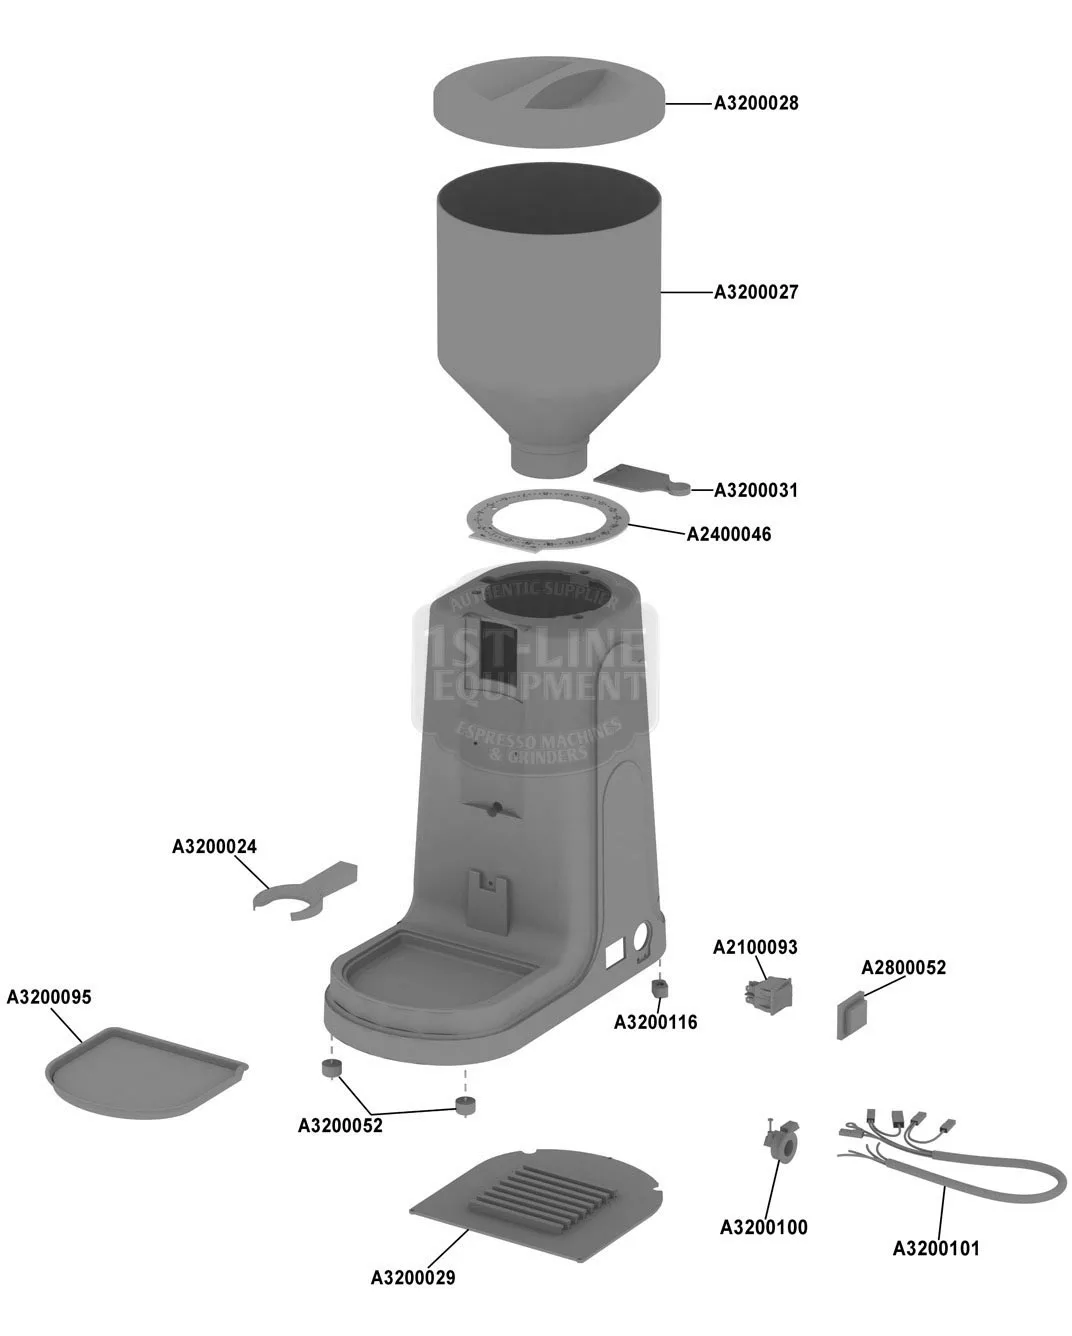
Remove the hopper by twisting counterclockwise until it releases from the grinding mechanism. On Fellow models like the Opus, you’ll notice alignment markers that help position the hopper correctly during reassembly. Set the hopper aside where it won’t collect dust or accidental spills. Next, detach the grounds container by lifting it straight off the base—most Fellow designs feature a magnetic or snap-fit connection that releases with gentle upward pressure.
How do you access hard-to-reach coffee particles?
Use compressed air or a handheld bellows to dislodge stubborn grounds trapped in crevices. Hold the nozzle at a 45-degree angle to the burr assembly, directing airflow downward to push debris toward the grounds chute rather than deeper into the mechanism. Apply short bursts rather than continuous streams to prevent static buildup that causes grounds to cling stubbornly to surfaces. For models with anti-static devices like the Fellow Bambu+, remove this component according to your manual before blowing out particles to ensure complete access.
What’s the fastest way to clear residual grounds?
The “rice method” provides a quick interim cleaning between deep sessions. Add one tablespoon of uncooked white rice to your hopper and grind as usual—the rice absorbs oils and carries away fine particles through the grinding mechanism. Immediately follow with compressed air to clear any rice fragments, then run two pulses of coffee beans to eliminate residual rice starch before brewing. This technique works particularly well for Fellow’s conical burr grinders but shouldn’t replace monthly deep cleanings.
Deep Clean Fellow Burrs Without Damage
The burrs represent your Fellow grinder’s most critical component and require careful cleaning to maintain precision grinding capabilities. Coffee oils polymerize over time, creating a sticky residue that dulls cutting edges and causes inconsistent particle distribution. This buildup directly impacts extraction quality—your espresso shots may pull too fast while pour-overs over-extract, all due to uneven grind size from contaminated burrs.
Start by using a dedicated coffee brush with stiff nylon bristles to scrub the burr surfaces. Hold the brush at varying angles to reach between the teeth, applying firm circular motions for at least two minutes per burr. Focus on the outer edges where coffee oils concentrate, but avoid excessive pressure that could damage the burr’s precision-machined surfaces. Rotate the upper burr manually if your Fellow model allows access—this reveals hidden residue pockets between grinding cycles.
Can you use water when cleaning Fellow burrs?
Never apply liquid directly to Fellow burrs as moisture causes steel components to rust and compromises the precise calibration essential for consistent grinding. Instead, use dry cleaning methods exclusively for burr maintenance. If you notice stubborn oil buildup that brushing won’t remove, consider specialized grinder cleaning tablets designed for burr grinders—these absorb oils without introducing moisture. Run one tablet through your grinder according to package instructions, then follow with thorough brushing and compressed air to remove any residual cleaning compound.
How often should Fellow burrs be deep cleaned?
Home users should deep clean Fellow burrs monthly under normal usage (1-2 coffees daily), while heavy users need bi-weekly maintenance. Commercial settings require weekly cleaning to maintain performance standards. Establish a visual indicator system—most Fellow grinders show noticeable darkening of the burr surfaces when cleaning becomes necessary. If you detect inconsistent grind texture or declining coffee quality before your scheduled cleaning, perform an immediate burr cleaning session as these indicate significant residue accumulation.
Clean Removable Components Properly
The grounds container and hopper require regular washing to prevent oil buildup that affects coffee freshness. Fellow’s stainless steel components resist staining but still absorb coffee oils over time, particularly in high-contact areas like the grounds chute and hopper base.
Wash the grounds container with warm water and mild dish soap, using a soft sponge to reach threaded connections where residue accumulates. Pay special attention to the magnetic connection points on Fellow models—clean these thoroughly to maintain strong adhesion during use. Rinse completely with distilled water to prevent mineral deposits, then air-dry upside down on a clean towel for at least two hours before reassembly. Never place Fellow grinder components in the dishwasher as high heat and harsh detergents can warp precision parts.
What’s the best way to clean Fellow’s anti-static components?
Models like the Bambu+ feature specialized anti-static devices that require gentle cleaning. Remove the component according to your manual’s instructions and wipe with a microfiber cloth dampened with 70% isopropyl alcohol. Avoid submerging these parts as liquid can damage the conductive elements essential for static reduction. Allow at least 30 minutes drying time before reinstallation—any moisture left in anti-static components will worsen static issues during grinding.
How do you remove stubborn oil stains from Fellow components?
For persistent oil residue on plastic or glass components, create a paste from baking soda and water. Apply gently with a soft cloth using circular motions, then rinse thoroughly. This method effectively breaks down polymerized coffee oils without scratching surfaces. For Fellow’s stainless steel parts, use a dedicated coffee equipment cleaner like Urnex Grindz that’s formulated specifically for grinder maintenance without damaging metal finishes.
Reassemble Your Fellow Grinder Correctly
Proper reassembly ensures your Fellow grinder maintains its factory calibration and performs consistently. Misaligned components create uneven grinding gaps that produce bimodal particle distribution—your coffee will contain both fines and boulders that ruin extraction quality.
Begin by reinstalling the anti-static component if your model includes one, ensuring proper orientation as indicated in your manual. The device should sit flush against the base without gaps or resistance. Next, attach the grounds container by aligning the magnetic points and pressing firmly until you feel secure adhesion—most Fellow containers produce a distinct “click” when properly seated.
Why does hopper alignment matter for Fellow grinders?
The hopper must align precisely with the grinding mechanism to maintain consistent bean flow. On Fellow Opus models, match the “0” indicator on the hopper with the corresponding mark on the grinder body. Incorrect alignment causes beans to bridge in the hopper or feed unevenly into the burrs, resulting in inconsistent grind size. Test the alignment by rotating the hopper clockwise until it locks—resist the urge to force it beyond this natural stopping point as over-tightening can strip internal threads.
How do you verify proper reassembly before brewing?
Run a “test cycle” with no beans to confirm correct assembly. Plug in your grinder and activate the grind function for 3-5 seconds. Listen for smooth, consistent operation without unusual grinding noises. If you hear irregular sounds, immediately unplug and check component alignment. Properly reassembled Fellow grinders operate with a distinctive rhythmic hum—any deviation indicates misalignment that requires disassembly and correction before brewing.
Establish a Fellow Grinder Maintenance Schedule

Consistent cleaning prevents performance degradation that occurs gradually between maintenance sessions. Most Fellow owners don’t notice declining quality until significant residue has accumulated—by then, flavor damage has already occurred in multiple brews.
Create a tiered maintenance routine: daily quick cleans, weekly intermediate maintenance, and monthly deep cleanings. After each use, wipe the hopper interior with a dry microfiber cloth to remove loose particles. Weekly, use compressed air to clear the grinding chamber and brush accessible burr surfaces. Monthly, perform the complete disassembly and cleaning process outlined in this guide. Heavy users should increase frequency to bi-weekly deep cleanings.
What are the warning signs your Fellow grinder needs immediate cleaning?
Pay attention to these critical indicators: inconsistent extraction times across brews, visible oil sheen on grounds, unusual grinding noises, or declining crema formation on espresso. These symptoms signal significant residue buildup that requires immediate attention before performance issues become permanent. Fellow’s precision engineering means even minor contamination affects results—you’ll notice flavor changes before visible residue appears.
How does regular cleaning extend Fellow grinder lifespan?
Proper maintenance prevents the three primary failure points in Fellow grinders: burr wear from abrasive residue, motor strain from increased resistance, and static buildup that disrupts grounds flow. Regular cleaning preserves the factory calibration that makes Fellow grinders exceptional, potentially doubling their operational lifespan. Owners who maintain strict cleaning schedules report consistent performance for 5+ years, while neglected grinders often show significant degradation within 18 months.
Your Fellow coffee grinder deserves the same attention you give to your brewing technique and bean selection. By following these specific cleaning procedures, you’ll maintain the precision engineering that makes Fellow grinders exceptional. Each cleaning session protects your investment and ensures every cup reflects the true character of your beans—no more mysterious flavor inconsistencies or disappointing extractions. Make this routine part of your coffee ritual, and you’ll taste the difference in your very next brew. The clean lines of your Fellow grinder should reflect the clean taste of your coffee—both achieve perfection through consistent care.


