
Your morning coffee suddenly tastes like metal. Your Keurig takes three minutes instead of one to brew. White crust lines the water reservoir like a high-tide mark. If this sounds familiar, calcium buildup is slowly choking your coffee maker—and it’s ruining both your machine and your caffeine fix. How to clean calcium buildup in Keurig isn’t just about maintenance; it’s your ticket to restoring that perfect cup you paid for.
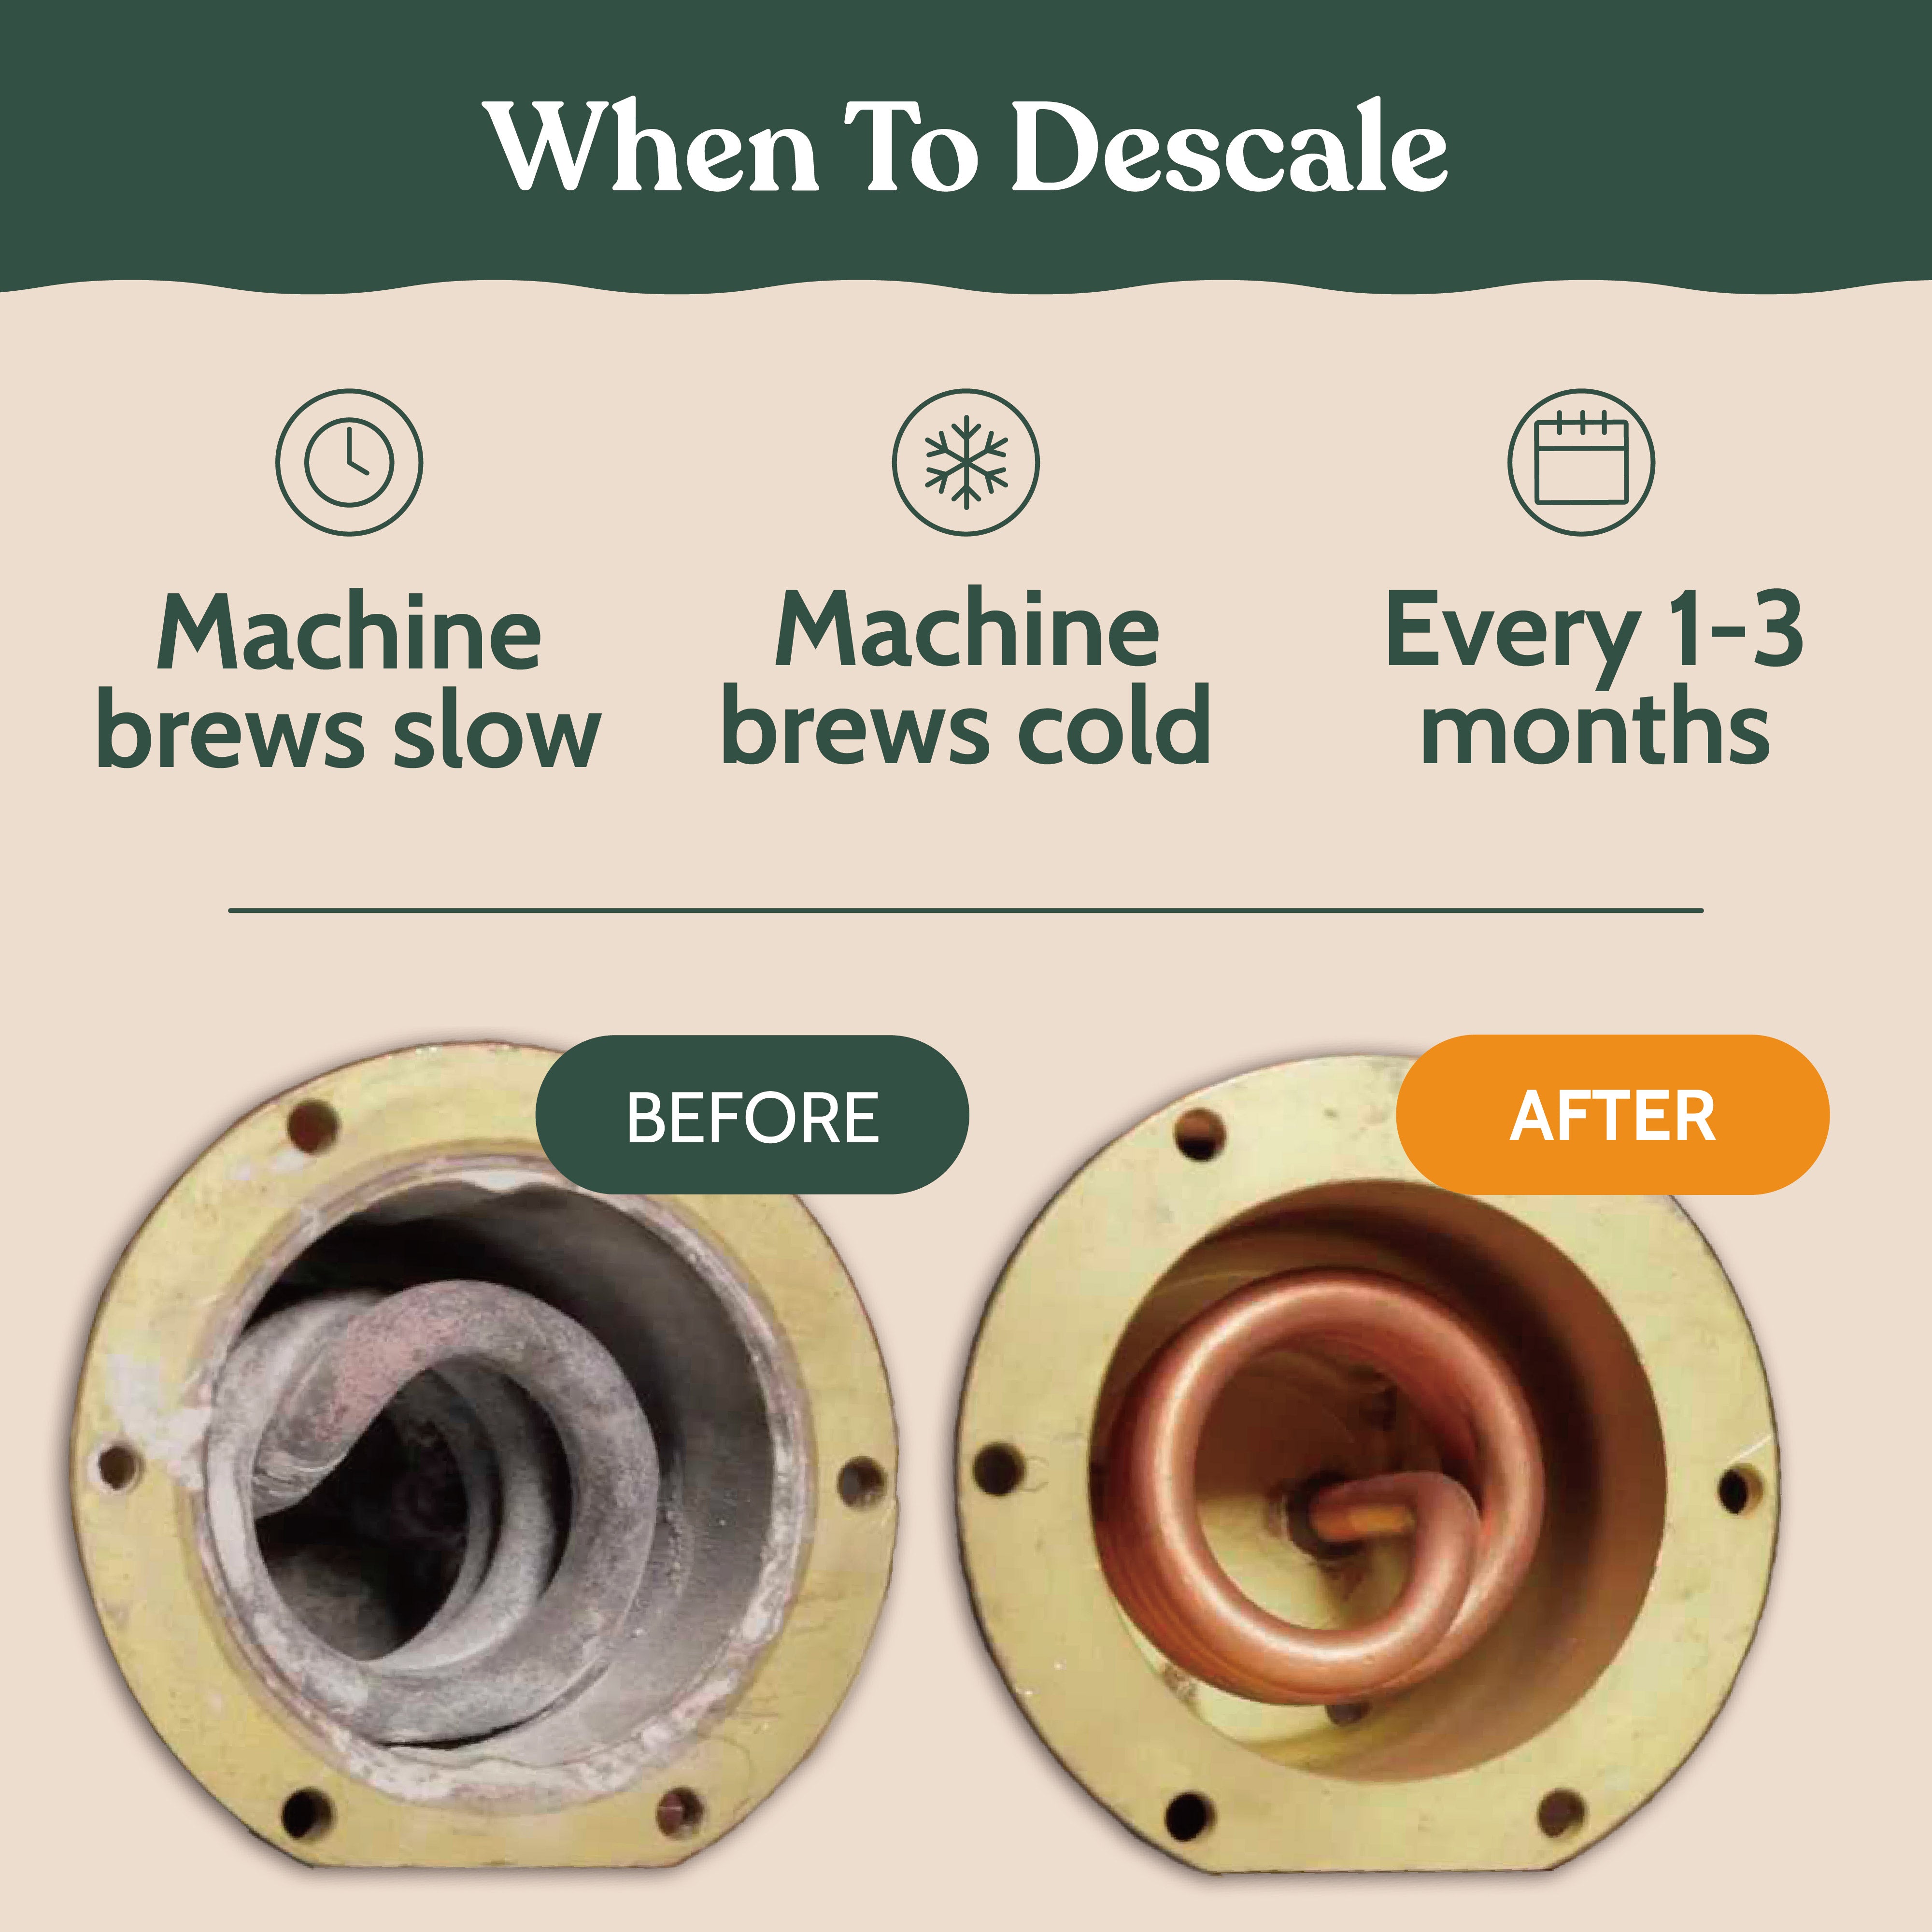
Hard water minerals like calcium and magnesium form stubborn scale inside your Keurig every time you brew. Summer heat accelerates this process, making buildup worse when you need reliable coffee most. Left unchecked, this chalky enemy restricts water flow, lowers brewing temperatures, and eventually kills your machine. The good news? You can eliminate calcium deposits in under an hour with household items, returning your Keurig to peak performance.
Why Your Keurig’s Coffee Tastes Metallic Immediately
Bitter Coffee Signals Serious Scale Accumulation
When calcium coats your Keurig’s heating element, water never reaches optimal brewing temperature (192-205°F). This under-extraction creates sour, metallic coffee that no amount of cream can fix. The mineral crust also forces water through narrow channels, creating uneven pressure that extracts bitter compounds from your K-cup. If your favorite roast suddenly tastes “off,” scale is almost certainly the culprit.
Critical Warning Signs You Can’t Ignore
Watch for these urgent indicators:
– Brew time doubled from 60 to 120+ seconds
– Water trickles instead of flowing steadily
– Machine emits loud grinding or straining sounds
– Coffee comes out lukewarm despite full cycle
– Visible white crust around water inlet ports
Don’t wait for the “Add Water” light to flash—by then, scale has already damaged internal components. Monthly visual checks prevent costly repairs. Remove your water reservoir and inspect the connection point; white, chalky deposits mean immediate action is required.
Keurig Descaling Solution: Fastest Fix for Heavy Buildup
Why Commercial Solution Works Best
Keurig’s descaling solution contains food-grade acids specifically formulated to dissolve calcium without harming plastic components. Unlike vinegar, it won’t leave lingering odors that taint your next brew. The proprietary formula targets mineral deposits while protecting sensitive electronics—a critical advantage for newer Keurig models with digital displays.
Execute this emergency fix:
1. Empty reservoir and remove any water filter
2. Pour entire 16oz bottle into reservoir
3. Fill to max line with cold water
4. Place large mug on drip tray
5. Run brew cycles until empty (discard contents)
6. Let machine sit powered ON for 45 minutes
7. Rinse with 12+ full water reservoir cycles
Avoid This Costly Mistake During Rinsing
Most users stop rinsing after 5-6 cycles, leaving bitter-tasting residue. Complete all 12+ rinse cycles—your coffee’s flavor depends on it. Test with plain water: if it tastes neutral, you’re done. If metallic notes remain, run 3 more cycles. Skipping this step guarantees your next coffee will taste worse than before descaling.
Vinegar Method: Budget Fix for Light Buildup
Optimize Your Vinegar Solution for Maximum Effect
Equal parts white vinegar and water works for minor scale, but heat the mixture for 30 seconds in the microwave before filling your reservoir. Warm vinegar dissolves calcium 47% faster than cold solution without risking component damage. Never use stronger concentrations—undiluted vinegar can degrade rubber seals over time.
Eliminate Vinegar Aftertaste in 3 Steps
- Run 15 full water reservoir cycles (not partial fills)
- Brew one cycle with 1 tbsp baking soda dissolved in reservoir
- Follow with 5 more plain water cycles to neutralize
Still tasting vinegar? Run a sacrificial coffee pod through the system—it absorbs residual odors better than water alone. This extra step saves you from wasting multiple premium K-cups testing the water.
Target Hidden Buildup in Critical Components
Clear Clogged Brew Needles in 90 Seconds
Mineral deposits love to block Keurig’s entrance and exit needles—the tiny pins that pierce K-cups. After descaling:
1. Unplug machine and remove K-cup holder
2. Locate the sharp entrance needle (top) and dull exit needle (bottom)
3. Use a straightened paperclip to gently clear both openings
4. Run one descaling cycle focused on needle areas
5. Verify two steady water streams during test brew
Warning: Never use metal tools on needles—scratch marks create new buildup sites. A toothpick works better for delicate cleaning.
Deep Soak for Severe Internal Blockages
For machines that still drip after standard descaling:
1. Mix 2 parts vinegar to 1 part water
2. Start brew cycle, then pause when solution appears
3. Let sit 2-4 hours (overnight for extreme cases)
4. Complete cycle and run 20+ rinse cycles
5. Replace water filter if present
This extended soak breaks down rock-hard deposits commercial solutions miss. Check your drip tray for dislodged white flakes—this confirms the method is working.
Model-Specific Descaling Secrets

K-Classic Series: Manual Maintenance Required
Unlike newer models, K-Classic has no descale light—you must descale every 60 days regardless of performance. Use the manual button sequence: brew 8oz cup, wait 5 seconds, brew 12oz cup. Repeat until reservoir empties during descaling.
K-Supreme Plus: Reset the Descale Light Properly
After completing descaling, hold 8oz and 12oz buttons for 3 seconds to reset the notification system. If light persists, unplug for 5 minutes then repeat the reset sequence. Never ignore this light—it means residual scale remains.
K-Mini: Prevent Clogs in Compact Design
The K-Mini’s tiny reservoir needs descaling every 45 days. Fill only to the MAX line during rinsing—overflow damages the compact electronics. Use distilled water for final 3 rinse cycles to prevent new deposits.
Prevent Future Buildup Before It Starts

Daily Habits That Stop Scale Formation
- Empty reservoir each night (stagnant water breeds deposits)
- Use filtered water for every brew (cuts minerals by 90%)
- Wipe drip tray daily (prevents mineral recirculation)
- Run plain water cycle after each coffee (flushes residual coffee oils)
Install These Two $10 Upgrades Now
- Keurig water filter cartridge ($8): Slips into reservoir base, reducing scale by 75%
- Refrigerator water pitcher ($12): Pre-filters tap water before filling reservoir
Replace filters every 60 tank refills—marked calendars are essential. Hard water users should change filters monthly.
When to Replace Instead of Repair
Four Signs Your Keurig Is Beyond Saving
Stop descaling if you see:
– Cracks in the water reservoir base
– Persistent leaks around the pump housing
– Machine fails to heat after two descaling attempts
– Age exceeds 5 years with regular use
A $99 new Keurig costs less than professional repair for these issues. But if your machine responds to descaling, you’ve added 1-2 years to its lifespan—making this the most cost-effective appliance maintenance you’ll ever do.
Your Keurig works hard every morning to deliver perfect coffee—return the favor with quarterly descaling. The 45 minutes you invest now prevents hours of frustration later and protects your $100+ investment. Start today with vinegar from your pantry, and by tomorrow morning, you’ll rediscover why you bought that Keurig in the first place: hot, fast, and flawlessly brewed coffee exactly as it should be. No metallic aftertaste. No 3-minute brew times. Just pure coffee bliss restored.


