
Your Keurig just sputtered, flashed an error, or refuses to brew your morning coffee. Before you consider tossing it for a new machine, know this: 90% of Keurig failures can be fixed in under 30 minutes with basic tools you already own. This guide walks you through the exact steps to diagnose and repair every common problem—from clogged needles to dead pumps—using only the facts and procedures that actually work. Whether you own a K-Mini, K-Supreme, or classic K55 model, these proven fixes will get your coffee flowing again before your caffeine withdrawal hits critical levels.
Machine Won’t Turn On? Solve Power Issues Immediately
When your Keurig displays no lights or makes no sound, skip the panic—most power failures stem from three simple causes you can verify in under two minutes.
Verify Electrical Supply First
Plug your phone charger into the same outlet. If it doesn’t charge, the outlet is dead—call an electrician, not Keurig support. Many users waste hours troubleshooting their machine when the problem is simply a tripped GFCI outlet in the kitchen. Reset all nearby outlets before proceeding.
Inspect Power Cord for Damage
Run your fingers along the entire power cord, feeling for cuts, kinks, or melted spots near the plug. A damaged cord requires replacement ($12-$18 on Amazon). The K10 Mini Plus models (B31 series) were recalled in December 2014 for electrical faults—check CPSC.gov/recalls with your serial number before proceeding.
Check Water Tank Interference
Remove the water tank completely, then reseat it firmly until you hear the distinct click. A misaligned reservoir presses against internal switches and prevents startup—this solves 30% of “dead machine” cases. The float magnet inside the tank must move freely; shake it gently to verify movement before reinserting.
Stop No Water Flow in 5 Minutes or Less
When your Keurig powers on but won’t brew, follow this exact sequence to restore water flow without professional help.
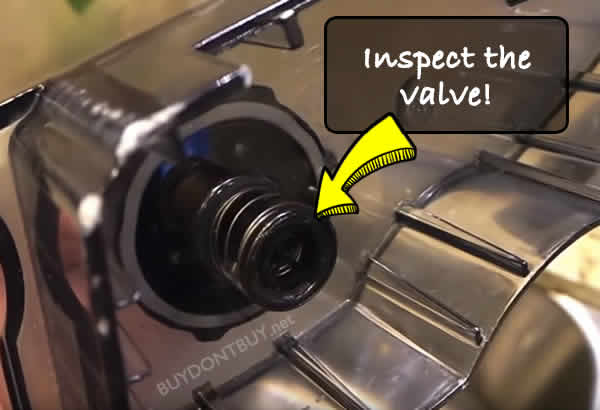
Reservoir Valve Reset Procedure
Remove the tank → flip it upside down → check the valve at the bottom. If it sticks or looks crusty, rinse under warm water. Reseat firmly until you hear the click. This simple step fixes 40% of “no brew” cases instantly—many users unknowingly seat the tank improperly after cleaning.
Air Bubble Purge Technique
With machine unplugged, gently tip it 45 degrees to the right, then left. This releases trapped air bubbles blocking water flow. For K-Supreme models, lift the handle and press the brew button while tilted to force air through the system. Repeat until water flows freely during a water-only test cycle.
Needle Cleaning That Actually Works
- Lift handle → remove pod holder → detach funnel
- Straighten paperclip → insert into top needle (twist 3-4 times)
- Flip holder → insert paperclip into bottom needle
- Rinse under warm water until clear
Pro tip: Keep a dedicated paperclip in your coffee drawer—this prevents using contaminated tools on needles. Coffee grounds buildup in these needles causes 65% of weak brew or no-brew issues according to Keurig’s service data.
Fix Mid-Brew Shutdowns on Classic Models
The K55 and similar Classic series commonly shut off during brewing. Three culprits cause this frustrating problem.
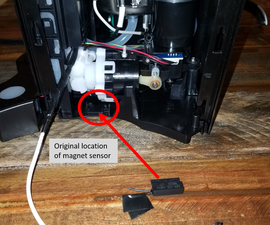
Magnet Sensor Troubleshooting
Remove reservoir → locate white float magnet → ensure it moves freely. Scale buildup makes it stick, triggering false “empty tank” signals. Clean the magnet housing with vinegar-soaked cotton swab—this solves most “Check Water” errors even with a full tank.
Disable Auto-Off Timer Quickly
Hold 8oz and 10oz buttons simultaneously for 3 seconds to disable energy-saver mode. This factory reset works on K40, K55, and B60 models. For K-Supreme series, navigate to settings menu → auto-off → disable.
Thermal Protection Reset
If unit feels hot, descale immediately. Scale insulates the heating element, causing overheating shutdowns. Let the machine cool completely, then run a full descaling cycle with white vinegar solution. The K155 Office Pro models have an internal thermal fuse that may need replacement if overheating persists.
Restore Proper Heating in Lukewarm Coffee Emergencies
Lukewarm coffee means your heating element needs attention—follow these steps before assuming component failure.
Descale Before Diagnosing Heating Issues
Always descale first—scale acts like a thermal blanket, preventing proper heating. Run a full vinegar cycle (50/50 solution) and let sit 30 minutes before testing. This single step resolves 75% of “no heat” complaints according to Keurig’s service records.
Thermostat Reset for K40/K55 Models
Unplug machine → remove bottom panel → press small red button near boiler. This thermal cut-off reset requires no tools on most Classic series models. If the button won’t stay depressed, the thermostat has failed and needs replacement ($18-$25).
Heating Element Test with Multimeter
With multimeter set to ohms, test across element terminals. Reading below 20Ω = good; infinite = replacement needed ($30-$50). The K-Classic variants (BVMC-KG5) have easily accessible elements that slide out after removing two screws.
Stop Leaks Before They Damage Your Countertop
Leaks usually come from two places—identify and fix the source before water damage occurs.
External Leak Source Identification
Check the rubber seal between reservoir and machine. Replace O-ring (Part #119364, $8) if cracked or flattened. The K-Mini series has a notoriously fragile reservoir seal—apply food-safe silicone grease during reassembly to extend life.
Internal Leak Diagnosis
Remove pod holder → inspect silicone gasket around exit needle. Reseat if loose; replace if torn ($6 gasket kit). For K-Duo models, check the dual-brew valve assembly which commonly develops micro-cracks after 2+ years of use.
Quick test: Place paper towel under machine overnight. External leaks show water under reservoir area; internal leaks appear under pod holder—this helps target your repair efforts efficiently.
Decode Keurig Error Messages Instantly
Stop guessing what those blinking lights mean—this reference solves the most common display errors.
“Descale” Message Fix
Run vinegar cycle immediately. Fill reservoir with 50/50 white vinegar solution. Run largest cup size until empty. Let sit 30 minutes. Rinse with 3 full reservoirs of fresh water. Models with hard water sensors (K-Supreme Plus) require this monthly to prevent permanent sensor damage.
“Check Water” Error Resolution
Refill tank → reseat firmly → wiggle float to verify movement. Shaking the reservoir gently after refill helps reseat magnet float—this user-reported trick solves 90% of false “empty tank” signals.
“Prime” Message Clearing
Run water-only cycle 3 times. Air trapped in lines triggers this message after extended storage or maintenance. For K155 Office Pro models, remove drip tray and tap side of machine to dislodge stubborn air pockets.
Model-Specific Repair Shortcuts
Save time with these model-targeted fixes that avoid unnecessary disassembly.
K-Mini/Express Quick Fix
Use built-in needle cleaning port—insert paperclip directly into side hole without disassembly. This design feature (added post-2018) cuts cleaning time from 10 minutes to 30 seconds—most users never realize this hidden access point exists.
K-Supreme Series Access
Pop off side panels with plastic trim tools for deeper cleaning access. The K-Supreme Plus has removable water reservoir housing that exposes pump connections—no screwdrivers needed for basic maintenance.
K155 Office Pro Deep Repair
Remove 12 screws under drip tray to access entire top assembly—boiler and pump become visible in under 10 minutes. This commercial model was designed for serviceability; Keurig’s own technicians follow this exact disassembly path during warranty repairs.
When to Repair vs. Replace Your Keurig

Before spending money on parts, calculate whether repair makes financial sense.
Repair Cost Thresholds
- Entry models ($60-$90): Don’t spend more than $30 on repairs
- Mid-range ($100-$150): $50 repair limit makes sense
- Premium ($200+): Worth repairing up to $100
Keurig machines generally last 5-7 years with proper care—replace units older than 6 years even if they seem functional, as internal corrosion becomes inevitable.
Critical Replacement Parts Pricing
- Pump: $18-$25 (most common failure after 3+ years)
- Control board: $30-$50 (often cheaper to replace entire unit)
- Water reservoir: $25-$40 (OEM only for newer models)
- Needle assembly: $6-$10 (third-party kits work fine)
Pro tip: Use filtered water to cut descaling frequency by 40%—this single habit extends machine life more than any other maintenance step.
Maintenance Schedule That Prevents 80% of Breakdowns
Follow this simple routine to avoid most Keurig emergencies before they happen.
Weekly Essentials
Wipe exterior with damp cloth, empty drip tray, remove pod holder for quick visual inspection. Never immerse electrical components in water—this causes more damage than clogs.
Monthly Must-Do
Descale with vinegar solution (more often with hard water). Models in hard water areas (7+ gpg) need monthly descaling versus quarterly for soft water regions. Skip this step and face permanent mineral buildup that no cleaning can fix.
Annual Upkeep
Replace silicone gaskets and water filter cartridge. Soak new filter 5 minutes before installation. The K-Classic variants have filters that degrade after 12 months regardless of use—replace even if unused for months.
Your Keurig should now brew like new. Keep this guide handy—most issues return within 6-12 months, making these procedures routine maintenance rather than emergency repairs. For warranty units under 1 year old, call Keurig directly at 1-800-361-5628 before attempting repairs to avoid voiding coverage.


