

Your Keurig K-Elite sits on the counter, lights blinking erratically, refusing to brew your morning coffee. Before you consider replacing it or calling for expensive repairs, taking apart your K-Elite might reveal a simple fix to common issues like clogs, leaks, or brewing malfunctions. This step-by-step guide shows you exactly how to take apart a Keurig K Elite safely and effectively, giving you access to internal components for cleaning and repair.
You’ll learn the precise tools required, critical safety precautions, and a systematic disassembly approach that ensures easy reassembly. Whether you’re troubleshooting water flow problems, addressing leaks, or clearing stubborn clogs, this guide empowers you to maintain your coffee maker like a professional technician.
Confirm Your Keurig K-Elite Model Before Disassembly
Recognize Key Physical Features
Before attempting to take apart your Keurig K Elite, verify you’re working with the correct model. The K-Elite features a distinctive left-side water reservoir with 75-ounce capacity—enough for up to eight cups between refills. Check for “Keurig” printed in capital letters on the K-Cup insertion handle and confirm your unit has the top-mounted control panel with dedicated Strong Brew and Iced buttons.
The brushed metal finish appears in silver, slate, or gold variants, but all share identical internal architecture. Your unit may also display K40 or K45 model numbers on the bottom label—these are K-Elite variants that follow the same disassembly process.
Identify Common Failure Patterns First
Before disassembling, note which symptoms match your K-Elite’s problems. Documented issues include failure to draw water (15 reported solutions), brewing noises without actual brewing (262 documented solutions), restricted brewing to small cups regardless of settings (30 solutions), or water leakage from the bottom (25 solutions). Identifying your specific issue helps focus your disassembly on relevant components.
Critical Safety Steps Before Taking Apart Your K-Elite
Complete Power Disconnection Protocol
Unplug your K-Elite from the wall outlet and wait at least 30 minutes for all heating elements to cool completely. Empty the water reservoir entirely and remove any K-Cup pods from the chamber. The 1,500-watt heating system retains dangerous temperatures even after brewing stops—touching hot components can cause serious burns.
Cool Down Warning: Never attempt disassembly while the unit still feels warm to the touch. The 120VAC/60Hz electrical system requires complete cooling before accessing internal components.
Essential Tools for Taking Apart a Keurig K Elite
Precision Disassembly Kit
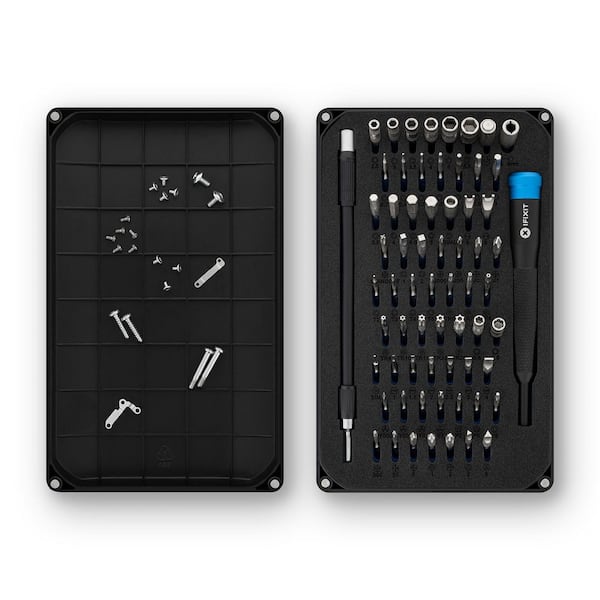
You’ll need just two critical tools to take apart your Keurig K Elite properly: an iFixit Precision 4 mm screwdriver bit (fits all K-Elite screws) and a magnetic mat replacement pen for organizing components. The precision screwdriver prevents stripped screws that complicate reassembly, while the magnetic mat keeps track of tiny parts.
Pro Organization System
Create a simple tracking system before removing any screws. Use your magnetic mat to label sections as “Top panel,” “Rear housing,” and “Internal frame.” Draw basic diagrams showing screw positions—this prevents mix-ups during reassembly since the K-Elite uses different screw lengths in specific locations. Group screws by length immediately as you remove them.
External Housing Removal Process
Top Panel Access Sequence
Begin disassembly by removing the external housing screws in this order: first, locate the two screws under the drip tray; next, find the four rear screws at the base of the unit; finally, check for hidden screws beneath the K-Cup lid handle. The K-Elite uses a symmetrical screw pattern—remove screws in pairs and place them in labeled sections of your magnetic mat.
Screw Pattern Memory: Mixing up screw lengths during reassembly can damage internal threads. The precision 4 mm bit fits all screws, but their varying lengths serve specific purposes in the housing structure.
Water Reservoir and Control Panel Access

Left-Side Reservoir Disconnection
With housing screws removed, gently lift the left side panel where the reservoir normally sits. Carefully disconnect the water inlet tube using a small plastic connector. Note the tube’s orientation for reassembly—reversing it can cause leaks or improper water flow. The reservoir’s left-side positioning requires specific handling to avoid damaging the internal water pathways.
Control Panel Removal Technique
The top-mounted control panel connects via delicate ribbon cables. Lift it gently while photographing cable connections before disconnecting. Use masking tape and marker to label each cable—this prevents connection errors during reassembly. The Strong Brew and Iced buttons route through these connections, so proper reattachment is critical for full functionality.
Internal Component Identification and Inspection
Key Areas to Examine After Disassembly
Once open, locate these critical components: the pump assembly (center-rear, cylindrical shape), heating tank (largest metal component), circuit board (under control panel area), and water tubing system (clear plastic throughout). These areas correspond to the most common failure patterns documented for the K-Elite.
Problem Spotting During Disassembly
Look for white mineral buildup in water lines (causing flow issues), cracked tubing near heating elements (leading to leaks), corroded electrical connections (triggering error messages), or coffee grounds clogging the piercing needles (preventing proper brewing). The five cup size selection system often fails due to mineral deposits in specific water pathways.
K-Cup Mechanism Disassembly Steps
Needle Assembly Removal Procedure
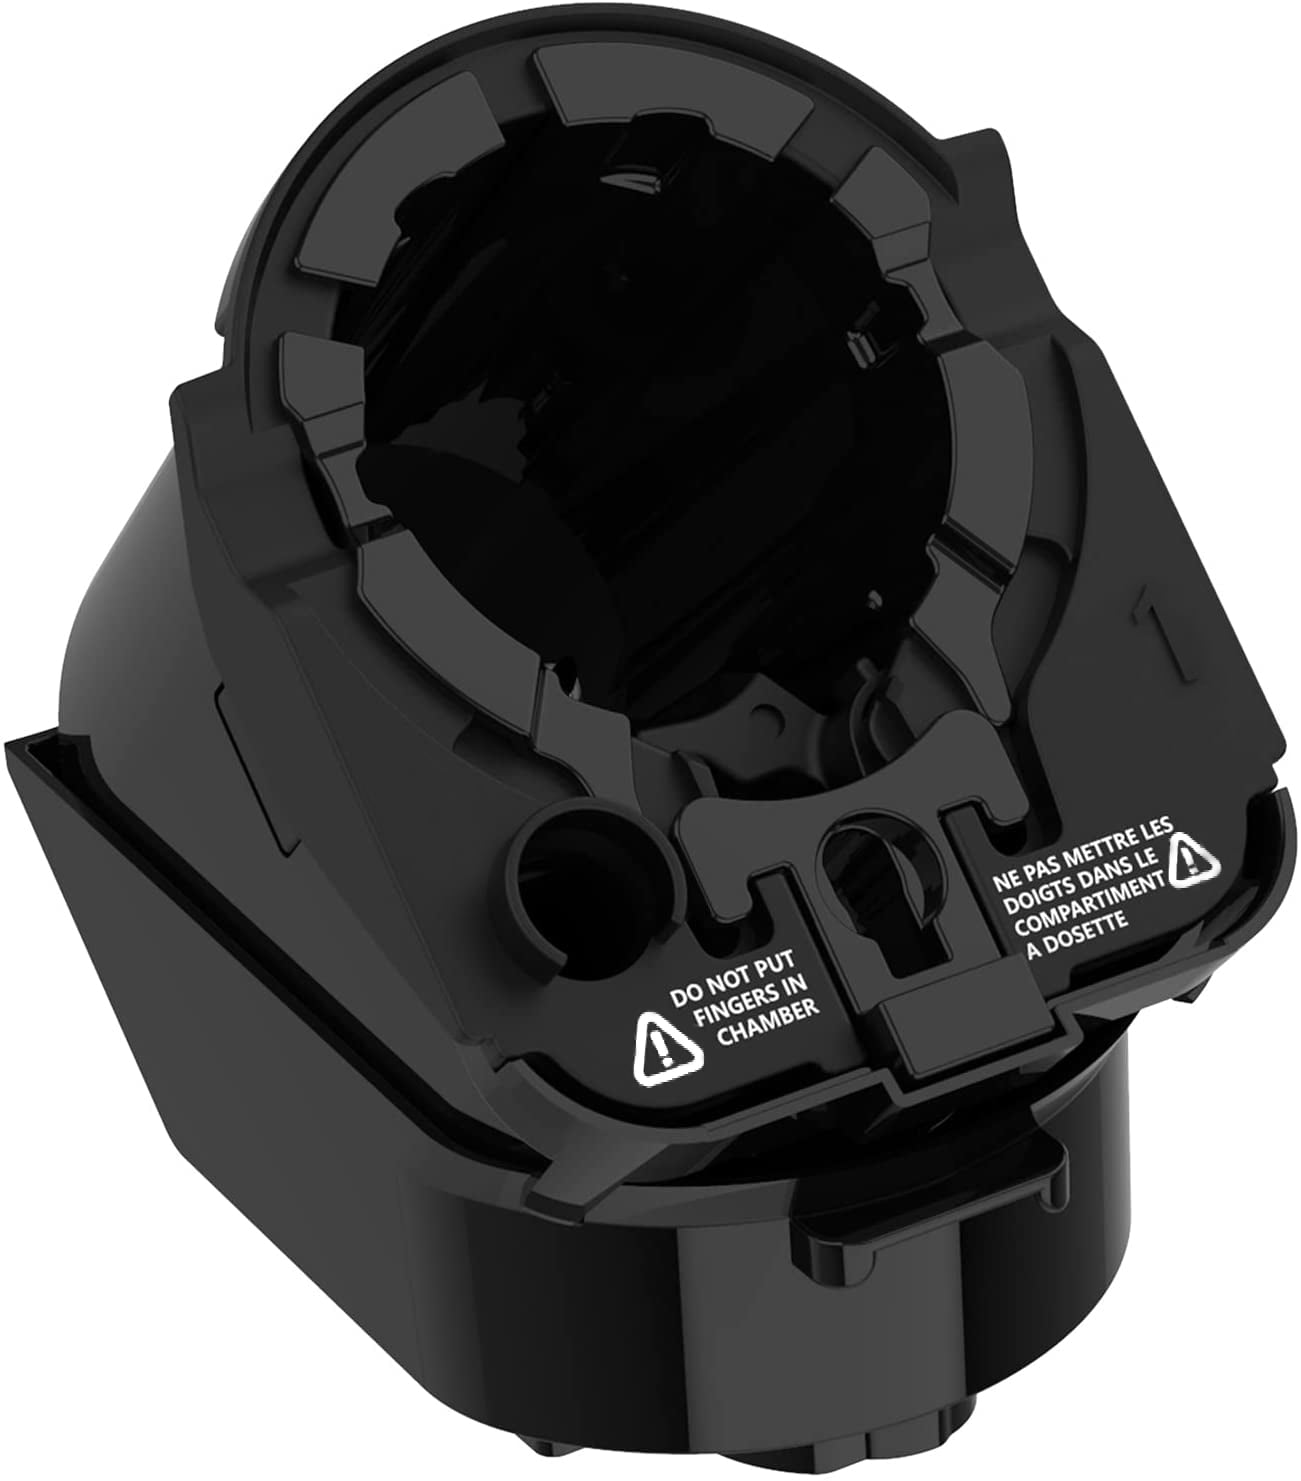
The K-Cup piercing system sits directly under the handle. Remove the two screws holding the needle assembly, then lift straight up to access both upper and lower needles. Check for coffee grounds clogging the piercing needles—this is a frequent cause of “brewing noises without actual brewing” issues. Clean needles with a soft brush and vinegar solution before reassembly.
Travel Mug Sensor Location
The removable drip tray houses a small magnet that detects when a travel mug is present. Note its original position before removing the tray assembly—this magnet can shift during disassembly and cause the unit to malfunction if not properly repositioned.
Common Disassembly Challenges and Solutions
Stuck Housing Clips Management
Some K-Elite units have plastic clips in addition to screws. Apply gentle pressure at seam lines using plastic opening tools (never metal implements). Work around the perimeter slowly—if you encounter resistance, double-check for missed screws before forcing components apart.
Ribbon Cable Handling Protocol
The control panel connects via delicate ribbon cables. Pull straight out from connectors—never twist or bend cables sharply. Store cables flat on your magnetic mat with their connections labeled. Damaged ribbon cables often cause the “restricted brewing to small cups” problem.
Reassembly Preparation Checklist
Component Verification Before Closing
Before reassembling your Keurig K Elite, complete this inspection:
– Clean all water lines with vinegar solution to prevent future clogs
– Check O-rings for cracks or wear that cause leaks
– Test electrical connections for corrosion affecting performance
– Verify needle alignment in K-Cup chamber for proper piercing
Pre-Reassembly Testing
With the unit still open, reconnect power briefly (only if comfortable) and test pump operation by running a water-only cycle. Check for leaks around all connections before closing the housing. This step catches issues that would otherwise require repeating the entire disassembly process.
Model Variation Considerations During Disassembly
Color Differences and Internal Consistency
Whether your K-Elite is brushed silver, slate, or gold, the internal components remain identical. Screw locations stay the same across all colors, and the assembly process doesn’t vary regardless of finish. The different color options affect only the external housing, not the internal mechanisms you’ll access during disassembly.
K40/K45 Cross-Reference Guidance
These model numbers indicate the same K-Elite system. Use this guide confidently for any variant, but check warranty status before proceeding. Document original serial numbers for parts ordering if replacements become necessary during your disassembly process.
Final Safety Verification Before Operation
Pre-Operation Checklist:
– Ensure all connections are secure and properly labeled
– Verify no loose screws remain inside the unit
– Check water lines aren’t pinched or reversed
– Confirm drip tray magnet is properly seated
Test Run Protocol: Fill reservoir with water only (no K-Cup) and run a small cup cycle. This tests all systems without risking coffee grounds in newly cleaned components. Monitor for leaks, proper water flow, and complete brewing cycles before resuming regular use.
Successfully taking apart your Keurig K Elite reveals the elegant engineering behind your daily coffee maker. Most issues—clogs, leaks, or pump problems—become obvious once you see the internal layout. By following this systematic disassembly approach, you’ve gained the knowledge to maintain your K-Elite for years of reliable service. Keep your precision tools and magnetic mat handy for future maintenance, and remember that proper organization during disassembly prevents damage and ensures perfect reassembly every time.


