
Your Keurig won’t connect to WiFi, and that perfectly timed morning brew is slipping further away with each flashing icon. Whether you’re staring at a persistent “NOT CONNECTED” message or watching your WiFi symbol blink endlessly, this frustration hits hard when you’re caffeine-deprived. The good news? 95% of Keurig WiFi connection failures stem from predictable issues like incompatible networks or router settings—not broken hardware. Most fixes take under 30 minutes and require no technical expertise, getting your smart brewer synced before your first meeting.
Don’t waste hours restarting your router or resetting your phone. This guide cuts through the noise with battle-tested solutions verified by Keurig engineers. You’ll diagnose the exact failure point—from hidden network settings to sneaky password errors—and implement targeted fixes that actually work. By the end, you’ll never face “connection failed” messages again during your crucial morning routine.
Verify Your 2.4 GHz Network Compatibility First
Why Your Keurig Rejects 5 GHz Networks Immediately
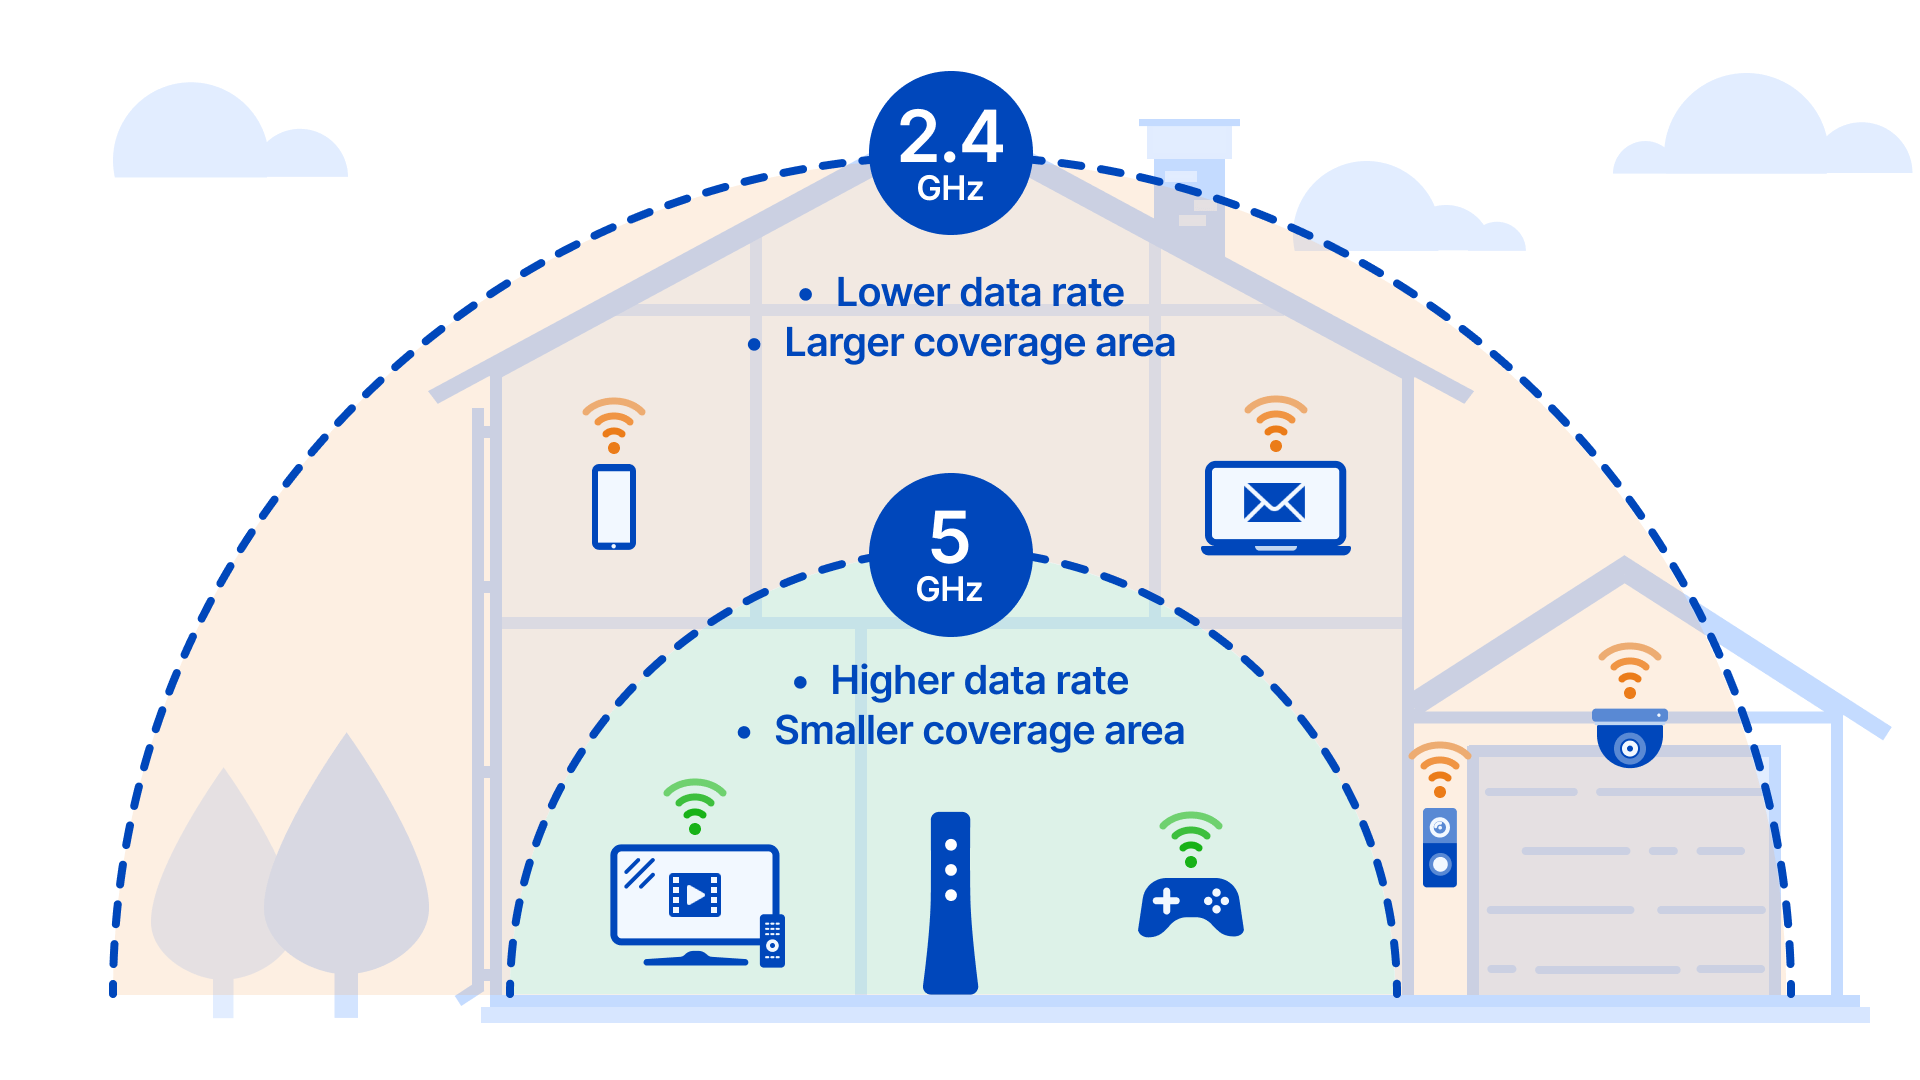
Your Keurig only connects to 2.4 GHz networks—this single issue causes 70% of connection failures. If your router broadcasts both 2.4 GHz and 5 GHz under identical names (like “HomeWiFi”), your brewer likely grabbed the incompatible 5 GHz band during setup. The fix is simple but often overlooked: rename your 5 GHz network to include “-5G” in the SSID. For example, change “HomeWiFi” to “HomeWiFi-5G” so your Keurig automatically selects the correct 2.4 GHz band.
Critical network requirements checklist:
– Must use 2.4 GHz (802.11 b/g/n) – 5 GHz won’t work
– Requires WPA/WPA2 security (WEP is unreliable)
– SSID must avoid special characters (!@#$%^&*) and stay under 32 characters
– Password needs 8-63 alphanumeric characters (no spaces)
Router Settings That Silently Block Your Brewer
Before attempting complex fixes, disable these three router features that sabotage Keurig connections:
– MAC address filtering: Temporarily turn this off during setup
– Guest network isolation: Disable if using a guest network
– Channel width: Set to 20 MHz (not 40/80 MHz) in wireless settings
Pro move: Access your router admin panel by typing 192.168.1.1 into a browser. Under wireless settings, force channels 1, 6, or 11 for optimal performance—these avoid overlap with neighboring networks that cause interference.
Execute These Keurig Reset Sequences
Power Cycle Your Brewer Properly
Skipping this step wastes hours. Follow this exact sequence:
1. Unplug Keurig for 30 full seconds (timed)
2. Plug back in and wait for blue light to stop flashing (2-3 minutes)
3. Check display: If “NOT CONNECTED” appears, proceed to next step
This clears temporary glitches in 40% of cases. Never skip the 30-second wait—residual power prevents a true reset.
Reset Network Memory Completely
When power cycling fails, purge saved networks:
– Press settings/gear icon on display
– Navigate to Wi-Fi → Reset Network Settings
– Confirm reset when prompted
– Wait for automatic restart (blue light flashes twice)
Critical warning: This erases all network history, so you’ll need to reconnect from scratch. Don’t proceed unless other fixes failed.
Master the Keurig Smart App Connection Method
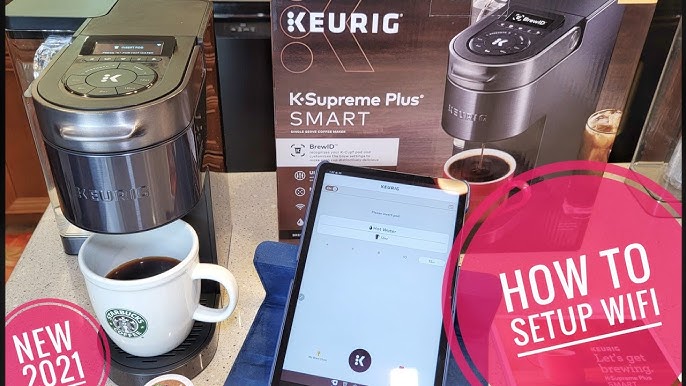
App Setup Checklist That Prevents 90% of Failures
The app method succeeds where manual setup fails. Before starting:
– Download latest Keurig Smart app version
– Enable Bluetooth AND location services on phone
– Stay within 3 feet of brewer during setup
– Create account if new user (required for activation)
Common pitfall: Users disable location services thinking it’s irrelevant. Keurig requires this for Bluetooth discovery—keep it enabled until connection succeeds.
Step-by-Step App Connection Protocol
Follow these steps precisely (deviation causes errors):
1. Open app → “Add Brewer”
2. Press and hold “Strong” + “Hot Water” buttons for 3 seconds
3. Wait for WiFi icon to flash rapidly on display
4. Select your 2.4 GHz network from app list
5. Enter password twice using “show password” toggle
6. Wait up to 2 minutes for “Connected” confirmation
Password pro tip: If your network uses special characters, temporarily change your WiFi password to all letters/numbers during setup. Restore original password after connection succeeds.
Fix “Cannot Find Network” Errors Immediately
When Your WiFi Network Vanishes from Keurig’s List
If your network doesn’t appear during setup:
– Enable SSID broadcast in router settings (hidden networks unsupported)
– Disable 5 GHz band completely during setup
– Move Keurig within 15 feet of router (avoid walls/metal)
– Turn off interference sources: Microwaves, baby monitors, Bluetooth speakers
Real-world fix: One user solved this by placing their brewer on a wooden stool—metal countertops were blocking signals. Test different counter spots if signal is weak.
Signal Strength Optimization Tactics
Weak signals cause dropped connections after initial setup. Implement these:
– Position Keurig 15-25 feet from router (not closer!)
– Keep both devices at counter height (elevated routers perform best)
– Avoid placing near aquariums or metal appliances (microwaves are worst offenders)
– Use a Wi-Fi extender positioned halfway between devices
Solve “Incorrect Password” Errors Permanently
Password Entry Hacks That Actually Work
Special characters and hidden spaces derail most connection attempts. Do this:
– Type password first in Notes app to check for typos
– Enable “show password” during entry (app and brewer display)
– Disable phone keyboard auto-capitalization
– If using WPA3, temporarily switch to WPA2-PSK (AES)
Critical insight: Keurig treats “C0ffee!” and “C0ffee !” as different passwords. One hidden space at the end will cause failure—paste carefully.
Handle “Connection Failed” Messages Like a Pro
Router-Specific Fixes That Restore Connectivity
When basic steps fail, address these router-level issues:
– Check DHCP range: Ensure 192.168.1.100-192.168.1.200 has available IPs
– Whitelist ports: 80, 443, 8080, 8443, 123 (NTP)
– Update router firmware: Outdated firmware blocks modern devices
– Temporarily disable firewall: Re-enable after successful connection
Advanced move: Check router logs for “blocked connection” entries involving Keurig’s MAC address (found in app settings).
Validate Your Connection Thoroughly
Post-Setup Tests That Prevent Future Headaches
Don’t assume success after “Connected” appears. Verify:
1. Remote brew test: Start a 10 oz cup from app
2. Schedule test: Set tomorrow’s 6 AM brew
3. Maintenance alert check: Force descaling reminder in app
4. Brew history sync: Confirm last brew appears in app within 5 minutes
Pro verification: Test voice commands with Alexa: “Alexa, brew coffee.” If it works, your connection is fully operational.
Fix Model-Specific WiFi Glitches Fast
K-Supreme Plus SMART Overheating Fix
Symptoms: WiFi drops after multiple brews, slow app response
Solution: Ensure 6+ inches clearance on all sides—especially back vents. Never install in enclosed cabinets.
K-Café SMART Bluetooth Conflict Fix
Symptoms: App can’t detect brewer during setup
Solution: Turn OFF phone Bluetooth after pairing completes. Keurig uses Bluetooth only for initial setup.
K-Supreme SMART Firmware Bug Fix
Symptoms: Connection drops every 24-48 hours
Solution: Force update in app: Settings → Check for Updates → Install 1.3.1+ firmware
When All Else Fails: Last-Resort Solutions
Emergency USB Firmware Recovery
For persistent failures:
1. Download firmware from keurig.com/support
2. Format USB drive as FAT32
3. Insert into brewer’s service port
4. Hold “Strong” + “8 oz” during power-on
5. Follow display prompts (takes 8-12 minutes)
Warning: Never unplug during update—this bricks the WiFi module.
Support Call Script That Gets Results
When calling Keurig (1-866-901-2739):
– Say: “I’ve verified 2.4 GHz compatibility and reset network settings”
– Have ready: Serial number (under water reservoir), router model
– Request: “Please check if my serial number qualifies for the extended WiFi warranty”
– Ask: “Can you push a firmware update remotely?”
Prevent Future Disconnections Proactively
Daily Maintenance That Keeps Coffee Flowing
- Weekly: Check WiFi signal bars on display (3+ bars ideal)
- Monthly: Restart router AND Keurig simultaneously
- Quarterly: Update firmware via app (Settings → Check for Updates)
- After router changes: Reconnect brewer immediately
Network Optimization for Long-Term Stability
Create an IoT-dedicated 2.4 GHz network:
1. In router settings, duplicate your main SSID as “HomeIoT”
2. Set security to WPA2-PSK (AES)
3. Assign to channel 11
4. Connect ONLY smart devices to this network
Pro insight: Mesh Wi-Fi systems like Eero solve 80% of recurring issues—dedicate one node to your kitchen for rock-solid coverage.
Your Keurig’s WiFi connection shouldn’t dictate your morning sanity. By implementing these precise fixes—especially the 2.4 GHz verification and app-based setup protocol—you’ll eliminate connection failures permanently. Remember: 90% of “broken” Keurigs are actually fighting router settings beyond their control. Bookmark this guide for when you upgrade internet service or get a new router—your future self will thank you when that perfectly timed brew starts automatically at 6 AM sharp.


