

You pour your morning coffee and notice tiny black particles floating on the surface. These mysterious specks in your Keurig aren’t just unappetizing—they signal a brewing system problem that demands immediate attention. Whether you’re seeing rubber fragments from a failing seal or mold colonies from poor maintenance, these specks indicate your machine needs urgent care.
This guide walks you through identifying the exact source of black specks in your Keurig and provides step-by-step solutions to restore your coffee’s purity. You’ll learn to distinguish between harmless debris and health-threatening contamination while implementing a systematic approach to eliminate the problem completely.
Identify Your Black Speck Source Immediately
Determine If You’re Dealing With Rubber Seal Fragments
Your Keurig’s brew needle contains a rubber seal that wears down over time, creating black specks that float in your coffee. These particles typically appear as irregular, 1-3mm fragments that feel rubbery when touched. If you notice specks increasing after each brew cycle or clustering near the cup’s center, you’re likely facing seal deterioration.
How to confirm rubber seal failure:
– Specks remain intact when stirred (unlike coffee grounds)
– Particles appear consistently across multiple brews
– Machine age exceeds 18 months with daily use
– Specks sink to the bottom rather than dissolving
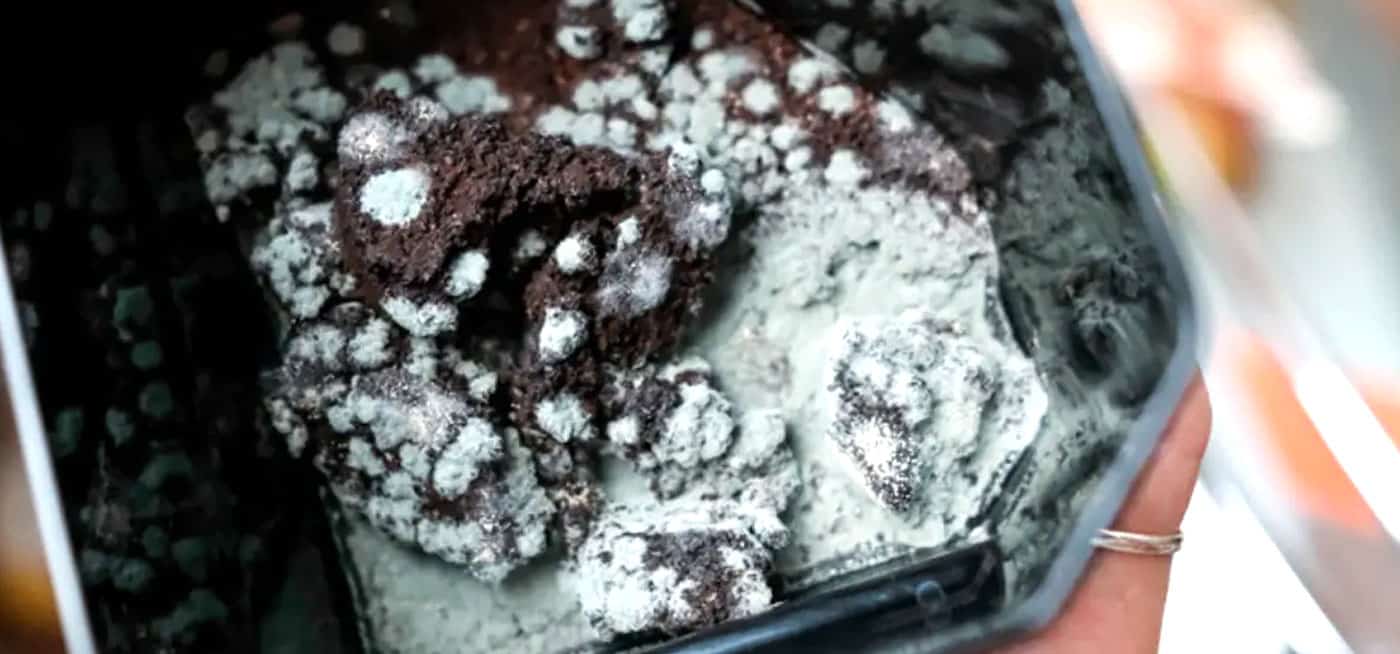
Spot Mold Contamination in Hidden Areas
Mold thrives in your Keurig’s warm, damp interior, creating dangerous black specks that pose health risks. Unlike rubber particles, mold specks appear smaller, more uniform, and often have a slimy or fuzzy texture. Check these high-risk areas for mold colonies: water reservoir corners, internal tubing, beneath removable components, and pod holder crevices.
Critical mold indicators:
– Specks float on coffee surface rather than sinking
– Musty odor accompanies visual contamination
– Black spots visible in water reservoir when empty
– Increased speck appearance after machine sits unused
Recognize Mineral Scale Fragments After Descaling
Recent descaling may have dislodged mineral deposits, creating temporary black specks in your Keurig coffee. These particles originate from calcium, magnesium, and iron buildup in hard water areas. Unlike rubber or mold, mineral fragments typically diminish within 5-10 brewing cycles after descaling.
Stop Brewing and Assess the Contamination Level
Document Your Black Speck Characteristics
Immediately halt all brewing operations when you notice black specks. Photograph the specks and note their quantity, size, and behavior in liquid to help identify the source. This documentation determines whether you’re facing a minor maintenance issue or serious health hazard requiring immediate component replacement.
Quick assessment checklist:
– Count specks: 1-5 (minor issue) vs. 20+ (serious problem)
– Measure size: Pinpoint (mineral) to 3mm (rubber)
– Test texture: Do specks sink, float, or dissolve?
– Check color: Uniform black (mold) or varied shades (debris)
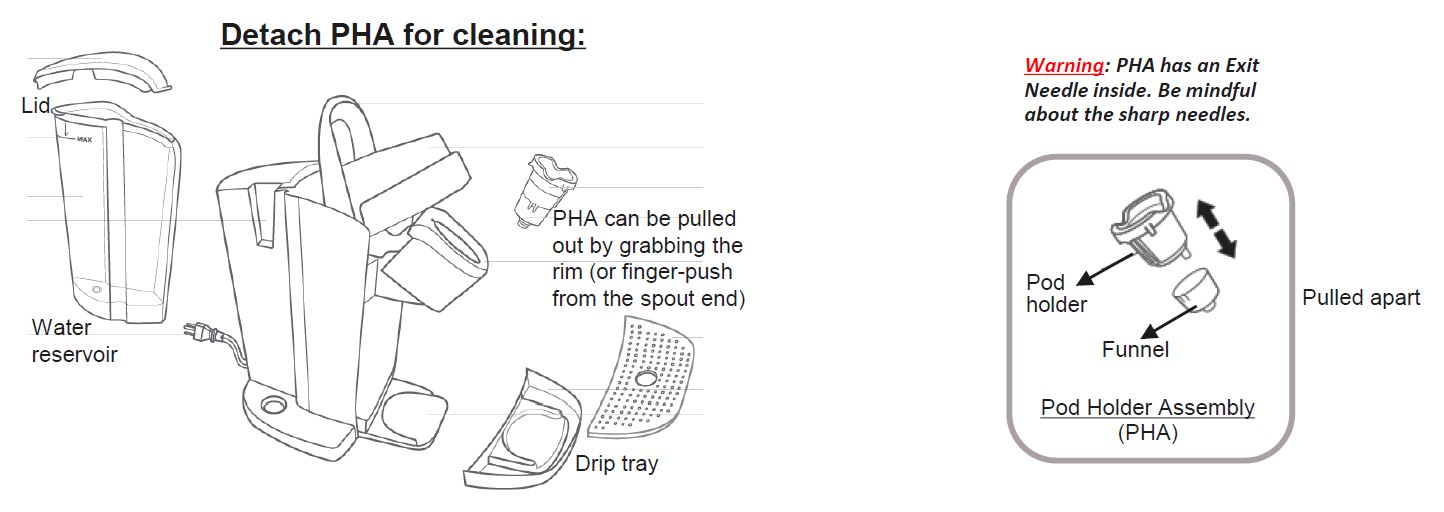
Unplug and Perform Initial Visual Inspection
With your Keurig unplugged, examine accessible components for obvious contamination sources. Remove the water reservoir and inspect for slimy film or black spots on interior surfaces. Check the pod holder for trapped grounds and visible wear on the brew needle seal. This preliminary inspection identifies whether the problem requires simple cleaning or professional service.
Clean Your Brew Needle System Thoroughly
Clear Clogs With the Paperclip Method
Your Keurig’s brew needle requires precise cleaning to eliminate black speck sources. Straighten a metal paperclip completely and insert it into both the entrance and exit needles, rotating gently to dislodge trapped particles. This simple procedure removes debris causing specks while assessing needle condition.
Effective needle cleaning steps:
1. Power off and unplug your machine completely
2. Remove the pod holder assembly for access
3. Insert straightened paperclip into entrance needle
4. Rotate paperclip 5-7 times to dislodge debris
5. Repeat process for exit needle in pod holder
6. Rinse needle area thoroughly with clean water
Evaluate and Replace Damaged Needle Seals
After cleaning, inspect the rubber needle seal for visible cracks, tears, or missing pieces. A damaged seal releases black specks with every brew cycle and requires immediate replacement. Contact Keurig support for genuine replacement parts matching your specific model to prevent further contamination.
Execute a Complete Keurig Deep Clean
Daily Cleaning Routine to Prevent Black Specks
Establish a 5-minute daily cleaning habit that stops black speck formation before it starts. Empty the water reservoir completely each evening, wash with warm soapy water, and leave the lid open to air dry. Remove and rinse the drip tray daily while running a water-only cycle to flush internal lines.
Essential daily maintenance:
– Empty and rinse water reservoir after each use
– Clean drip tray with dish soap and soft brush
– Wipe exterior surfaces with damp microfiber cloth
– Remove used pods immediately after brewing
– Run one 6-8oz water-only brew cycle weekly
Weekly Deep Sanitization Protocol
Perform comprehensive cleaning every 7 days to eliminate potential black speck sources. Disassemble the pod holder into two parts, soak in warm soapy water for 10 minutes, then scrub all crevices with a soft brush. Sanitize the water reservoir with a mild bleach solution (1 tablespoon bleach per quart of water) followed by three complete water flush cycles.
Quarterly Descaling to Remove Mineral Buildup
Descale your Keurig every 3-4 months using white vinegar or Keurig descaling solution to prevent mineral-related black specks. Fill the reservoir with solution, run largest cup size until empty, let sit for 30 minutes, then flush with 12 full reservoirs of clean water. Document descaling dates to maintain proper maintenance intervals.
Prevent Future Black Speck Contamination

Upgrade Your Water Quality Immediately
Switch to filtered water exclusively to reduce mineral content causing black specks. Replace water filters every 60 tank refills or 2 months, whichever comes first. Empty the reservoir daily instead of leaving water standing overnight to prevent bacterial growth in stagnant water.
Pro tip: Place your Keurig on a slight angle during storage to encourage complete water drainage from the reservoir, eliminating mold formation in hard-to-reach corners.
Establish Component Replacement Schedule
Track usage to anticipate when parts need replacement before black specks appear. Replace the needle seal every 12-18 months with daily use, water filters every 2 months, and pod holders when cracks or permanent staining develop. Use only genuine Keurig replacement parts to ensure proper fit and prevent new contamination sources.
Monitor Your Keurig for Early Warning Signs
Track Performance Changes That Predict Speck Problems
Monitor your machine’s performance to catch black speck issues before they appear in your coffee. Note any changes in coffee taste, brewing time, or unusual sounds during operation. Keep a simple maintenance log tracking cleaning dates and component replacements to identify patterns before contamination occurs.
Critical performance indicators:
– Coffee taste becomes bitter or off-putting
– Brewing time increases by 30+ seconds
– Gurgling sounds during water heating cycles
– Visible residue in cups or on machine components
Create Custom Maintenance Schedule Based on Usage
Develop a written maintenance schedule tailored to your Keurig usage frequency and water hardness. Daily users need more frequent cleaning and component replacement than occasional users. Adjust timing based on environmental factors like humidity levels and storage conditions to prevent black speck formation.
Black specks in your Keurig signal a solvable problem requiring immediate action and ongoing prevention. By identifying the source—whether worn seals, mold colonies, or mineral deposits—you can implement targeted solutions to restore pure, contamination-free coffee. Establish consistent cleaning habits, monitor performance indicators, and replace components proactively to prevent future speck formation.
Remember: persistent black specks after thorough cleaning indicate professional service needs. Don’t ignore ongoing contamination—it compromises both taste and health safety. Document your maintenance schedule and stick to it religiously to enjoy clean, speck-free coffee every morning.


