
Your morning coffee ritual shouldn’t involve weak streams, half-filled cups, or mysterious grounds floating in your mug. When your Keurig starts brewing slower than molasses or leaves coffee debris in your cup, the culprit is almost always clogged or damaged needles. These tiny but crucial components pierce your K-cup thousands of times, and eventually, they need replacing.
This guide walks you through replacing both entrance and exit needles across every major Keurig model. Whether you own a classic K-Select or the newer K-Supreme with MultiStream technology, you’ll learn exactly how to restore full brewing power without a service call. How to replace Keurig needle is simpler than you think with the right approach.
Essential Safety Steps Before Replacing Your Keurig Needle
Before touching any sharp components, power down completely. Unplug your machine and let it cool for 30 minutes minimum—these needles retain heat like tiny branding irons. The exit needle sits directly above the heating element, so patience prevents painful burns. Working on a hot machine is the #1 cause of DIY repair injuries with Keurig systems.
Empty the reservoir and remove any K-cup from the holder. Position your machine over the sink or cover your counter with thick towels. Coffee grounds mixed with residual water create a mess that stains everything. Keep paper towels within arm’s reach—you’ll need them for unexpected spills and cleaning debris.
Required Tools and Parts for Successful Keurig Needle Replacement
What you’ll need:
– Orange needle maintenance tool (came with your Keurig) or straightened paperclip
– Phillips head screwdriver (Plus/2.0 series only)
– Needle-nose pliers for stubborn needles
– Flashlight or phone light for visibility
Replacement parts:
– Model-specific needle kit (check your part number below)
– New K-cup holder assembly (if needles aren’t sold separately)
– Food-grade silicone lubricant for reassembly
Cleaning supplies:
– White vinegar for descaling
– Warm soapy water
– Clean cloths for drying
Find Your Model Fast to Ensure Correct Needle Replacement
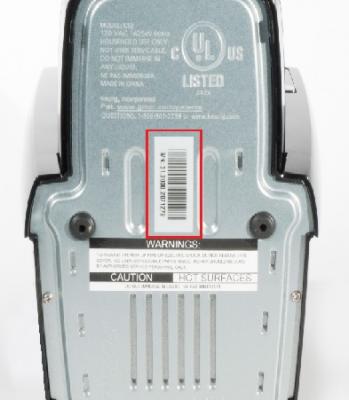
Flip your machine over and locate the model number label. This determines your exact replacement procedure:
Classic Series (K-Classic, K-Select, K-Elite): Single top needle, removable holder
Plus Series (K-Supreme, K-Supreme Plus): Five MultiStream needles in circular pattern
2.0 Series (K200-K575): DRM sensor near needles—handle carefully
Mini Series (K-Mini, K-Mini Plus): Compact integrated system
Check if your water reservoir detaches and whether you see one needle or five in the brew head. These visual cues confirm your model category. Getting this step right prevents ordering incompatible parts—nothing’s more frustrating than having your Keurig disassembled with the wrong needle kit.
Classic Series Replacement Steps That Actually Work
Why Your K-Classic Exit Needle Needs Replacement
Classic models develop weak brewing when coffee grounds clog the exit needle. You’ll notice partial cups, slow dripping, or grounds in your coffee. This happens because the exit needle (at the bottom of the K-cup holder) bears the brunt of coffee debris accumulation during normal use.
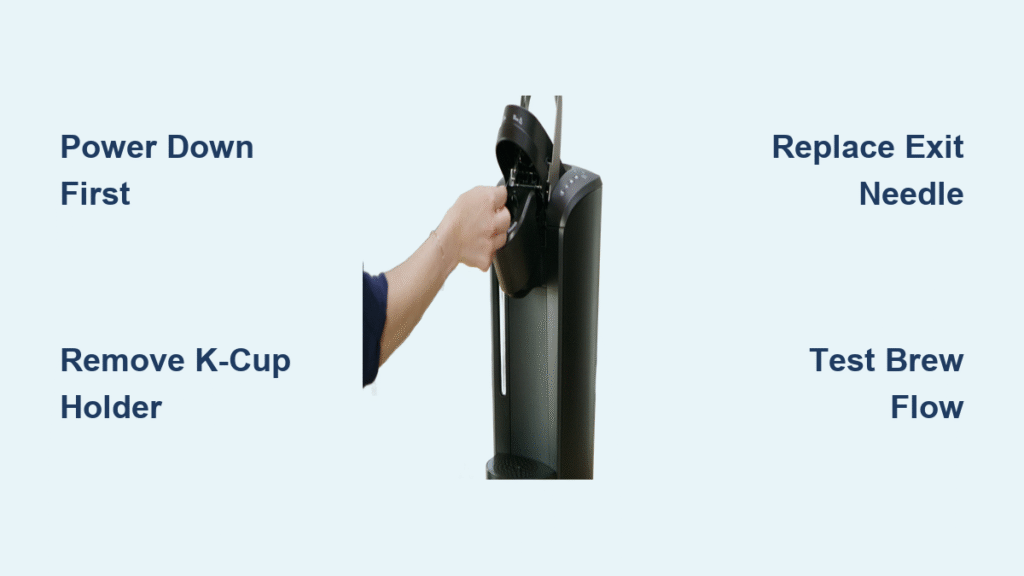
Remove K-Cup Holder Without Damaging Components
Open the handle completely and pull the holder straight up. It lifts out as one unit with the exit needle attached underneath. If it sticks, rock gently while pulling—coffee grounds often create resistance. Never force it; this can crack the plastic tabs that secure the holder.
Clean Entrance Needle While You’re Inside
Look up into the brewer lid to see the downward-pointing entrance needle. Use your orange tool or paperclip to clear debris. Most Classic models don’t allow entrance needle replacement—cleaning usually suffices. Run your tool through the needle channel 5-6 times to dislodge stubborn buildup.
Swap Exit Needle Without Losing the Critical Rubber Gasket
Grip the plastic base (never the metal tube) with needle-nose pliers. Twist counterclockwise while pulling down. The needle assembly pops out with a small rubber gasket. Keep this gasket—your new needle needs it. If the gasket tears during removal, order a replacement before proceeding.
Install New Exit Needle for Optimal Flow
Seat the rubber gasket on your new needle base. Align with the holder opening and push up while twisting clockwise until secure. No wobbling allowed—loose needles cause leaks. Test by gently tugging on the needle; it should resist movement.
Plus Series MultiStream Procedure for Perfect Five-Needle Replacement
Access Five-Needle Assembly Without Triggering Error Codes
Remove the water reservoir and K-cup holder. Look for two small screws beneath where the holder sits—these secure the needle housing cover. These models have delicate electrical components nearby; use a magnetic screwdriver to prevent losing screws inside the machine.
Replace Individual Needles Without Mixing Up Positions
Each needle pulls straight down with a slight twist. They’re position-specific—use the diagram in your replacement kit to match old and new needles correctly. The center needle differs from the others; installing it in the wrong slot causes uneven water distribution.
Install New MultiStream Needles for Even Water Flow
Press each new needle upward until it clicks. All five should sit at identical heights when properly installed. Replace the cover and secure with screws—don’t overtighten plastic threads. Over-tightening is the #1 cause of cracked housing in Plus series models.
2.0 Series Special Handling to Avoid DRM Sensor Damage
These models include a DRM sensor that detects Keurig-branded pods. This sensor sits dangerously close to the entrance needle. The holder removes by lifting while depressing side tabs, but the exit needle comes only as part of a complete holder assembly.
Replacement kits for 2.0 series include both needles pre-installed in a new holder—no individual needle swapping required. Handle the sensor arm carefully during installation; bending it triggers error codes that require professional resetting.
Post-Replacement Testing Protocol That Catches Hidden Issues
Fill the reservoir and run 2-3 hot water cycles without K-cups. This flushes debris and verifies proper flow. For MultiStream models, watch all five needles—water should exit each one evenly. Uneven flow indicates misaligned needles requiring reinstallation.
Brew a test cup with a fresh K-cup. Note brew time and volume. Classic models should deliver 10oz in under 2 minutes. If flow seems weak or uneven, recheck needle alignment. Never skip this step—it prevents coffee grounds from contaminating your next brew.
Troubleshooting Common Problems After Needle Replacement
Holder won’t release: Coffee grounds jam the mechanism. Use a flashlight to spot obstructions and rinse under warm water. Let components dry completely before reassembling.
Needle stuck tight: Apply food-safe penetrating oil and wait 10 minutes. Never force removal—broken needle pieces require professional repair and can damage your entire brewer.
Leaks after replacement: Check the rubber gasket seating and verify the holder locks completely into place. Coffee grounds on sealing surfaces prevent proper closure—a common oversight during rushed repairs.
Part Numbers and Compatibility Guide to Avoid Costly Mistakes
Official Keurig replacement kits:
– K-Classic/Select/Elite: Part #119251 (exit needle only)
– K-Supreme Series: Part #119364 (MultiStream kit)
– K-Mini Series: Part #119442 (holder with integrated needles)
– 2.0 Series: Part #119297 (complete holder assembly)
Third-party universal kits cost $8-25 but verify compatibility before purchase. Official parts guarantee proper fit and materials—critical when learning how to replace Keurig needle successfully on your first attempt.
Prevent Future Needle Problems with These Simple Habits
Weekly: Rinse the K-cup holder under warm water immediately after use
Monthly: Use the needle maintenance tool to clear debris before it hardens
Quarterly: Deep clean with vinegar solution to dissolve mineral deposits
Annually: Replace needles based on usage frequency (daily users need replacements every 12-18 months)
Filtered water dramatically reduces mineral buildup. Consider a reservoir filter if your tap water runs hard—this simple change extends needle life by up to 50%.
Expected Performance Gains After Proper Needle Replacement
Proper needle replacement restores full cup volume, eliminates slow brewing, and prevents coffee grounds in your mug. Most users notice improved flavor extraction within the first week as water flows correctly through coffee grounds.
Your Keurig should operate like new for another 1-2 years with proper maintenance. The small investment in needle replacement pays dividends in consistent, quality coffee every morning. How to replace Keurig needle correctly means never wasting another K-cup on a faulty brew.
Final tip: Order your replacement kit before starting this project. Nothing’s more frustrating than a disassembled Keurig and no parts to complete the repair. Keep your old needles as spares—they might save you during future emergencies when replacement kits are backordered.


