
That bitter aftertaste in your morning coffee isn’t just in your head—it’s your Keurig telling you it’s time to replace the water filter. But when you go to swap it out, you hit a roadblock: how to open the Keurig water filter holder seems like a mystery. Don’t force it or risk damaging your machine. This exact step-by-step guide reveals the precise technique to access and replace your filter without breaking a single plastic tab. You’ll learn the specific pressure points, common mistakes to avoid, and why most people struggle with this simple process—plus how to complete the entire filter replacement in under 10 minutes.
Locate Your Keurig’s Hidden Filter Holder
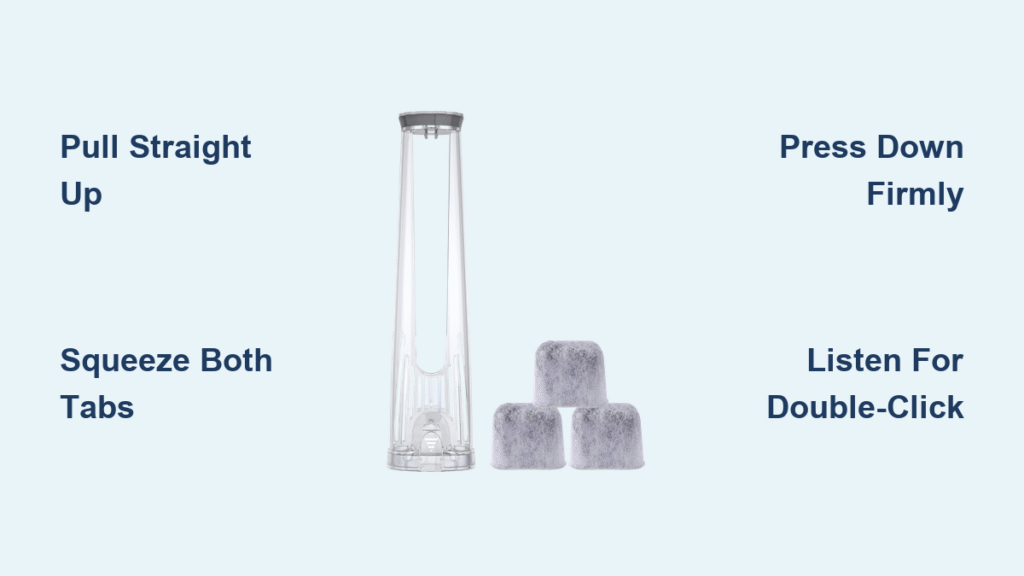
Before you can open the filter holder, you need to find it inside your water reservoir. Unlike obvious components, this critical piece hides in plain sight along the reservoir wall or corner. Look for a vertical plastic tower about 4-5 inches tall with a distinctive molded grip at the top—this is your filter assembly. The tower snaps onto a black inlet at the reservoir bottom and contains your charcoal filter cartridge.
Confirm Your Model Has This Internal Filter System
Not all Keurig machines use this internal filter design. If you don’t see the plastic tower inside your reservoir, your model likely uses external filtration or no filtration at all. Check your user manual or look for the telltale handle protruding from the reservoir interior—this confirms you have the internal filter system requiring this specific opening technique.
Pro Tip: Keurig K-Elite, K-Supreme, K-Duo, and many other premium models include this internal filter system. If your reservoir has a dial showing months, you definitely have this system.
Remove Water Reservoir Without Spills or Damage
Unplug your Keurig completely before touching any components—this critical safety step prevents electrical hazards and protects sensitive internal circuitry from accidental water exposure. Never attempt filter maintenance while the machine remains plugged in.
Lift the entire water reservoir straight up from the machine base using both hands. The reservoir slides out smoothly when pulled vertically—no tilting or twisting required. This gives you full access to the filter assembly without awkward angles that could cause spills inside the machine.
Safety Checklist Before Proceeding
- ✓ Coffee maker completely unplugged from wall outlet
- ✓ Water reservoir at least 75% empty to prevent spills
- ✓ Clean, dry workspace with no obstructions
Warning: Skipping the unplugging step risks serious electrical damage to your Keurig. Water and electricity don’t mix—even a small spill near electrical components can fry your machine’s motherboard.
Extract Filter Holder Assembly Correctly

Grasp the molded handle at the filter holder’s top and pull straight upward with steady, firm pressure. The key here is vertical motion—no twisting or side-to-side movement. You’ll feel a distinct pop as the holder releases from the black inlet at the reservoir bottom. This upward motion disengages the entire assembly in one smooth movement without damaging the plastic tabs.
Why Most People Fail at This Step
If the holder feels stuck, you’re likely pulling at an angle or using insufficient force. Never twist the holder—this cracks the plastic tabs permanently. Instead, apply consistent upward pressure while gently wiggling the assembly side-to-side. The combination of upward force and minimal lateral movement releases the holder without damage.
Pro Tip: If resistance persists, fill the reservoir with warm water for 2 minutes to loosen mineral deposits around the base before attempting removal again.
Open Filter Compartment Without Breaking Tabs
Hold the extracted filter holder upside down to access the bottom compartment. You’ll see two small plastic tabs on opposite sides—these delicate release mechanisms control the bottom cap. Many users break these tabs by squeezing incorrectly or applying pressure in the wrong direction.
Step-by-Step Tab Release Technique
- Position your thumbs on the outer sides of both tabs simultaneously
- Apply firm downward pressure on the bottom cap with your fingers
- Squeeze tabs inward while maintaining downward pressure
- The cap should separate cleanly with a light click
Critical Mistake to Avoid: Never squeeze just one tab at a time—this uneven pressure cracks the plastic housing. Both tabs must compress simultaneously for proper release.
Remove Old Filter Cartridge Safely
The filter cartridge is a cylindrical charcoal unit, 2-3 inches long with mesh coverings on both ends. Pull it straight out from the holder tube—no twisting required. The used filter will appear dark grey with possible mineral deposits depending on your water hardness.
Disposal Guidance: Charcoal filters aren’t recyclable through standard programs. Wrap the used filter in paper before discarding to contain any loose charcoal dust. Check local waste management guidelines for specific disposal recommendations in your area.
Prepare New Filter Cartridge Properly
Submerge your replacement filter in cold water only for exactly 5 minutes. This crucial step saturates the activated charcoal and removes manufacturing dust that could affect coffee taste. Never skip this soaking phase—unprepared filters release carbon particles into your first few brews.
Essential Pre-Installation Rinse Process
- Place filter in a glass of cold water
- Set timer for exactly 5 minutes
- Remove filter and rinse under cold running water for 60 seconds
- Gently shake off excess water before installation
Temperature Warning: Hot water permanently damages the charcoal filtration media. Always use cold water for soaking and rinsing—this maintains optimal filter performance and extends its lifespan.
Install Fresh Filter Without Leaks

Slide the prepared cartridge into the holder tube, ensuring it seats firmly against internal stops. The filter works equally well in either orientation, but must be fully inserted to create a proper seal. A partially seated filter causes water bypass and reduced filtration efficiency.
Secure Bottom Cap Perfectly
- Align cap with holder tube markings
- Press upward firmly while keeping tabs compressed
- Listen for the crisp double-click confirming both tabs engaged
- Gently twist cap to verify secure attachment
Troubleshooting Tip: If the cap won’t snap closed, check that the filter cartridge is fully seated against internal stops—this is the most common cause of installation failures.
Restore Filter Holder to Reservoir Correctly
Position the complete assembly over the black inlet at the reservoir bottom. Press downward firmly with even pressure until you hear the distinctive double-click of proper engagement. The holder should sit perfectly vertical without wobbling—if it leans, it’s not fully seated.
Final Assembly Verification Steps
- Replace reservoir lid by aligning front edge first
- Press down firmly around entire perimeter
- Slide reservoir back onto machine base until it clicks into place
- Run a cleansing brew cycle without a K-Cup using plain water
Critical Test: After reassembly, fill the reservoir and watch for leaks around the filter holder base. Any dripping indicates improper seating—remove and reinstall the holder before proceeding.
Maintenance Schedule to Prevent Coffee Taste Issues
Replace your filter every 2 months or after 60 tank refills—whichever comes first. Some filter holders feature a dial indicator showing installation and replacement dates for easy tracking. Ignoring this schedule causes noticeably bitter coffee as mineral buildup overwhelms the saturated filter.
Smart Maintenance Reminder System
- Set a recurring phone alert for 60 days from installation date
- Mark your calendar with “Filter Change” on installation day
- Use the rotation dial on compatible filter holders to track time
Consequence Alert: Waiting too long between filter changes allows mineral deposits to accumulate in your machine’s internal components, potentially causing permanent damage requiring professional repair.
Troubleshooting Common Filter Holder Problems
Holder won’t release from reservoir: Ensure you’re pulling straight up with consistent pressure. A gentle side-to-side wiggle while pulling upward usually releases stubborn holders without damage.
Cap won’t stay closed: Check for filter cartridge misalignment—this is the #1 cause. The cartridge must seat fully against internal stops before capping.
Water leakage around holder: The assembly isn’t fully seated in the reservoir base. Remove and reinstall with firm downward pressure until you hear the distinct double-click.
Filter floats in holder: The cartridge should fit snugly. If loose, verify you have the correct replacement filter for your specific Keurig model—using the wrong size causes poor filtration.
Mastering how to open Keurig water filter holder transforms your coffee experience from bitter disappointment to morning perfection. This simple 10-minute maintenance task ensures your machine delivers consistently great-tasting coffee while extending its lifespan. Now that you know the exact technique—vertical pull for removal, simultaneous tab compression for opening, and firm downward pressure for reinstallation—you’ll never struggle with filter replacement again. Set that phone reminder today and enjoy noticeably better coffee tomorrow.


