
That stubborn mineral crust lining your Keurig’s reservoir? The faint sour smell when you brew? Your neglected coffee maker isn’t just making bad coffee—it’s breeding bacteria in hidden crevices and clogged needles. Years of mineral buildup from hard water and coffee residue have transformed your morning essential into a health hazard that ruins every cup. When your old Keurig sputters weak brews or leaves gritty deposits in your coffee, standard cleaning won’t cut it. This guide delivers the exact restoration protocol to revive even the most neglected machine, using only household items you already own.
You’ll learn professional techniques to dissolve decade-old mineral deposits, sterilize mold-infested reservoirs, and clear coffee grounds jammed in critical pathways. Forget quick fixes—this complete deep clean eliminates the root causes of poor performance while extending your Keurig’s lifespan. After following these steps, you’ll taste the difference in your very next cup: smooth, clean coffee without that stale, metallic aftertaste.
Unplug Before Touching Any Component
Never skip this critical safety step—water and electricity create lethal combinations during disassembly. Immediately unplug your Keurig and wait 10 minutes for internal components to cool. Place the machine on a stable surface near your sink with easy access to running water. Gather these supplies: white vinegar, dish soap, straightened paper clip, old toothbrush, microfiber cloth, and your largest ceramic mug. Having everything ready prevents mid-process scrambling that risks accidental electrical contact.
Warning: Never immerse the main unit in water or use abrasive scrubbers on electrical components. Moisture trapped in circuitry causes permanent damage. If your Keurig shows visible rust or cracks in the housing, consult a professional—this guide assumes basic mechanical integrity.
Empty and Scrub Water Reservoir Thoroughly
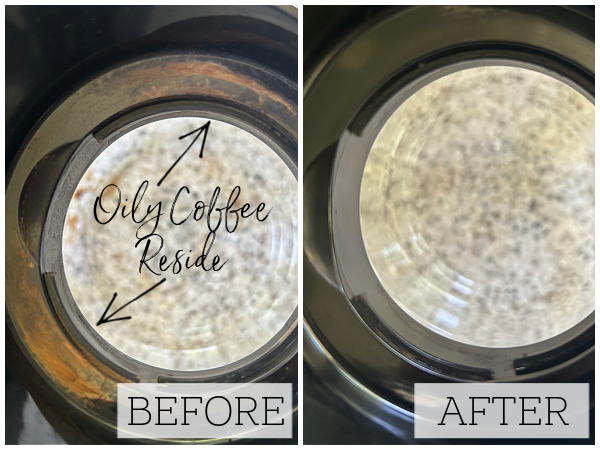
Remove the reservoir completely—don’t just pour out stagnant water. That slimy film coating the tank interior contains bacteria thriving in dark, damp conditions. Empty all water (use it for plants to avoid waste), then inspect for black mold spots or cloudy discoloration. Fill the reservoir with warm, soapy water and scrub every surface using a soft sponge. For stubborn mold: repeat washing cycles with dish soap until all traces disappear—never use bleach as residue contaminates future brews.
Critical drying step: Rinse thoroughly under running water, then invert the reservoir on a clean towel for 2+ hours. Trapped moisture reignites bacterial growth, undoing your efforts. If your machine has a water filter cartridge (typically in the reservoir base), remove and replace it now—old filters harbor contaminants.
Clear Clogs in the K-Cup Holder Assembly

Lift the handle and push the K-Cup holder upward from beneath to release it. This two-part assembly separates into the main holder and the funnel containing the brew needle. Coffee grounds jammed in the needle’s base cause sputtering and weak flow—this is the #1 issue in neglected Keurigs. Use a straightened paper clip to gently circle inside each opening at the needle’s base, dislodging compacted debris. Alternative tools: an old toothbrush (dedicated solely to Keurig maintenance) or damp cotton swab.
Visual cue for success: Hold the needle assembly up to light—the tiny holes must be completely clear, not partially blocked. Rinse both pieces under hot running water until water flows freely through all openings. Reassemble only when no coffee residue remains.
Eliminate Mineral Buildup with Vinegar Descaling
Hard water deposits cripple heating elements—this step dissolves years of calcium crust that standard cleaning misses. Mix equal parts white vinegar and water in your clean reservoir (never use straight vinegar—it creates permanent off-flavors). Fill halfway with vinegar, then top with water. Let the solution sit for exactly 30 minutes (max 3 hours) to penetrate internal pathways.
Run Full Descaling Cycle Properly
- Plug in and power on your Keurig
- Place your largest ceramic mug under the spout
- Select the highest cup setting (8-10oz)
- Brew without a K-Cup until reservoir empties
- Empty mug between cycles—never let vinegar pool under the machine
- Rest machine 30 minutes after emptying—this soaks stubborn deposits
- Rinse reservoir with fresh water 3 times
- Run 12 consecutive water-only brews to flush all vinegar traces
- Leave mug in place overnight to catch residual leakage
Sterilize Drip Tray and Mug Platform
Remove the drip tray completely—that slimy layer beneath your cup stand traps bacteria and coffee sludge. Hand-wash with warm, soapy water using an old toothbrush to scrub corners where grime accumulates. For heavy buildup: soak in vinegar solution for 15 minutes before scrubbing. Never force the tray back if misaligned—this cracks internal components. Air-dry completely on a clean towel before reinserting.
Pro tip: Place a drop of dish soap on your fingertip and rub it across the mug platform surface. This lifts stubborn coffee stains during regular weekly wipes. Wipe dry immediately with microfiber cloth to prevent water spots.
Restore Exterior Surfaces Without Damage
Wipe down all visible surfaces with a microfiber cloth dampened with dish soap and warm water—never spray liquid directly onto the machine. Focus on the K-Cup opening area where coffee grounds collect unnoticed, and the control panel where sticky residue impairs button function. For stainless steel models: rub in the direction of the grain to avoid scratches.
Avoid these mistakes: Using window cleaner (damages plastic), abrasive sponges (scratches surfaces), or compressed air (forces debris deeper). For stubborn water spots on the reservoir exterior, rub with vinegar-dampened cloth before rinsing.
Prevent Flavor Contamination After Deep Cleaning
Run a dedicated rinse cycle before brewing coffee—residual vinegar affects taste. Insert a Keurig Rinse Pod (or make your own: 1 tbsp vinegar in water reservoir) and brew one full cycle. Follow immediately with two fresh water brews. This is non-negotiable when switching between coffee and hot chocolate—old Keurigs trap oils that create rancid flavors.
Weekly maintenance: Use rinse pods every time you change beverage types. For machines without rinse pods, run a mini-cycle with 1 tsp vinegar in full reservoir, followed by two water brews. Never skip this step—it prevents yesterday’s dark roast from contaminating today’s vanilla latte.
Clean Reusable K-Cups for Optimal Flavor
Disassemble reusable filters completely—coffee oils seep into hidden crevices. Hand-wash with dish soap and a soft brush, focusing on the mesh screen where rancid oils accumulate. For stubborn buildup: soak in vinegar solution for 10 minutes before scrubbing. Critical step: Air-dry all components for 4+ hours before reuse—trapped moisture breeds mold inside the cup.
Warning: Never put reusable K-Cups in the dishwasher unless explicitly marked top-rack safe. High heat warps plastic components, causing leaks during brewing. If your filter shows permanent discoloration, replace it—old filters impart bitter tastes.
Fix Common Post-Cleaning Issues Immediately

Sputtering instead of smooth flow? Recheck the brew needle—tiny coffee particles often re-clog during reassembly. Use a paper clip to poke each hole while holding the assembly under running water. Weak water output? Verify the reservoir is fully seated (listen for the click) and the filter cartridge isn’t upside down. Vinegar taste lingering? Run 3-5 additional water brews until the smell disappears completely.
Urgent action required: If coffee leaks from the base after cleaning, unplug immediately. This indicates improper reassembly—recheck the drip tray alignment and reservoir seating. Never operate a leaking Keurig—it risks electrical damage.
Implement This Maintenance Schedule Now
Mark these dates visibly: Stick a Post-it note on your Keurig with these reminders:
– Weekly: Wash reservoir with soapy water, wipe exterior
– Every 2 months: Replace water filter cartridge
– Every 3 months: Full descaling (extend to 6 months only with soft water)
– Immediately after performance dips: Clean pod holder assembly
– Weekly: Run rinse cycle when switching beverage types
Time-saving hack: Sync filter changes with descaling—replace the filter cartridge right after completing descaling, then reset your calendar. This creates one consolidated maintenance day per cycle.
Professional Longevity Secrets
Dedicate cleaning tools exclusively to your Keurig—a labeled bag containing an old toothbrush, paper clips, and microfiber cloth prevents cross-contamination with household chemicals. Use filtered water daily—this single change reduces mineral buildup by 70%, extending time between deep cleans. Always air-dry components completely before reassembly; a hairdryer on cool setting speeds this process without heat damage.
Critical final step: After your first post-cleaning brew, run one more water cycle with a pinch of baking soda to neutralize any residual acidity. Your revived Keurig now delivers coffee that tastes as fresh as the day you bought it—with regular maintenance, you’ll avoid this intensive deep clean for years. Remember: consistent weekly care takes 5 minutes but prevents 2-hour restoration projects. That first clean cup of coffee after this process? It’s worth every minute.


