
That first cup of coffee should taste like pure perfection, not like it’s been filtered through a chemistry experiment. Tap water carries minerals, chlorine, and other impurities that sabotage your brew, turning what should be a delightful morning ritual into a bitter disappointment. If you’ve ever wondered how does the Keurig water filter work to fix this problem, you’re not alone—millions of coffee drinkers rely on this small but mighty component to transform ordinary tap water into the perfect brewing companion. Let’s uncover exactly how this compact cartridge makes such a dramatic difference in every cup you brew.
Your Keurig’s water filter isn’t just a marketing gimmick—it’s a scientifically engineered solution to water quality problems that directly impact both your coffee’s taste and your machine’s longevity. Understanding how does the Keurig water filter work reveals why it’s worth the minimal investment in replacement cartridges. Whether you’re a casual coffee drinker or a daily devotee, this filtration system quietly works behind the scenes to ensure your machine performs optimally while delivering consistently delicious coffee.
The Activated Carbon Process in Keurig Filters
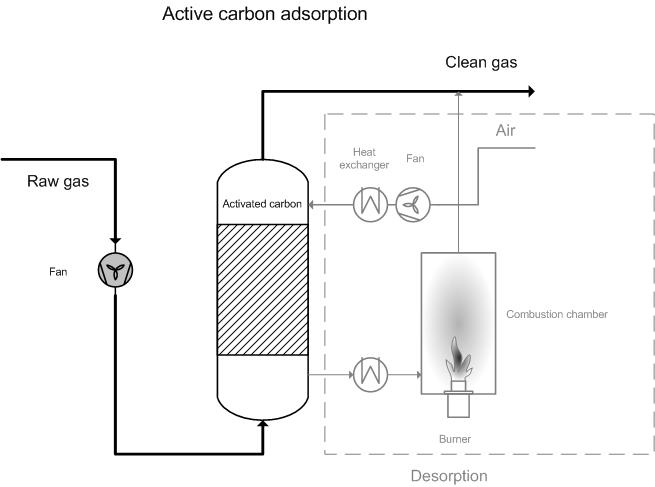
Every time you fill your Keurig’s reservoir, water must pass through a compact cartridge no bigger than your thumb before reaching the brewing chamber. This tiny powerhouse uses activated carbon derived from coconut shells as its filtration medium. Unlike regular carbon, activated carbon contains millions of microscopic pores created through a special heating process, dramatically increasing its surface area and trapping capacity.
As water flows through the filter, contaminants become trapped within these pores through a process called adsorption (not absorption). Think of it like static cling rather than a sponge—impurities stick to the carbon surface while clean water molecules pass through. The coconut shell carbon provides superior performance compared to other carbon sources, with more micropores per gram that increase the surface area available for contaminant capture.
Why Coconut Shell Carbon Outperforms Standard Filters
Coconut shell carbon offers approximately 50% more surface area than coal-based carbon used in many standard filters. This increased surface area translates to better contaminant removal and longer filter life. The structure of coconut shell carbon creates more micropores (pores smaller than 2 nanometers), which are ideal for capturing chlorine molecules and other small contaminants that ruin coffee flavor.
The Critical Filter Soaking Process Before First Use
Never skip the 5-minute soaking step when installing a new filter. This activates the carbon by allowing water to penetrate deep into the microscopic pore structure. Without proper activation, the filter’s effectiveness drops by up to 30% during initial use. After soaking, always rinse the filter under cold water for 30 seconds to remove loose carbon dust that could cloud your first few brews.
How Keurig Filters Eliminate Chlorine and Mineral Impurities
Hard water minerals like calcium and magnesium are coffee’s silent enemies. These minerals create limescale deposits that coat heating elements like frost on a window. Your Keurig works overtime trying to heat through this mineral blanket, resulting in lukewarm coffee and eventual machine failure. The filter captures these minerals before they can cause damage, extending your machine’s lifespan significantly.
Chlorine Elimination: Why Your Coffee Tastes Better
That swimming pool smell in your tap water? It’s chlorine, added by municipalities to keep water safe. While great for killing bacteria, chlorine creates bitter, medicinal flavors in coffee. The activated carbon in Keurig filters snaps up chlorine molecules like a Venus flytrap, removing 97% of free chlorine compounds. This dramatic reduction transforms bitter, chemical-tasting coffee into a smooth, flavorful experience.
Organic Compound Filtration: The Hidden Threat
Your water may contain traces of:
– Pesticides from agricultural runoff
– Industrial solvents from manufacturing
– Herbicide residues from lawn treatments
– Volatile organic compounds (VOCs)
The carbon filter acts as a molecular bouncer, denying entry to these unwanted flavor saboteurs. While Keurig filters aren’t designed to remove all contaminants (like fluoride or dissolved salts), they specifically target the compounds that most directly impact coffee taste and machine performance.
Keurig Models That Benefit from Built-In Water Filtration

Not every Keurig includes this filtration system. The filter-ready models feature a special holder built into the reservoir that’s easily identifiable by a removable plastic component near the water inlet. Premium models like the K-Elite series and K-Supreme series integrate filtration seamlessly into their design, while versatile models like the K-Duo Plus and K-Café Special Edition include the system to protect their more complex internal mechanisms.
Finding Your Filter Holder Location
To locate your filter holder, remove the water reservoir and look for a small cylindrical compartment, typically near the front or side. On most models, you’ll need to press a release tab to remove the holder. If you don’t see this component, your Keurig model doesn’t support built-in filtration—consider using pre-filtered water from a Brita pitcher or faucet-mounted system instead.
Filter Cartridge Specifications You Need to Know
Inside each standard Keurig filter cartridge lies precisely 15 grams of activated carbon—about the weight of three nickels. Despite its small size, this carbon payload can process 60-100 brewing cycles before exhaustion. That’s roughly 40-60 gallons of water, enough for two months of daily coffee for most households.
The Filter Life Calculator
Your actual filter lifespan depends on water hardness and usage:
– Light users (1 cup daily): Replace every 3 months
– Moderate users (2-3 cups daily): Replace every 2 months
– Heavy users (5+ cups daily): Replace every 6-8 weeks
When in doubt, replace filters more frequently if you notice changes in brewing time, water flow, or coffee taste—these are your system’s warning signs.
How Filtered Water Transforms Coffee Flavor Profiles
Filtered water lets coffee’s true character shine through. Without mineral interference, subtle notes like chocolate, fruit, or nut flavors become more pronounced. It’s like cleaning a dirty window—the view was always there, just obscured by mineral deposits and chemical contaminants that alter extraction.
The pH Balance Connection
The filter helps maintain water pH between 6.5-7.5, the sweet spot for coffee extraction. Too acidic water creates sour coffee by over-extracting certain compounds, while too alkaline water produces flat, lifeless brews. By removing compounds that skew pH in either direction, the filter ensures balanced extraction every time.
Machine Protection: How Filters Extend Your Keurig’s Lifespan
Users report 50-75% less frequent descaling needs when using filtered water regularly. That translates to less vinegar smell in your kitchen and more money in your wallet—considering descaling solution costs and potential repair bills. A $6 filter replacement every two months beats a $150 repair bill for heating element damage.
Scale Prevention System
Scale buildup acts like cholesterol in arteries, restricting water flow and straining your Keurig’s pump system. Filters keep your machine’s “cardiovascular system” healthy and strong by removing the calcium and magnesium ions that form these deposits. This preventative measure is the single most effective way to extend your Keurig’s operational life.
When to Replace Your Keurig Water Filter
Don’t wait until your coffee tastes bad—replace filters proactively based on usage. The standard replacement interval is every 60 brew cycles, which equals about two months for most households. However, hard water areas may require more frequent changes.
Warning Signs Your Filter Needs Immediate Replacement
Replace your filter immediately if you notice:
– Brewing time increases beyond normal
– Water flow decreases noticeably
– Coffee taste changes becoming bitter or flat
– Filter turns dark gray or shows visible buildup
Ignoring these signs risks both poor coffee quality and potential damage to your machine from unfiltered water.
Step-by-Step Filter Replacement Guide
Proper Installation Technique
- Soak new filter: Submerge in cold water for 5 minutes to activate carbon
- Rinse thoroughly: Run under tap water for 30 seconds to remove carbon dust
- Check orientation: Ensure arrow points downward in holder
- Insert firmly: Push until you hear a click indicating proper seating
The Critical Post-Installation Flush
Run 3-4 brew cycles without coffee to flush residual carbon dust. This step is crucial—skipping it may result in grayish water or cloudy coffee for your first few brews. Discard this water; it’s not harmful but affects taste and appearance.
What Contaminants Keurig Filters Actually Remove
Keurig filters don’t remove everything—they specifically target compounds that impact coffee taste and machine performance. Verified removal rates include:
– 97% chlorine reduction (goodbye, pool taste)
– 99% lead reduction when present
– 95% mercury removal
– 99.9% benzene elimination
What Keurig Filters Don’t Remove (And Why That’s Good)
Unlike reverse osmosis systems, Keurig filters intentionally preserve beneficial minerals that contribute to coffee’s flavor profile. They don’t remove fluoride, dissolved salts, or calcium/magnesium completely—only enough to prevent scale buildup while maintaining optimal extraction chemistry.
Troubleshooting Common Keurig Filter Issues
Fixing Poor Water Flow After Installation
If water flow decreases after filter installation:
– Check for proper seating (remove and reinsert)
– Verify you’re using the correct filter model
– Run additional cleaning cycles to flush the system
– Inspect for cracks or damage to the filter holder
Solving Taste Problems Even With a New Filter
When coffee quality drops despite a fresh filter:
1. Check water source (extremely hard water may require pre-filtering)
2. Run descaling cycle (mineral buildup may already exist)
3. Verify filter activation (did you soak and rinse properly?)
4. Clean needle and exit points (clogs may exist elsewhere)
Your Keurig water filter works silently in the background, transforming questionable tap water into brewing excellence. This small cartridge represents the intersection of chemistry and convenience—removing what you don’t want while preserving what you need for perfect coffee extraction. Replace filters regularly, use cold water, and enjoy consistently delicious coffee while extending your Keurig’s lifespan. The filter does the hard work; you just need to keep the fresh cartridges coming.


