
You’re staring at a broken coffee maker on a Monday morning, or perhaps you’re stranded at a cabin with no electricity. Maybe you’re traveling light and forgot your portable brewer. Whatever the situation, the craving for coffee hits hard when your usual equipment isn’t available. The good news is that you absolutely can filter coffee without a coffee maker—humans have been brewing coffee for centuries without electric appliances. This guide reveals practical, proven techniques that transform everyday household items into effective coffee filtering systems, ensuring you never have to miss your morning cup again.
Boiling Water and Letting It Settle
Cowboy coffee remains one of the most reliable methods when you lack proper equipment. Start by heating your water until it reaches a rolling boil, then remove it from the heat source. Add medium-coarse coffee grounds directly to the water—two tablespoons per eight ounces works as a solid starting point. Stir gently to ensure all grounds get wet, then let the mixture sit undisturbed for three minutes. This crucial rest period allows the coffee to extract properly while the grounds settle to the bottom.
Critical tip: Don’t skip the settling time. Pouring too soon guarantees gritty coffee. As you pour, tilt your cup and pour slowly down the side, not directly onto the settled grounds. Stop pouring when you see sediment beginning to flow—usually leaving the last ounce in the pot. For cleaner results, place a spoon across the pot’s rim as you pour; the spoon catches escaping grounds while letting liquid flow around it. This method works best with coarser grounds since fine particles float longer and end up in your cup.
Why Your Cowboy Coffee Might Be Bitter
Water temperature dramatically affects flavor extraction. Boiling water (212°F) scalds coffee, releasing harsh compounds. Let your water cool for 30 seconds after boiling to reach the ideal 195-205°F range. If your coffee tastes bitter despite proper temperature, you’re likely over-extracting—reduce your steep time from three minutes to two. Conversely, weak coffee indicates under-extraction; extend steeping to four minutes or increase your coffee-to-water ratio slightly.
DIY Paper Filter Alternatives
Paper towels transform into surprisingly effective coffee filters with minimal preparation. Fold a standard paper towel into quarters, then shape it into a cone that fits your mug or cup. Wet the paper towel first with hot water to remove any paper taste and help it maintain its shape. Add coffee grounds to the makeshift filter, then slowly pour hot water through in circular motions, starting from the center and working outward.
Cloth Options That Work Better Than Paper
Cotton fabric filters produce superior results to paper in many cases. A clean bandana, tea towel, or even a cotton T-shirt cut into squares works well. Rinse your cloth thoroughly first to remove loose fibers. Place two tablespoons of medium-coarse grounds in the center, gather the edges to form a pouch, and secure with string or a rubber band. Steep for 3-4 minutes in hot water, then remove the pouch before sediment starts to rise. Unlike paper, cloth filters preserve coffee’s natural oils, creating a richer mouthfeel while still catching most sediment.
The Cloth Sock Method
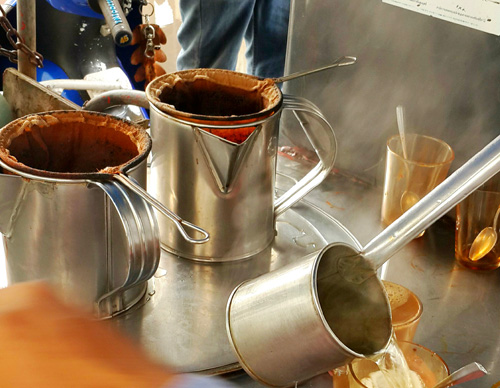
This traditional technique from Latin America delivers exceptional results with minimal equipment. Find a clean, unused cotton sock—athletic socks work best due to their tighter weave. Place 2-3 tablespoons of medium-coarse grounds inside, tie the open end securely, and submerge in hot (not boiling) water. Let it steep for 3-4 minutes, adjusting time based on your strength preference. The cotton naturally filters out grounds while allowing flavorful oils to pass through.
Pro tip: After brewing, gently squeeze the sock to extract the last flavorful drops—but stop before you feel resistance. Squeezing too hard forces bitter compounds and fine sediment into your cup. Rinse the sock thoroughly after each use and hang to dry completely before storing to prevent mold and lingering odors.
Using a Fine Mesh Strainer

Your kitchen sieve becomes an excellent coffee filter with one simple modification. Place a paper towel or coffee filter inside your fine mesh strainer for double filtration. Without this secondary layer, very fine grounds will pass through most standard strainers. Position the strainer over your cup, add medium-fine grounds, then slowly pour hot water in circular motions, allowing the coffee to drip through.
Troubleshooting Mesh Strainer Issues
If your coffee still contains sediment, your grind is too fine for the strainer’s mesh size. Switch to a coarser grind immediately—fine espresso grounds will clog any standard strainer. For faster pouring, gently shake the strainer side-to-side to prevent grounds from packing too tightly. Never press down on the coffee bed, as this forces sediment through the filter. If you’re camping without paper products, use two nested mesh strainers for better results.
Achieving the Perfect Coffee-to-Water Ratio
Getting this ratio right makes or breaks your improvised brew. The golden standard is 1:16—1 gram of coffee to 16 grams of water. Without a scale, use this practical measurement: two level tablespoons of medium-coarse grounds per six ounces of water. For stronger coffee, increase to three tablespoons; for milder, reduce to one and a half.
Critical adjustment: When using cloth or sock methods, increase coffee by 20% since these methods extract less efficiently than paper filters. Keep a small notebook to record your ratios and taste results—this helps you dial in your perfect cup faster. Remember that water quality matters too; filtered water produces noticeably better coffee than hard tap water in any brewing method.
Choosing the Right Grind Size

Grind size affects both flavor and filtration success more than most beginners realize. For cowboy coffee and sock methods, use medium-coarse grounds—similar to rough sand. This size extracts well while settling quickly. Paper filter alternatives work best with medium grind (like table salt), while mesh strainers tolerate slightly finer grounds.
Warning: Avoid espresso-fine grinds with any non-brewer method. These tiny particles pass through most improvised filters and create bitter, muddy coffee. If you only have finely ground coffee, double your paper filter layers or use a cloth filter with multiple thicknesses. When in doubt between two grind sizes, choose coarser—you can always steep longer for more strength without sacrificing clarity.
Common Mistakes That Ruin Your Coffee
Most failed attempts stem from preventable errors. The biggest mistake? Using boiling water directly on grounds. Let water cool for 30 seconds after boiling to avoid scalding your coffee. Another frequent error: pouring too aggressively through improvised filters, which disturbs the coffee bed and forces sediment through.
Don’t ignore these warnings:
– Never reuse coffee grounds—they produce weak, bitter coffee
– Avoid metal containers that might impart flavors (stainless steel is safe)
– Don’t skip rinsing cloth filters—they can add paper or fabric tastes
– Never squeeze cloth filters aggressively—that extracts bitter compounds
Storing Coffee for Emergency Situations
Smart storage ensures you always have coffee ready when your maker fails. Keep whole beans in an airtight container away from light, heat, and moisture—they stay fresh for 2-3 weeks. For true emergency preparedness, portion pre-ground coffee into small ziplock bags (enough for one cup each) and store in the freezer—these stay viable for months.
Pro storage tip: Add a food-safe oxygen absorber packet to your coffee container to extend freshness by weeks. For travel, consider single-serve instant coffee packets—just add hot water. While not equivalent to freshly brewed, quality instant coffee has improved dramatically and makes a reliable backup when no filtering options exist.
Final Thoughts
Mastering how to filter coffee without a coffee maker transforms you from equipment-dependent to coffee-empowered. These techniques aren’t just emergency backups—they’re legitimate brewing methods with dedicated followings worldwide. The next time your coffee maker fails, reach for that cotton sock or paper towel instead of resigning yourself to caffeine withdrawal. With practice, you’ll discover which method produces your ideal cup, whether you’re at home, camping, or traveling light. Remember that great coffee depends more on your knowledge than your equipment—so experiment, take notes, and soon you’ll brew confidently anywhere, with almost anything.


