
Coffee makers are among the most frequently used appliances in households, yet many users feel intimidated when it comes to basic maintenance or repair. If your Black and Decker coffee maker needs attention beyond simple cleaning, you might be searching for “how to disassemble Black and Decker coffee maker” to address issues like persistent leaks, internal mineral buildup, or component replacement. Before you grab your screwdriver and start taking apart your appliance, understanding the proper approach is crucial—not only for the longevity of your coffee maker but for your personal safety as well.
Unlike some appliances that come with detailed service manuals, many Black and Decker coffee makers lack comprehensive disassembly instructions in their user guides. This gap often leads users to search online for guidance, sometimes encountering incomplete or dangerous advice that could result in electrical hazards, permanent damage to the unit, or voided warranties. The truth is, most Black and Decker coffee makers aren’t designed for user disassembly beyond basic removable parts like the carafe and filter basket.
This guide will help you navigate what you can safely do yourself versus when to seek professional service. We’ll cover the limited disassembly that’s generally safe for consumers, proper preparation steps to avoid common mistakes, and clear indicators that your coffee maker needs professional attention rather than DIY intervention. By the end, you’ll know exactly how to approach maintenance without risking damage to your appliance or your safety.
Why Most Black and Decker Coffee Makers Shouldn’t Be Fully Disassembled

Understanding the Design Philosophy of Modern Coffee Makers
Black and Decker designs most of their coffee makers with sealed internal components that aren’t meant for consumer access. Unlike older models that allowed for relatively straightforward servicing, modern units incorporate sealed heating elements, integrated wiring harnesses, and plastic housings that snap together in ways that are difficult to reverse without damage. Attempting to force these components apart often results in broken plastic tabs or compromised water pathways that cannot be properly resealed.
Safety Risks of Improper Disassembly
Electrical components in coffee makers present significant hazards when exposed. The heating element operates at high temperatures and connects directly to mains voltage. Without proper training, you risk:
– Creating electrical shock hazards from exposed wiring
– Damaging water-resistant seals leading to future electrical faults
– Voiding any remaining warranty coverage
– Causing irreparable damage to internal components
Most importantly, coffee makers contain water and electricity in close proximity—any compromise to the factory-sealed design could create dangerous conditions even after reassembly.
When Disassembly Is Actually Appropriate
The only disassembly generally safe for consumers involves components specifically designed for removal:
– Water reservoir (for descaling)
– Drip tray and warming plate
– Filter basket assembly
– Removable carafe and lid
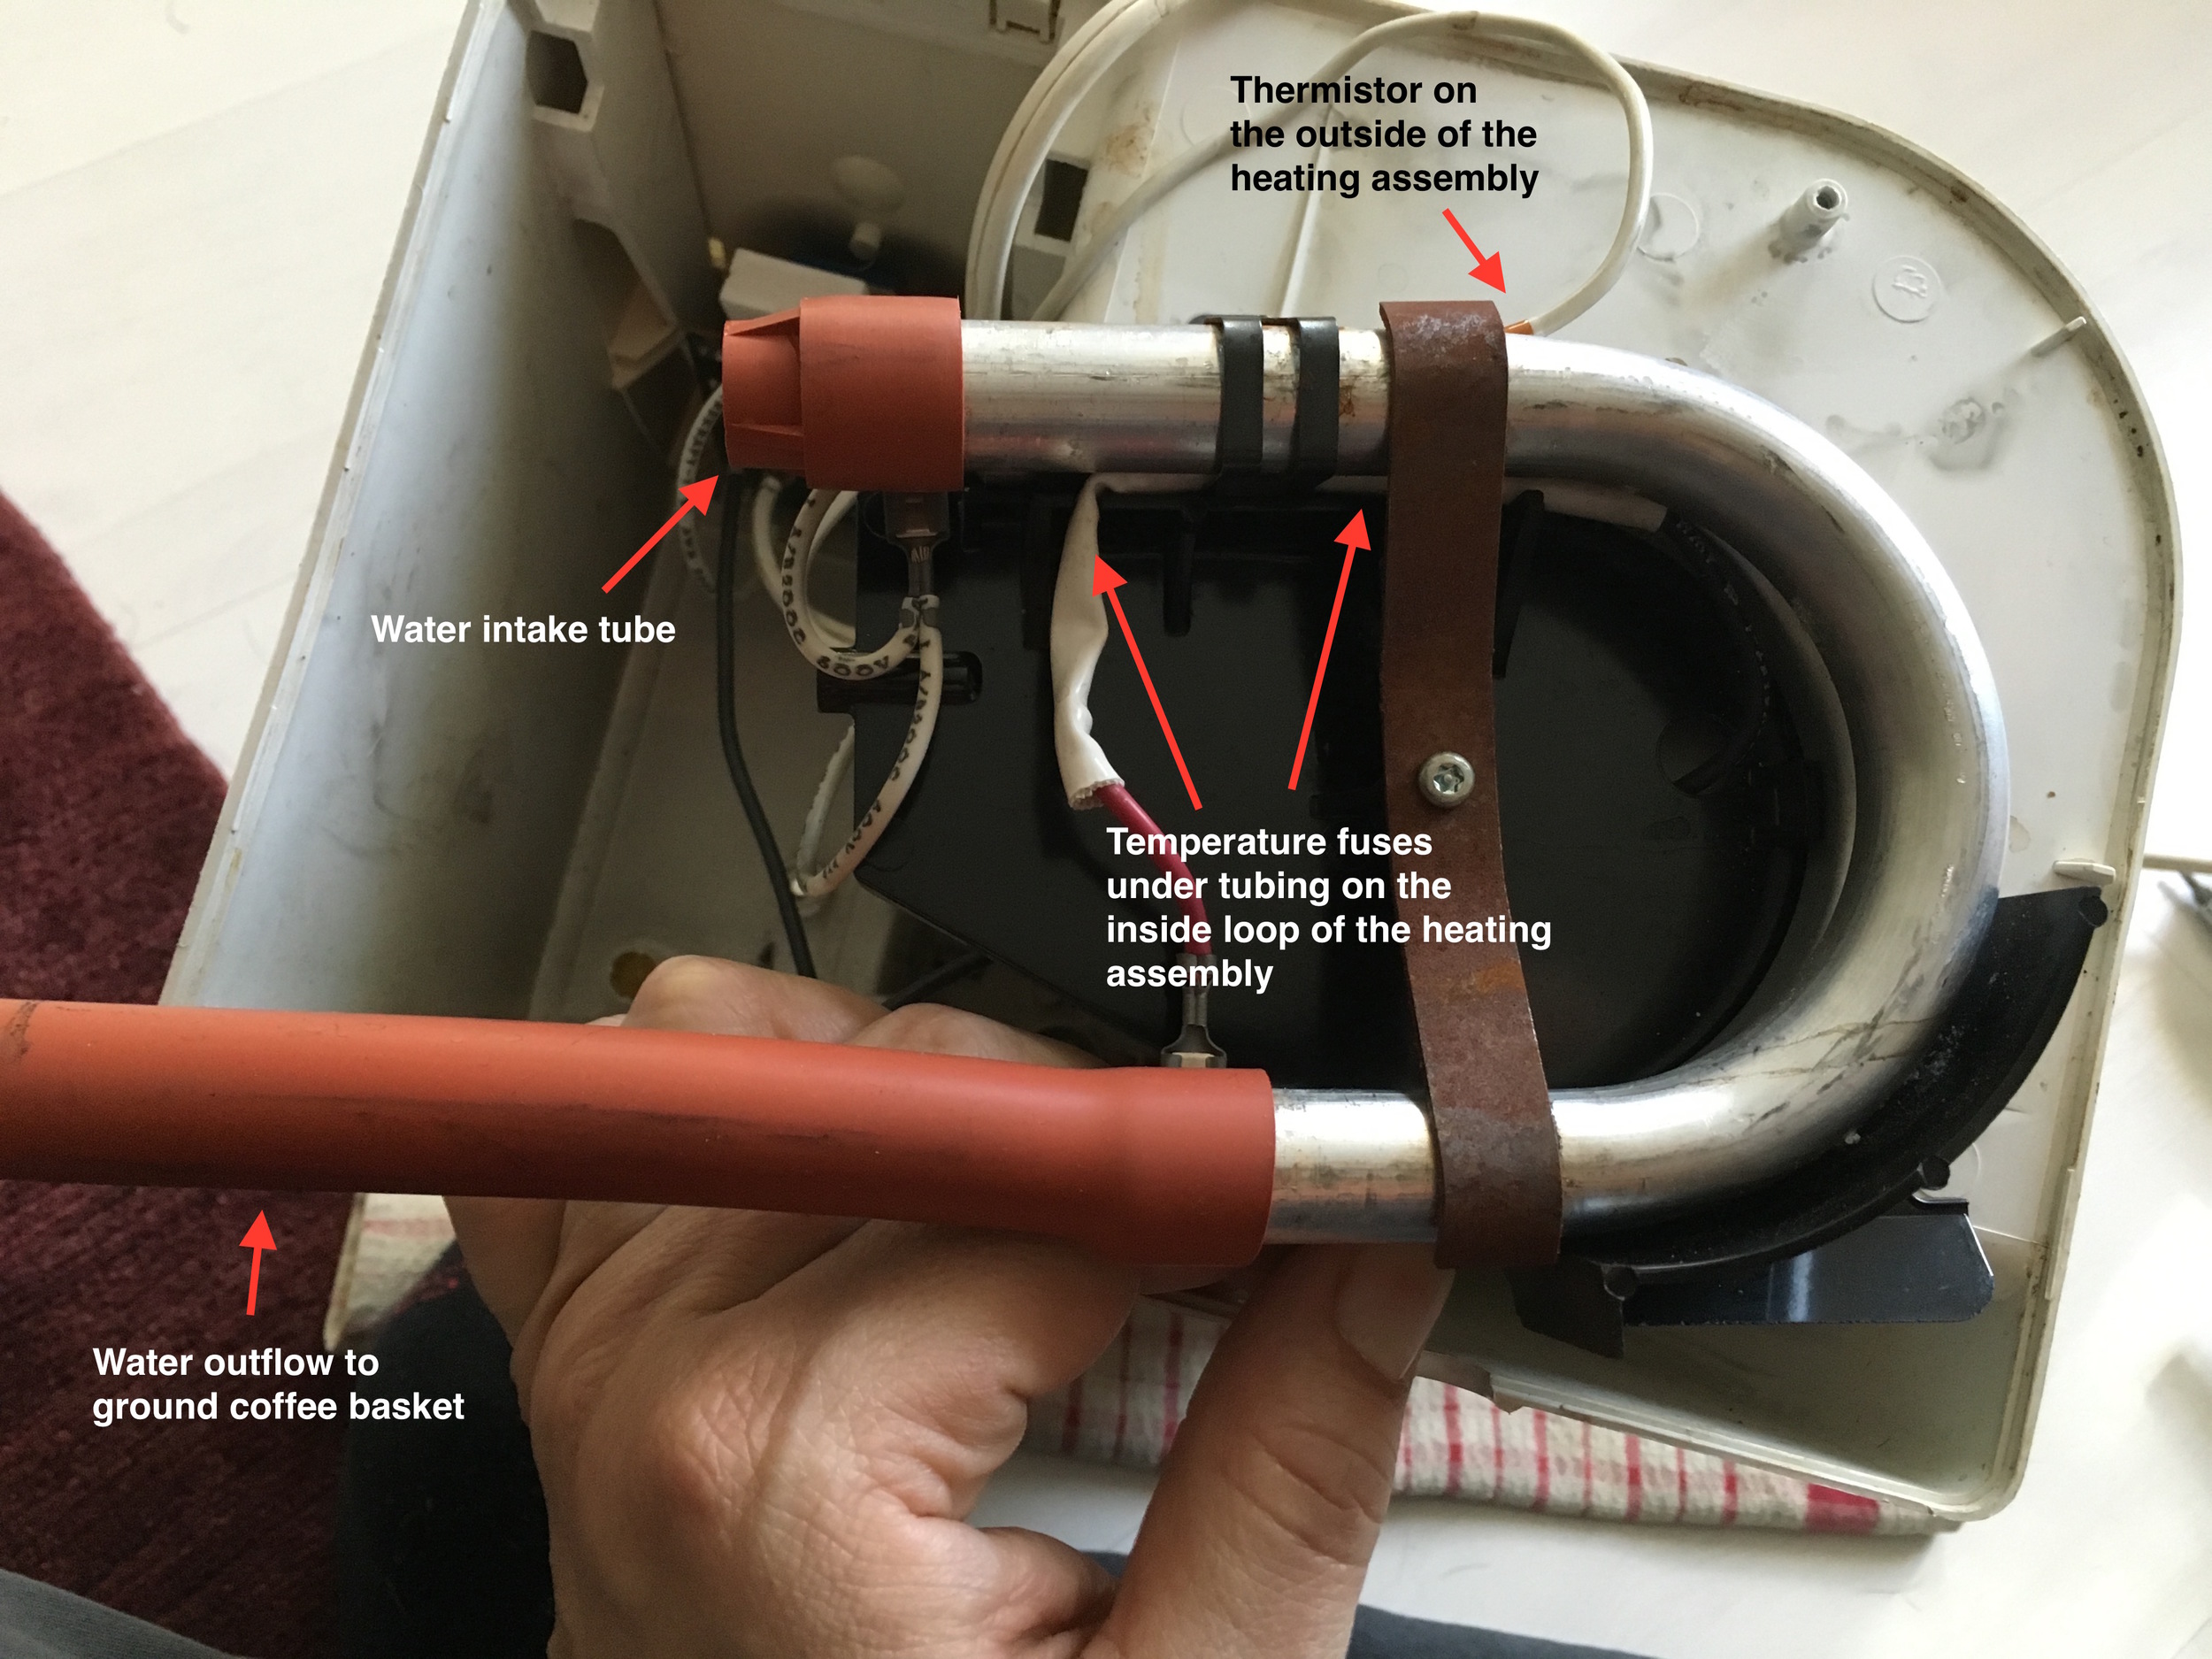
If your issue involves internal components like the heating element, thermostat, or pump (in drip models), attempting disassembly will likely cause more problems than it solves. For these issues, professional service or replacement is usually the most cost-effective solution.
Proper Preparation Before Attempting Any Disassembly
Essential Safety Measures for Coffee Maker Maintenance
Before touching any tools, ensure your coffee maker is completely disconnected from power and has cooled for at least 2 hours. Residual heat in the heating element can cause serious burns even when the unit appears off. Place the coffee maker on a clean, dry workspace with good lighting—never attempt maintenance while the appliance is on a wet surface or near a sink.
Tools You Actually Need for Safe Maintenance
For the limited disassembly that’s appropriate for consumers, you’ll typically need:
– Soft microfiber cloth
– Mild dish soap
– White vinegar for descaling
– Small soft-bristled brush (like an old toothbrush)
– Pipe cleaners for hard-to-reach areas
Note that screwdrivers or pry tools are generally unnecessary for proper maintenance of Black and Decker coffee makers. If you find yourself needing tools beyond these basic items, you’re likely attempting disassembly beyond what’s safely recommended for consumers.
Documenting Your Process (When Appropriate)
If you’re removing components that might be confusing to reinstall (like certain filter assemblies), take photos with your phone at each step. However, for most Black and Decker models, components only fit one way and don’t require documentation for reassembly. The simplicity of proper maintenance means you shouldn’t need a step-by-step photo record.
Step-by-Step Guide to Safe Component Removal
Removing and Cleaning the Water Reservoir
The water reservoir is the only component that typically requires regular removal for thorough cleaning. To remove it properly:
- Ensure the coffee maker is unplugged and completely cool
- Locate the reservoir release mechanism (usually a button or lever near the fill area)
- Gently lift the reservoir straight up—never force it sideways
- Empty any remaining water and remove the reservoir cap
- Clean with a solution of equal parts white vinegar and water
- Use a soft brush to remove mineral deposits along the water level markings
- Rinse thoroughly with clean water before reinstalling
Never attempt to remove the internal tubing connected to the reservoir—this requires professional service.
Accessing and Cleaning the Filter Assembly Area
For models with permanent filters:
- Remove the filter basket completely from the unit
- Soak in warm, soapy water for 15 minutes
- Use a soft brush to clean coffee oils from all surfaces
- Pay special attention to the small holes where water sprays into the basket
- Rinse thoroughly before reinstalling
For models with removable permanent filters, never force the filter out of its housing—most are designed to lift straight out with minimal pressure.
Cleaning Under the Warming Plate
Mineral deposits often accumulate beneath the warming plate:
- Remove the drip tray completely
- Wipe the area beneath with a vinegar-dampened cloth
- Use a pipe cleaner to access small crevices around the plate edges
- Never insert tools underneath the warming plate itself
- Allow to dry completely before replacing the drip tray
Warning Signs That Indicate Professional Service Is Needed
When Water Leaks Occur Inside the Unit
Internal leaks require professional diagnosis because:
– They often indicate failed seals that require specialized tools to replace
– Water may have contacted electrical components, creating hidden hazards
– DIY attempts to access leak sources typically cause more damage
Electrical Issues Requiring Expert Attention
If your coffee maker shows any of these symptoms, stop using it immediately and seek professional service:
– Burning smells during operation
– Visible sparks or smoke
– The unit trips circuit breakers
– Inconsistent heating or failure to heat
When Standard Cleaning Doesn’t Resolve Performance Issues
If descaling and basic maintenance don’t improve performance, the problem likely involves internal components that shouldn’t be accessed by consumers. Continuing to operate a malfunctioning unit could create safety hazards.
Safe Alternatives to Full Disassembly
Effective Descaling Without Internal Access
Most performance issues stem from mineral buildup that can be addressed without disassembly:
- Fill the reservoir with equal parts white vinegar and water
- Run a full brewing cycle without coffee
- Discard the solution and run two cycles with clean water
- Repeat monthly for best results
This process cleans internal pathways without requiring any disassembly.
Troubleshooting Common Issues Without Taking Apart Your Unit
For weak brewing: Check filter size and grind fineness before assuming internal problems.
For slow dripping: Ensure the water reservoir is properly seated and the fill cap is venting correctly.
For bitter coffee: Replace old coffee beans and clean the carafe thoroughly before suspecting appliance issues.
When Replacement Is More Practical Than Repair

Cost-Benefit Analysis of Coffee Maker Repair
Most Black and Decker coffee makers cost between $20-$50. Professional repair typically costs $50-$100 plus parts. Unless you have a high-end model, replacement is usually more economical than repair.
Environmental Considerations
While it’s admirable to want to repair appliances, consider:
– Energy efficiency of newer models versus older units
– The environmental impact of shipping for repair versus local disposal
– Whether your local waste facility recycles small appliances
Knowing When to Call It Quits
Replace your coffee maker if:
– It’s more than 3 years old
– You’ve had multiple issues
– The cost of potential repair approaches the price of a new unit
– You notice any signs of electrical damage
Final Maintenance Tips to Extend Your Coffee Maker’s Life
Regularly clean removable parts after each use, descale monthly, and never operate the unit without sufficient water. Store your coffee maker with all components dry to prevent mold growth. Most importantly, respect the design limitations—your Black and Decker coffee maker wasn’t engineered for user disassembly beyond basic components, and attempting more creates unnecessary risks.
By following these guidelines, you’ll maximize your coffee maker’s performance and lifespan while staying safe. When in doubt about whether a problem requires disassembly, remember that for most Black and Decker models, the safest and most effective approach is proper external maintenance rather than internal intervention.


