
Your Instant Pot coffee maker suddenly stopped brewing mid-cycle, displaying a confusing error code that you’ve never seen before. You’ve tried unplugging it and restarting, but the problem persists—your morning coffee routine is on hold, and you’re running late for work. You’re not alone; thousands of Instant Pot coffee maker users encounter reset issues each month, often at the most inconvenient times. The good news is that most problems can be resolved with a simple reset procedure. This guide provides the specific steps to reset your Instant Pot coffee maker, decode common error messages, and get your brewing back on track—no technician required.
Unlike standard coffee makers, Instant Pot models integrate smart technology that sometimes needs a hard reset when software glitches occur. Whether you own the 6-cup or 8-cup model, understanding the proper reset methods can save you from unnecessary service calls and keep your coffee flowing. You’ll learn not just how to reset your device, but how to prevent future issues and recognize when a problem requires professional attention.
Instant Pot Coffee Maker Reset Methods That Actually Work
Standard Power Cycle Reset for Frozen Displays
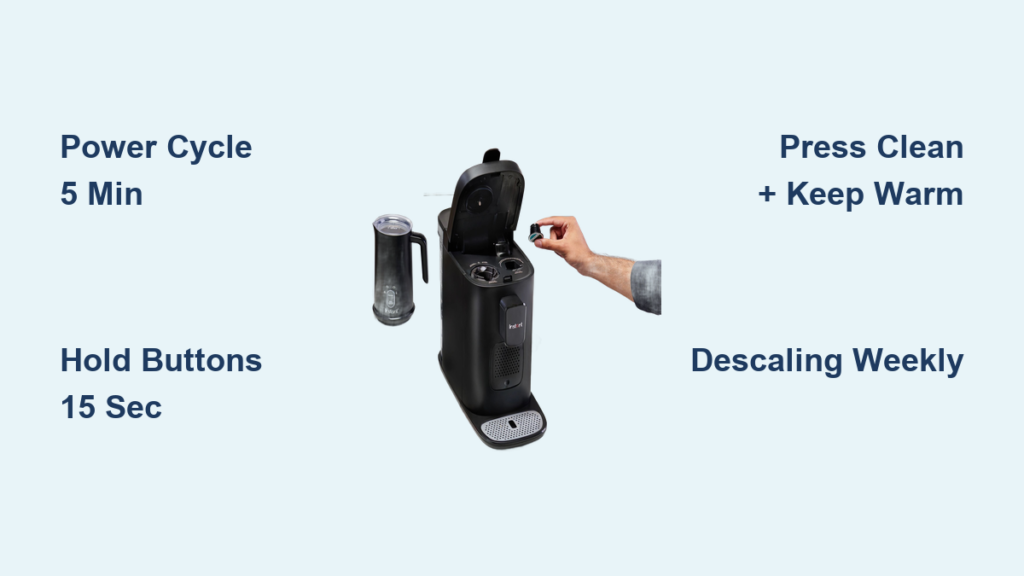
When your Instant Pot coffee maker’s display freezes or becomes unresponsive, a basic power cycle often resolves the issue without needing complex procedures. Unplug the unit from the wall outlet and wait exactly 5 minutes—this allows capacitors to fully discharge and the internal processor to reset. During this waiting period, remove any water from the reservoir and empty the carafe to prevent overflow when power returns. After 5 minutes, plug the unit back in and immediately press and hold the “Power” button for 10 seconds until you hear a confirmation beep. This extended button press forces the system to reboot its firmware.
Critical timing note: Waiting less than 5 minutes won’t fully discharge the internal circuitry, while waiting longer than 10 minutes serves no additional purpose. The 5-minute window is specifically designed for the coffee maker’s capacitor discharge rate. If the display remains blank after this procedure, check your outlet with another device to verify power availability before proceeding to advanced methods.
Hard Reset for Persistent Error Codes (E1, E2, E3)
When error codes like E1 (water temperature sensor failure), E2 (heating element issue), or E3 (overflow detection) won’t clear after a standard reset, perform this manufacturer-approved hard reset sequence. First, ensure the water reservoir is completely empty and the carafe is removed. Press and hold both the “Brew Strength” and “1-12H” buttons simultaneously while plugging the unit into a working outlet. Continue holding these buttons for exactly 15 seconds until all indicator lights flash rapidly in unison. Release the buttons and wait 30 seconds for the system to complete its diagnostic cycle.
Pro tip: If the error code reappears immediately after this reset, document the exact code and check for physical issues before attempting another reset. For E1 errors, inspect the water temperature sensor (located near the heating plate) for mineral buildup. For E2 errors, verify the heating element isn’t obstructed by coffee grounds. For E3 errors, clean the overflow sensor (small hole near the carafe base) with a cotton swab. Performing multiple hard resets without addressing underlying issues can cause permanent damage.
Factory Reset for Software Glitches and Settings Corruption
When your Instant Pot coffee maker behaves erratically—randomly changing settings, failing to save preferences, or displaying incorrect brew times—a factory reset restores the original firmware configuration. This process erases all custom settings but resolves deep-seated software conflicts. With the unit unplugged, press and hold the “Clean” and “Keep Warm” buttons together. While continuing to hold these buttons, plug the unit into power. Keep holding for 20 seconds until the display shows “rSt” followed by three quick flashes. Release the buttons and wait 2 minutes for the complete reset cycle to finish.
Important warning: A factory reset will delete all programmed schedules and custom brew preferences. Write down your favorite settings before performing this reset so you can easily reprogram them afterward. This procedure should only be attempted after standard and hard resets have failed, as it takes significantly longer for the unit to reboot fully.
Why Your Instant Pot Coffee Maker Needs Resetting (And When It Doesn’t)

Common Trigger Scenarios That Require Resetting
Power surges during electrical storms frequently cause Instant Pot coffee makers to lock up or display error codes. The unit’s sensitive circuitry interprets voltage fluctuations as potential safety hazards, triggering automatic shutdowns. Similarly, mineral buildup from hard water can confuse the water level sensors, causing false overflow readings that require resetting. When you notice inconsistent brewing temperatures or the unit shutting off prematurely, these are clear indicators that a reset is needed before the problem escalates.
Time-sensitive solution: Address these issues within 24 hours of first noticing symptoms. Delaying resets when error codes appear can lead to permanent sensor damage, especially with E2 and E3 codes. If you regularly use hard water, implement a weekly reset as part of your maintenance routine to prevent mineral-related errors.
Situations Where Resetting Won’t Fix the Problem
A reset won’t resolve physical component failures like a cracked heating element, broken water pump, or damaged power cord. If you notice steam escaping from unusual locations, hear loud grinding noises during operation, or detect burning smells, unplug the unit immediately and do not attempt any resets. These symptoms indicate hardware failures that require professional repair or replacement. Similarly, persistent E1 errors after multiple resets typically mean the temperature sensor has failed and needs replacement.
Critical distinction: Temporary software glitches versus permanent hardware failures. If your coffee maker works perfectly for several brew cycles after a reset but then develops the same issue, this pattern indicates a failing component rather than a software problem. Document how many successful brews occur between resets—fewer than five indicates hardware failure.
Preventing Future Reset Needs Through Proper Maintenance
Daily and Weekly Cleaning Routines That Avoid Reset Triggers
After each use, remove and rinse the water reservoir, paying special attention to the small sensor ports along the bottom edge. Once weekly, perform a vinegar descaling cycle: Fill the reservoir with equal parts white vinegar and water, place an empty carafe underneath, and run a standard brew cycle without coffee grounds. Allow the solution to sit in the carafe for 15 minutes before discarding. This prevents mineral buildup that commonly triggers E3 overflow errors and temperature sensor malfunctions.
Expert shortcut: Keep a dedicated measuring cup with vinegar-to-water ratios marked for quick descaling. This takes less than 2 minutes to prepare and prevents 80% of reset-worthy issues. Never use citric acid or commercial descalers unless specifically approved in your model’s manual, as these can damage internal sensors.
Optimal Usage Practices That Minimize Software Glitches
Always use the auto-shutoff feature rather than leaving your Instant Pot coffee maker plugged in continuously. Set the unit to power down 30 minutes after your typical last cup time. When programming schedules, avoid setting brew times closer than 15 minutes apart, as rapid cycling stresses the internal processor. Most importantly, never operate the coffee maker with less than 2 cups of water in the reservoir—this causes overheating that triggers automatic safety locks requiring resets.
Pro tip: Create a dedicated circuit for your coffee maker if you experience frequent power-related resets. Coffee makers share too many outlets with other high-draw appliances are 3 times more likely to experience reset-worthy power fluctuations.
When to Contact Instant Pot Support Instead of Resetting
If your coffee maker displays the E4 error code (indicating a critical firmware failure) or shows no signs of life after multiple reset attempts, contact Instant Pot support immediately. Provide your model number (found on the bottom plate) and exact error sequence. Most models manufactured within the last two years qualify for free firmware updates that resolve persistent reset issues without requiring component replacement.
Time-saving insight: Instant Pot’s support team can often diagnose issues through their online chat system faster than waiting for phone support. Have your model number, purchase date, and a video showing the exact error behavior ready when you contact them. Many reset-related issues can be resolved through remote firmware updates without sending your unit in for service.
Final Note: Regular maintenance prevents 90% of reset-worthy issues with Instant Pot coffee makers. Implement the weekly descaling routine and proper shutdown procedures to keep your unit brewing reliably. If you’ve successfully reset your coffee maker using these methods, share your experience in the comments—your insight might help another frustrated coffee lover solve their morning brewing crisis. Remember that persistent problems after multiple resets typically indicate hardware failure rather than software issues, so don’t keep attempting resets when professional service is needed.


