

Have you ever stared at your electric coffee maker, wondering why your morning brew doesn’t taste as rich as the coffee shop version? You’re not alone. Many coffee drinkers struggle with basic electric coffee maker operation, resulting in weak, bitter, or inconsistent coffee. The good news is that mastering your electric coffee maker takes just a few simple steps and the right knowledge. In this guide, you’ll learn exactly how to operate any standard electric drip coffee maker for perfect results every time—without complicated equipment or barista training. By the end of this article, you’ll understand water ratios, filter types, brewing settings, and maintenance practices that transform your daily coffee routine.
Essential Pre-Brew Setup for Perfect Coffee
Before you even think about pressing that “brew” button, proper setup determines 70% of your coffee’s quality. Most people skip these critical preparation steps, leading to disappointing results.
Choosing the Right Coffee-to-Water Ratio
The foundation of great coffee is the perfect coffee-to-water ratio. Too little coffee creates weak, watery results, while too much makes bitter, over-extracted coffee.
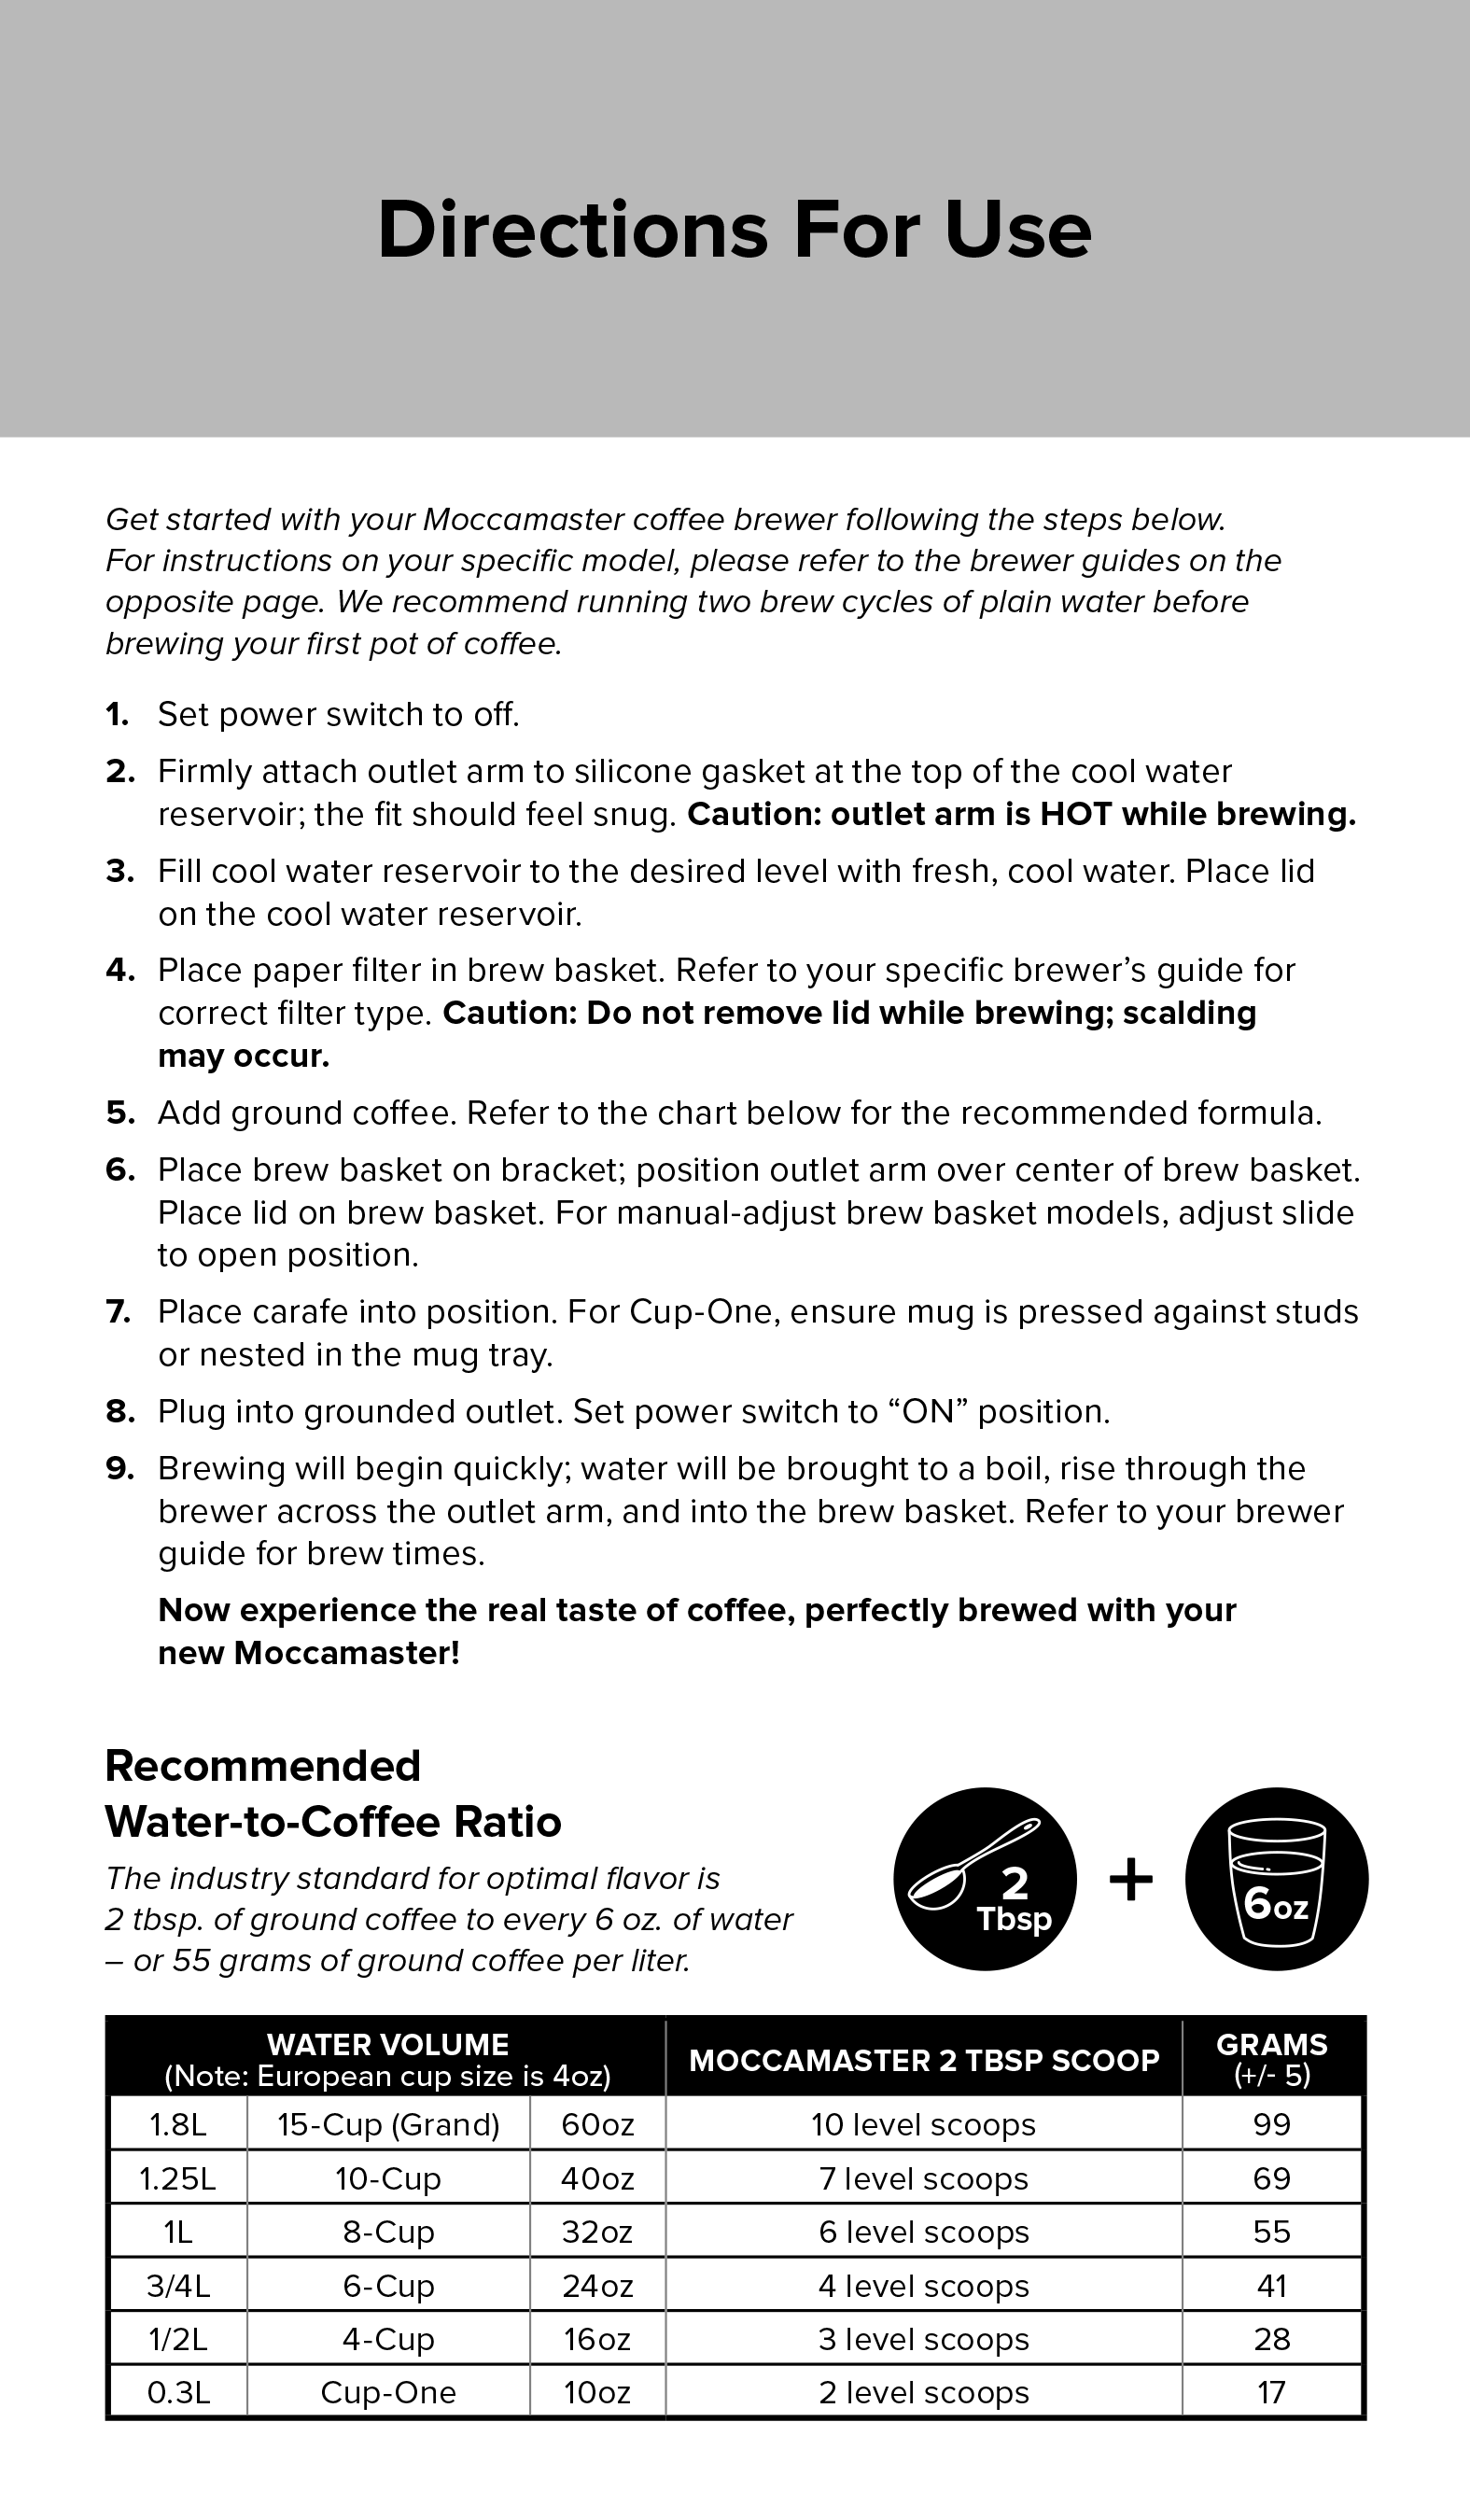
- Use 1-2 tablespoons of medium-ground coffee per 6 ounces of water
- For stronger coffee, use 2 tablespoons; for milder, use 1 tablespoon
- Always measure coffee with a proper tablespoon—not heaping scoops from the bag
- Use filtered water at room temperature for best extraction
Pro Tip: Many coffee makers include a water reservoir with cup measurements, but these “cups” are typically 5-6 ounces, not the standard 8-ounce cup. Check your manual to confirm your machine’s actual cup size.
Selecting and Preparing Your Filter
Not all filters are created equal, and using the wrong type affects flavor and can cause messy spills.
- Paper filters: Remove any paper taste by rinsing with hot water before adding coffee
- Permanent filters: Clean thoroughly after each use to prevent oil buildup
- Match filter size exactly to your machine’s requirements (common sizes: #2, #4)
- Never overload filters—that’s the #1 cause of messy overflow during brewing
Water Quality Matters More Than You Think
Your tap water quality directly impacts coffee flavor, yet most people never consider it.
- Hard water creates mineral buildup in your machine and affects taste
- Distilled water lacks minerals needed for proper extraction
- Filtered water provides the ideal balance for clean-tasting coffee
- Always fill to the appropriate line—overfilling causes overflow, underfilling makes weak coffee
Operating Your Electric Coffee Maker Correctly
Now that your ingredients are prepared, let’s walk through the actual brewing process with precision.
Step-by-Step Brewing Process
Follow these exact steps for consistent, restaurant-quality coffee at home:
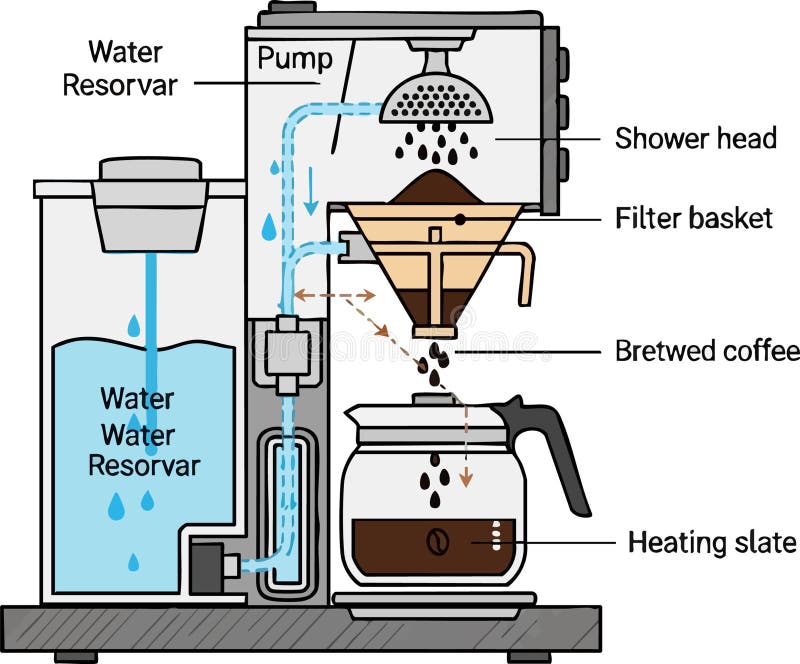
- Add the correct amount of cold, filtered water to the reservoir
- Place the appropriate filter in the basket
- Add precisely measured coffee grounds to the filter
- Close the lid completely (an open lid disrupts the brewing cycle)
- Place your carafe on the warming plate
- Press the “brew” button and wait for completion
- Remove carafe immediately when brewing finishes to prevent bitter over-extraction
Critical Warning: Never start a brew cycle without the carafe in place—this can damage the heating element in many models.
Understanding Your Coffee Maker’s Features
Modern electric coffee makers offer features most users never utilize properly.
- Delay brew: Program your machine the night before for fresh morning coffee
- Strength control: Adjust water flow rate for bolder or milder coffee
- Auto shutoff: Typically activates after 2 hours—don’t rely on it to keep coffee hot all day
- Cleaning indicator: Heed these warnings to maintain optimal performance
Troubleshooting Common Brewing Problems
Even with proper setup, issues can occur. Here’s how to fix them immediately:
- Coffee brewing too slowly: Clean clogged spray head with vinegar solution
- Weak coffee: Increase coffee amount or check water temperature (should be 195-205°F)
- Overflowing basket: Reduce coffee amount or use coarser grind
- Machine not turning on: Check power connection and circuit breaker
Maintaining Your Electric Coffee Maker
Most people only clean their coffee maker when it stops working properly—but maintenance prevents problems before they start.
Daily Cleaning Routine
Spend just 2 minutes after each use to extend your machine’s life significantly.
- Rinse carafe and filter basket with warm, soapy water
- Wipe exterior with damp cloth (never immerse base in water)
- Remove and discard used filter immediately to prevent mold
- Dry all parts thoroughly before reassembling
Monthly Deep Cleaning Process
Mineral deposits build up even with filtered water, affecting taste and performance.
- Fill reservoir with equal parts white vinegar and water
- Place empty carafe in position
- Run a complete brew cycle
- Discard solution and run 2-3 cycles with clean water
- Wipe spray head with soft brush to remove deposits
- Clean warming plate with vinegar-soaked cloth
Expert Note: Never use lemon juice or citric acid for descaling—these can leave residual flavors in your machine.
Advanced Tips for Coffee Perfection
Once you’ve mastered the basics, these professional techniques elevate your coffee experience.
Water Temperature Optimization
Most home coffee makers don’t reach the ideal 200°F brewing temperature, resulting in under-extracted coffee.
- Pre-heat your machine by running a water-only cycle first
- Use slightly hotter than room temperature water in the reservoir
- Choose models with temperature control (195-205°F is ideal)
Coffee Freshness Preservation Techniques
Stale coffee ruins even perfect brewing techniques.
- Buy whole beans and grind just before brewing
- Store coffee in an airtight container away from light and heat
- Never keep coffee in the freezer—moisture damages flavor
- Use coffee within 2 weeks of roasting for peak freshness
When to Replace Your Electric Coffee Maker
Even with perfect care, coffee makers have a limited lifespan that affects your coffee quality.
- 3-5 year lifespan is typical for most drip coffee makers
- Warning signs it’s time to replace:
- Inconsistent brewing temperature
- Persistent mineral deposits despite cleaning
- Plastic components cracking or warping
- Coffee tastes consistently off despite proper technique
Cost Consideration: Repairing older machines often costs more than replacement—consider upgrading when performance declines.
Maximizing Your Coffee Experience on a Budget
You don’t need an expensive machine to make great coffee—just proper technique.
- Use medium-dark roast beans for balanced flavor
- Invest in a $10 burr grinder instead of blade grinders
- Try the “bloom” technique: pour small amount of water first, wait 30 seconds, then continue
- Keep a brewing journal to track what works best for your taste
Final Note: Mastering your electric coffee maker transforms your daily routine from a chore to a pleasure. By following these precise steps for setup, operation, and maintenance, you’ll consistently create café-quality coffee at home. Remember that great coffee starts with fresh beans, proper ratios, and regular cleaning—not expensive equipment. Implement just one new technique from this guide tomorrow morning, and you’ll notice an immediate improvement in your cup. For continued success, bookmark this page as your reference guide and revisit the maintenance section monthly to keep your machine performing at its best.


