
Your morning routine grinds to a halt when your Keurig refuses to brew that essential first cup. Whether it’s sputtering, leaking, or completely dead, these issues plague millions of users daily. The good news? Most Keurig problems have simple solutions that don’t require replacing your entire machine. This comprehensive guide walks you through diagnosing and fixing the most common Keurig failures, from stubborn clogs to mysterious error messages. You’ll learn step-by-step repair techniques, preventive maintenance strategies, and when it’s time to consider replacement—all using proven methods tested across dozens of Keurig models.
Quick Diagnostic Checklist
Before diving into repairs, run through these 30-second checks to save time and effort. First, verify your water reservoir is properly seated and filled to the appropriate level. Next, ensure your power cord is firmly connected to a working outlet—many issues stem from loose connections. Check for any visible leaks or pooling water around the base, which indicates an immediate problem needing attention. Confirm your K-cup holder is empty and clean, as leftover grounds can trigger false errors. Finally, make sure your machine has been plugged in for at least 3 minutes to complete its warm-up cycle.
Red flags requiring immediate attention include burning smells or visible damage to the unit, boiling water spewing from unexpected areas, electrical sparks or exposed wires, and repeated circuit breaker trips when operating your Keurig. These serious issues indicate potential safety hazards that may require professional assessment rather than DIY fixes.
No Water Flow Problems

When your Keurig makes noise but nothing comes out, water flow issues are almost always the culprit. These problems typically stem from three sources: blocked needles, air bubbles, or pump failure. For most Keurig models including K40, K55, and K75 Platinum systems, clogged needles account for approximately 80% of flow issues according to manufacturer data.
Clear Clogged Needles Fast
Materials needed: Paperclip, flashlight, clean cloth
- Power down completely – unplug machine for safety before attempting any cleaning
- Remove K-cup holder – lift handle and pull out the entire assembly
- Locate both needles – entrance needle under lid, exit needle inside holder
- Insert paperclip – gently poke through each needle opening 3-4 times to dislodge coffee grounds
- Rinse thoroughly – run water through holder under faucet while brushing with soft toothbrush
- Test with water-only brew – no K-cup to verify flow restoration before regular use
Pro tip: Clean needles monthly to prevent buildup that causes most flow issues. The entrance needle (top) gets clogged by coffee grounds while the exit needle (bottom) clogs with brewed coffee residue.
Eliminate Air Bubble Blockages
Air trapped in water lines creates stubborn flow problems. The fix is surprisingly simple:
- Remove water reservoir
- Turn machine upside down over sink (protect counter with towel)
- Gently tap sides with palm for 30 seconds to dislodge air pockets
- Refill reservoir with fresh water
- Run 2-3 water-only cycles
This technique works because trapped air compresses, preventing water from reaching the pump. Physical agitation releases these bubbles. If this doesn’t work after two attempts, the issue likely involves deeper clogs or pump problems.
Fix Brewing Speed Issues
Slow brewing frustrates morning routines and often signals developing problems. Address these before complete failure occurs.
Mineral Buildup Removal
Monthly descaling prevents 90% of slow brewing issues:
Commercial descaler method:
1. Empty reservoir completely
2. Add 4oz ACTIVE Coffee Machine Descaler
3. Fill to maximum line with clean water
4. Run two large cycles without K-cups
5. Rinse with 3-4 full reservoirs of fresh water
Vinegar alternative:
– Create 50/50 white vinegar and water solution
– Run two cups through machine
– Let solution sit overnight (minimum 8 hours)
– Flush with full reservoir of clean water
Important: Never use lemon juice for descaling as pulp can cause additional clogs, despite what some online guides suggest.
Water Quality Impact on Speed
Problem water sources causing slow brewing:
– Well water with high mineral content
– Softened water with excessive salt
– Tap water with high chlorine levels
Solution: Switch to filtered or bottled water. Many users report immediate speed improvements after changing water source. The minerals in hard water react with coffee components, creating stubborn deposits that gradually restrict water flow.
Stop Water Leaks Fast
Water pooling under your Keurig creates safety hazards and indicates specific, fixable issues.
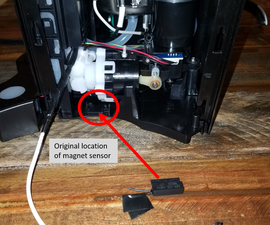
Reservoir Magnet Problems
Symptoms: Water leaks from reservoir area, “Add water” error with full tank
Fix in 2 minutes:
1. Remove reservoir and check bottom magnet
2. Reposition dislodged magnet – should snap firmly into place
3. Clean magnet area – use damp cloth to remove debris
4. Verify seating – reservoir should click when properly positioned
This issue commonly affects Mini Series models (K10 Mini Plus, K-Mini) where the magnet can become dislodged during regular use. The magnet activates a sensor that tells the machine when water is present.
Seal and Connection Issues
Common leak points:
– Reservoir to machine connection
– Drip tray overflow
– Internal tubing connections
Quick fixes:
– Empty drip tray daily – prevents overflow onto counter
– Check reservoir positioning – ensure flush against machine
– Inspect seals – look for cracks or displacement
Replacement needed when: Seals show visible damage or leaks persist after repositioning. For most Classic Series models, replacement seals cost under $5 and install in minutes.
Power Failure Solutions
Complete power loss or intermittent shutoffs often have simple electrical fixes.
Reset Your Keurig Correctly
Most effective reset sequence:
1. Unplug machine for minimum 5 minutes (not seconds)
2. Remove water reservoir during reset
3. Plug into different outlet – test with lamp first
4. Replace reservoir and power on
5. Run water-only cycle to test functionality
Why this works: Keurigs lack physical reset buttons. Extended unplugging clears electrical memory and recalibrates sensors. Many users report success after this simple procedure, especially with K-Supreme and K-Duo models.
Outlet and Power Cord Issues
Troubleshooting steps:
1. Test outlet with phone charger or lamp
2. Check power cord for cuts, frays, or damage
3. Try different outlet on different circuit
4. Avoid power strips – plug directly into wall when possible
Warning signs requiring replacement: Power cord heat during use, burning smell from machine, or visible electrical damage. These indicate serious safety issues that shouldn’t be ignored.
Error Message Decoder
Understanding what your Keurig is trying to tell you prevents unnecessary repairs.
“Add Water” Despite Full Tank
Three possible causes:
1. Float stuck – tap reservoir gently to dislodge
2. Sensor blockage – clean reservoir bottom thoroughly
3. Magnet misalignment – reposition reservoir magnet
Quick test: Remove and replace reservoir 3 times rapidly. Error should clear if sensor issue. This works for most K-Express Essentials and K-Elite models where sensor sensitivity varies.
Flashing Indicator Patterns
Red flashing: Overheating or internal error – unplug 10 minutes
Blue flashing: Water heating but not brewing – check needle clogs
All lights flashing: Serious error requiring reset sequence
These patterns vary slightly by model but generally indicate specific component failures that can be addressed with targeted troubleshooting.
When to Replace Your Keurig
Calculate replacement value:
– Repair cost exceeds 50% of new machine price
– Machine age over 5 years with multiple issues
– Model affected by recall (check Keurig website)
– Parts unavailable for older models
New model advantages:
– Improved energy efficiency (saves $15-20 annually)
– Better brewing technology (more consistent temperature)
– Enhanced safety features (automatic shut-off improvements)
– Warranty coverage (typically 1-2 years)
For most users with machines older than 2014 (pre-K2000 series), replacement becomes more economical than repair due to parts availability and improved technology in newer models.
Final Testing Protocol
Before declaring victory:
1. Run 3 consecutive water-only cycles to verify consistent flow
2. Test with actual K-cup for taste and temperature consistency
3. Check for leaks during full brewing cycle
4. Verify all features work correctly (temperature settings, cup sizes)
5. Monitor for 24 hours of normal use
Success indicators:
– Consistent brewing speed (20-30 seconds for 8oz cup)
– Proper water temperature (192-205°F ideal range)
– No error messages during operation
– Clean, great-tasting coffee without aftertaste
– Zero leaks or unusual sounds
Your Keurig should now function like new. Remember, consistent maintenance prevents 90% of problems—set those monthly reminders and enjoy perfect coffee every morning. For persistent issues beyond these DIY fixes, contact Keurig customer support directly for model-specific guidance before investing in replacement parts or a new machine.


